C Git and GitHub
A frightening number of people still email their code to each other, have dozens of versions of the same file, and lack any structured way of backing up their work for inevitable computer failures. This is both time consuming and error prone.
And that is why they should be using git.
This chapter will introduce you to git command-line program and the GitHub cloud storage service, two wonderful tools that track changes to your code (git) and facilitate collaboration (GitHub). Git and GitHub are the industry standards for the family of tasks known as version control. Being able to manage changes to your code and share it with others is one of the most important technical skills a programmer can learn, and is the focus of this (lengthy) chapter.
C.1 Setup
In order to use git effectively, we need some additional pieces of software.
shell: A command-line interface for controlling your computer. We use command line later in this course to work with file system, and to work with git. Macs already have a Bash (or more recently, zsh) program called Terminal. On Windows, installing
gitwill also install a Bash shell called Git Bash, or you can try the Linux subsystem for Windows 10.Note that Windows has two additional command shells, Windows Powershell and command prompt (aka DOS prompt or CMD). These are not bash-compatible and we do not discuss these shells in this book.
Git: A set of tools for tracking changes to computer code (especially when collaborating with others). This program is already installed on Macs.
- GitHub: A web service for hosting code online. You don’t actually need to install anything (GitHub uses
git), but you’ll need to sign up for the service.
- GitHub: A web service for hosting code online. You don’t actually need to install anything (GitHub uses
C.1.1 Command-line Tools (Bash)
The command-line provides a text-based interface for giving instructions to your computer (much more on this in Section B). Later in this book, we use the command-line interface for navigating your computer’s file structure (see Section B). We also use commands to for version control with git, to keep track of changes you do to the code you write (see Section C).
In order to use the command-line, you will need to use a command shell (also called a command prompt, or terminal). This is a program that provides the interface to type commands into. In particular, we’ll be working with the Bash shell, which provides a particular set of commands common to Mac and Linux machines.
On a Mac you’ll want to use the built-in app called Terminal. You can open Terminal by searching via Spotlight (hit Cmd (⌘) and Spacebar together, type in “terminal”, then select the app to open it), or by finding it in the Applications > Utilities folder.
The terminal allows you to use many of the command-line tools without any further installation. However, certain commands, in particular git, require X-Code Tools. Mac will automatically ask your permission to install these tools, you have to reply “Yes”. X-Code is also available through the Mac App Store. Xcode is a developer tool on the Mac OS system, and this developer tool is essential for using certain tools and for building packages in R. Even though we will not be building packages in INFO 201, we still have to use git commands.
On Windows, we recommend using Git
Bash, which you should
install along with git (see below). Start this program by typing “git
bash” in the start menu search box, this opens the command-shell.
git-bash is somewhat better inegrated with git than the default
terminal on Mac, e.g. it displays the default branch and uses better
shortcuts and colors. But these differences are just cosmetic.
Windows includes two different shells, called the DOS Prompt and Windows powershell. These are not compatible with bash and zsh, the shells we use in this course.
Alternatively, you can use bash shell in the linux subsystem. You can
access this by enabling the subsystem for
Linux
and then running bash in the command prompt.
All desktop linux distros include command line out of the box, most likely bash, the shell that we use in this course. Find the app called “terminal”.
C.1.2 Git and github
git is a version control system that provides a set of commands
that allow you to manage changes to written code, particularly when
collaborating with other programmers (much more on this in Section
C).
Git is normally already installed on macs (and linuxes), so there
is no need to do anything. On Windows, you’ll need to
download it from git-scm.com and install it.
Accept the default options, unless you know better.
If you are using a Windows machine, this will also install a program called Git Bash, which provides a text-based interface for executing commands on your computer.
GitHub is a cloud service that is used to store copies of computer
code that are being managed with git. This is the primary way both
to backup and share your code with others.
In order to use GitHub, you’ll need to create a free GitHub account, if you don’t already have one. You should register a username that is identifiable as you (e.g., based on your name or your UW NetID). This will make it easier for others to determine who contributed what code, rather than needing to figure out who ‘LeetDesigner2099’ is. This can be the start of a professional account you may use for the rest of your career!
C.2 What is this git and what is version control?
Git is a version control system, perhaps the most popular version control system these days. Version control (VC, also called revision control RC) is a system that lets you go “back in time” and access previous versions of your project files. You may have seen built-in version control in programs like MS Word or dropbox. We often talk about it not as “version control” but as “track changes”, as it allows to make changes by different users visible in different color.
Like Dropbox and Google Docs, git can show you all previous versions of a file and can quickly roll back to one of those previous versions. This is often helpful, especially if you embark on making a massive set of changes, only to discover part way through that those changes were a bad idea (we speak from experience here 😱 ). It also makes it safe to delete those project files you do not need right now–it is easy to get them back in case you want those again.
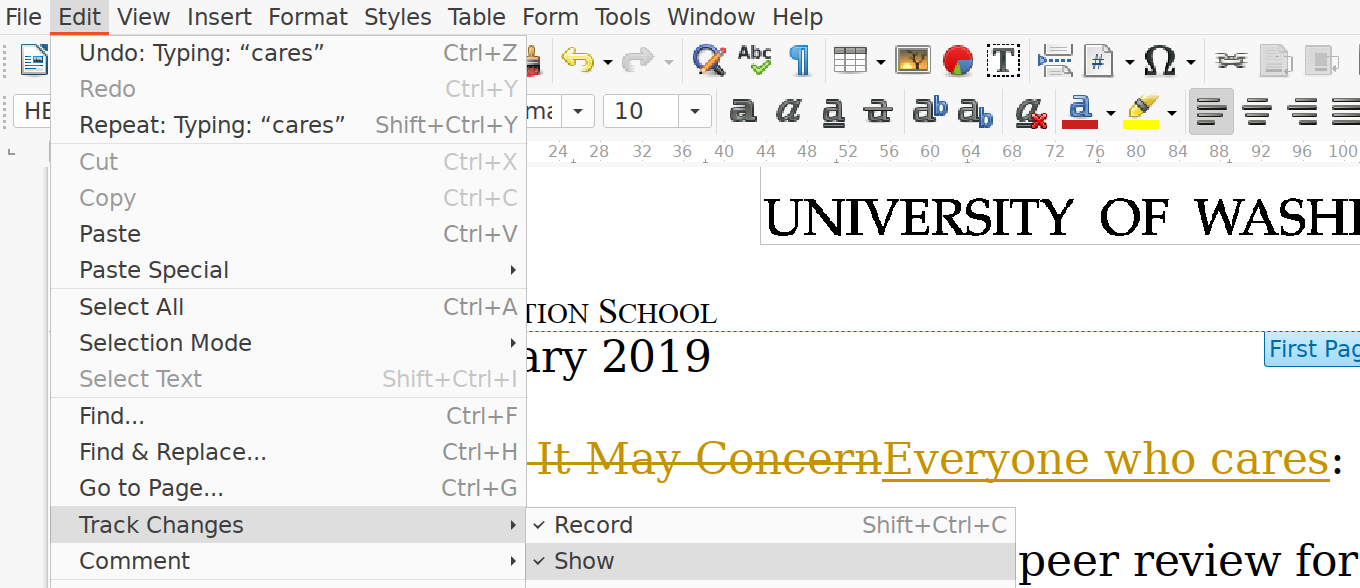
Tracking changes in Libroffice writer. “Track changes” is a simple version control system that allows you to record, see, and roll back the edits.
Dedicated version controls are much more powerful and complex than the simple “track changes”. There are many version control systems, but as below we use only git, we will further just discuss that system. You can imagine that git is a glorified “track changes”, but there are many important differences.
- In a similar way as track changes, git will keep track of your edits.
- While track changes in word processors work automatically, you have to tell git explicitly when you want it to remember the current state of the project (this is called “committing”). So you have more control about what kind of changes to record–it is not worthwhile to keep track of all minor edits, but some minor edits may be very-very important.
- When you record the changes (commit), you are expected to supply a commit message–a brief explanation about what you have done. This makes it much easier to understand why changes were made. git will also automatically keep track of who and when made the changes.
- You can view and retrieve old versions of project files (it is a “time machine”). You can go back to every commit you have done (or anyone else working for the project has done), including retrieving old files that were deleted later.
- Git allows to have multiple semi-independent versions (branches) of the project so that several people can work in parallel on different tasks
- Incorporate other team members’ work into your version (branch) or otherwise synchronize content between branches.
- Keep track and solve potential problems (conflicts) that may arise if different members do incompatible changes to the project.
- Synchronize your local set of project files with the other members through cloud-based remotes. Unlike google docs, your changes are by default only stored locally (in your computer). You have explicitly share those through remotes, typically could-based services like github. (This is called pushing and pulling.)
- Label different stages of the project, so you can have labels like “version 1.0” or “final pre-release”.
Where git is most valuable is in team development. Almost all professional development work is done in teams, which involves multiple people working on the same set of files at the same time. Git helps the team to coordinate all these changes, and provides a record so that anyone can see how a given file ended up the way it did. But git is also useful for larger personal projects, anywhere where one may want to go back and check old versions of the files, or where one is wants to test potentially destructive edits.
C.3 Git Core Concepts
Working with revision control systems involves a number of concepts that may sound quite confusing to beginners. Here we explain the most important ones.
- repository (usually called repo) is a
database containing all versions of all your files, along with some
additional metadata (like time stamps, authorship, and commit
messages). You can imagine that git simply stores all former
versions of all your project files. (It is much smarter than that,
but from our perspective it is a good enough explanation.) Git keeps
these files stored in a hidden subdirectory named
.gitwithin your project directory. If you want to sound cool and in-the-know, call a project folder a “repo.” - working copy: this is the set of project files that you are
working with.

Some of the content of a git repository. These files are not copies of the project files but are stored in an obscure internal git format.
It is crucial to understand the difference between working copy and the repo: working copy are the project files you have in your computer. The repo contains a set of historic versions of the same files. So this is one difference–repo is a set of historic versions, not the current files. The second crucial difference is where and how are the things stored. Your working copy is stored in wherever you store your files. The repo is in the
.gitfolder inside your project folder (that is normally hidden). It is also not stored as something that resembles your project files but in an obscure internal git format. - commit: as explained above, git does not automatically add your changes to the database (repo). It only does this when you explicitly tell to save the current state of your project. This is called committing, or “committing the changes”. “Commit” is the state of the project, a snapshot, at the time when you commit. Besides the project files, commits also include author, timestamp and commit message (a brief explanation written by the author about what these changes contain). You can imagine that the repo consists of commits–snapshots of your project.
- remote: when you work with git, then you normally work with the repo that is located in your own computer (local repo). But when collaborating with your team-mates, or just as a backup, you may want also to store your repository onto a server on internet. These servers, more specifically the copies of your repo on those servers, are called “remotes”. We use remotes stored on the github servers, but there are other popular options, such as BitBucket or GitLab. Teams typically have policies around remotes, e.g. one of the remotes contains the “correct”, the authoritative version of the project, and everyone else has to ensure that their changes are compatible with that version.
- pushing and pulling: normally git does not communicate with remotes and only stores your commits in the local repo. You have to tell git explicitly that you want to upload your commits to a remote repo. This is called “pushing”. Alternatively, if you want to download the changes your team-mates have done, you must explicitly tell git to do that. This is “pulling”.
- Github is a cloud service that hosts remotes. It is perhaps the most popular of such services. Everyone can sign up for a github account and create new repositories there. Note that these are “repositories” from Github perspective, but from your perspective, they are “remotes”. However, in Github parlance they are typically called repos.
- branch: project development can occur in multiple parallel “tracks”, called branches. For instance, you may have one clean and correct “final branch”, often called “main” or “master”–branch. You may also have a few different branches to work on different features, e.g. one branch called “fix-docs” to fix the documentation, and another one “better-visualizations” to implement better visualizations for the project.
- merging: when done with one of the branches, e.g. when you have fixed all the documentation problems, then you may want to incorporate these into the “clean”, main branch. This is called merging.
- conflicts: in order to merge two branches, the edits must be compatible. If this is the case, you can merge branches without conflicts. But sometimes it happens that the edits are not compatible, for instance if two team-mates changed the same line in a different way. Now git cannot tell which version is correct (if any). Instead, if flags the file as in conflict, and asks the users to figure out how to fix this.
These are the most important git-related concepts. Next, we discuss how to install and set up git and Github, and then we start discussing git workflow.
C.4 Getting started with git and github
Now it is time to walk through the basics of how to use git. We assume here that you have already installed git on your computer, see setting up your machine for how to do it.
C.4.1 Configuring git
The first time you use git on your computer, you’ll need to configure the installation, telling git who you are so you can commit changes to a repository. You can do this by using the git command with the config option (i.e., running the git config command):
# enter your full name (without the dashes)
git config --global user.name "your-full-name"

# enter your email address (the one associated with your GitHub account)
git config --global user.email "your-email-address"
If you forget to do these configuration steps, git will refuse to work, and tells you to do exactly this. So no worries if you forget!
C.4.2 Github access tokens
Next, it is time to set up your Github account and generate the access token. GitHub is an online service that stores copies of your repositories in the cloud. These repositories are linked to your local repositories (the one on your machine, like you’ve been working with so far) so that you can synchronize changes between them. So the repositoris on Github are remotes, see Section C.3 above.
You can thing about the relationship between git and GitHub as similar tot that between your camera and Imgur: git is the program we use to create and manage repositories; GitHub is simply a website that stores these repositories. So we use git, but upload to/download from GitHub.
Github does not support ordinary passwords for accessing your materials, only ssh keys (see below) and access tokens. Here we work with access tokens. Tokens are basically long random passwords that allow access to certain features of Github, for instance they allow to access your repos. You can always delete old tokens and create new ones, and you can have different tokens with different access permissions. These are separate from your main password.
You can create the access token by selecting
- “Settings” in your profile menu (your small profile menu picture at top-right on the Github screen)
- “<> Developer settings”, the last item at the menu at left side
- “Personal access tokens”, the last item again at the left-side menu
- “Tokens (classic)”
- “Generate new token”
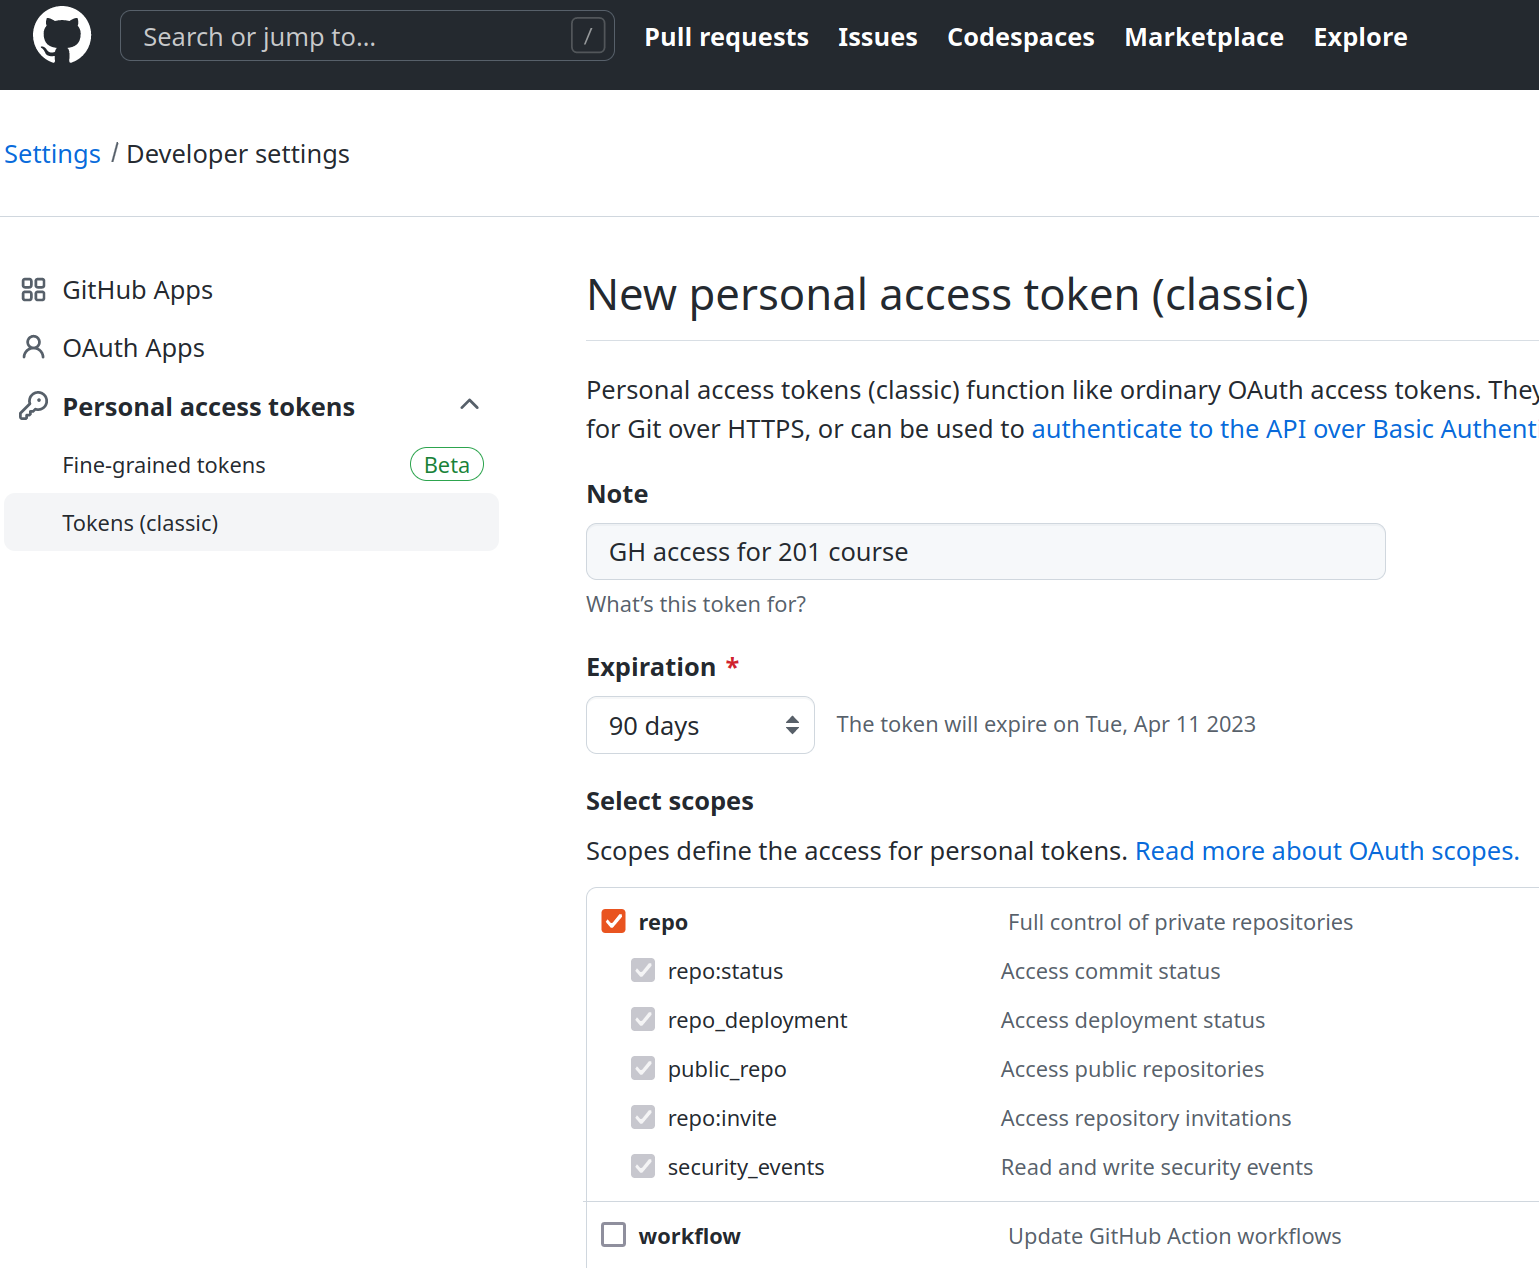
Creating Github access token. Just “repo” access will do, no need to add other options. If you choose “90 days” then you do not need to renew it through this course.
Github may ask you about the token type (choose “classic”, not fine-grained), and your password.
You will see the access token dialog where you can choose what kind of access you are giving to your token. “Repo” is enough for this course. Click on “generate token” and you’ll have one.
The access token will look like a random combination of letters and
numbers, e.g. 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. You should
save it in a handy place and use this as a password for all your
Github access. Alternatively, you can set up SSH
keys
for GitHub access. Ssh keys are a much easier way to access Github
(and other we services), but the relevant security implications are
beyond the scope of this course.
If you don’t set up the key, you’ll need to enter your GitHub token
each time you want to push changes up to GitHub (which may be multiple times a day). Simply follow the instructions on this page to set up a key, and make sure to only do this on your machine.
Repositories stored on GitHub are examples of remotes: other repos that are linked to your local one. Each repo can have multiple remotes, and you can synchronize your changes between them. Each remote has a URL associated with it (where on the internet the remote copy of the repo can be found), but they are given “alias” names (like browser bookmarks). By convention, the remote repo stored on GitHub’s servers is named origin, since it tends to be the “origin” of any code you’ve started working on.
We repeat there that repos can have more than a single remote, and remotes do not have to be stored on Github. But through this course we work only with single remotes stored on Github.
C.4.3 Creating and cloning a Repo
Before you can start working with git you need to create a repository. Remember, repository (or repo) is a database of all historic versions of your project. There are several ways to create a repo, e.g. you can convert and existing project folder into a repo, or you can create a new empty repo on your computer. Here we discuss how to create the repo on Github first, and then copy (clone) it to your computer.

Github “add” menu, the one you need to create new repos.
First, log onto your Github account. At top-right, you see a plus sign. This is the menu where you can create new repos.

The “Create new repo” dialog. You need to provide the name, it is also useful to add a brief description. This can be edited later.
The “New repository” menu opens a dialog window. The only field you have to fill is the “Repository name”. I recommend to choose something that you can easily remember. It is better to avoid spaces (you can use dashes instead). You can choose to keep the repo public (everyone can see it and download its content) or to make it private (only those users you choose will have access to it).
We also recommend to add readme file–this will contain the content of the repo description you can provide above. Most importantly, it makes a skeleton repo that you can start building upon.
And finally, you click “Create repository”.
Now you have created your first factory-fresh repo on Github. Congrats! Well done! But we are not done yet. You cannot just use the repo on Github–you need the repo to be in your computer to be able to work with it. This is cloning–downloading the remote repo into your computer. Technically, it is not just downloading, cloning also connects your local repo to the remote on Github so you can easily upload (push) your changes there.
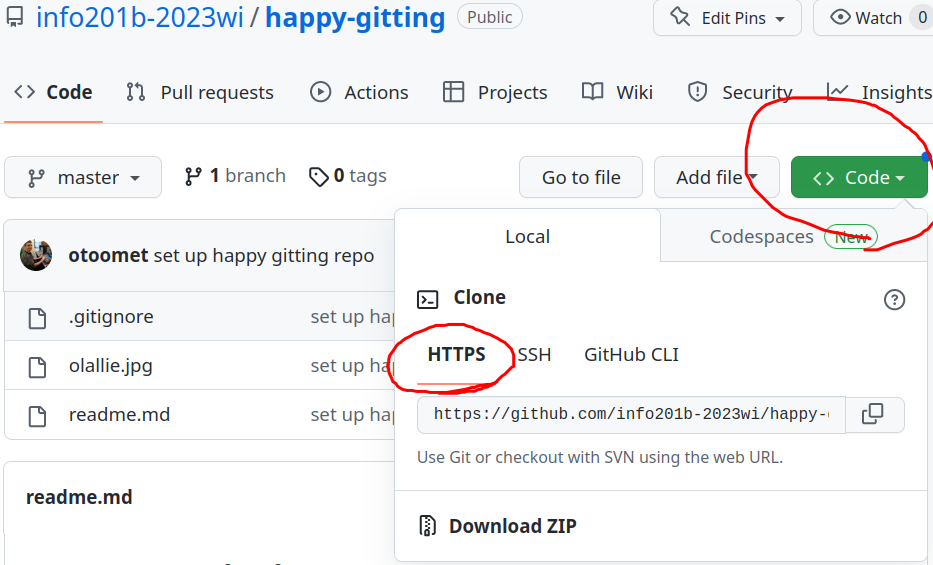
Repo url button on Github. Use the HTTPS version, unless you have set up ssh keys
You can clone a repo as
(see the figure at right about how to find the URL). Cloning creates the repo in your computer–this will be a folder with the repo name. It will contain a working copy of the repo files, and also all data git needs to recover the historical state of your files. It will also be linked to the original Github repo (the original repo is its remote).
Note that git may not ask for password when you clone a repo. This is because many repos are public–everyone can access their content. Hence there is no need to authenticate the user.
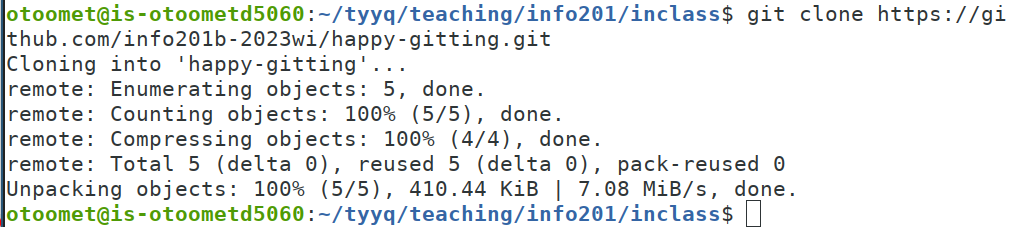
Git cloning in action.
Git should output some informative messages when cloning, so you can see if it worked or not.
C.5 Working with your repo
Now when you have cloned your first repo in your computer it is time to start working on it. Typically it includes modifying and adding files, committing the changes, and occasionally pushing your work to Github. Now more about all these steps.
C.5.1 Situational awareness
After you have cloned a repo, it is a good idea to check what is
there. You can do it using the file manager, but you can also use
command ls on command line. For instance, ls -la lists all files
(including the hidden files)
in the long form, including their modification times and sizes.44
Before you edit anything, all timestamps should show the time you
cloned the repo.
Next, it is a good idea to check if all is well from git’s point of
view. This can be done through git status:

Git status gives a brief overview of changed, added and deleted files. Right after cloning it should tell that “nothing to commit”.
The git status is a very useful command to understand the state of
your repo:
- Are you actually in a repo? (otherwise you’ll get an error)
- What is the active branch (more about branches in Section C.10 below).
- Are any files changed? Any files added or deleted?
- Any files that git does not keep track of (untracked files)
It also gives hints about what to do next.
This makes git status the most useful command in the entire process. Learn it, use it, love it.
Note that many other git messages are also verbose and somewhat awkward to read, but if you look at them carefully then they often tell you what to do next.
If the output of git status seems too verbose to you, you may use git status -s, the “short” version of it instead. It does gives you only the very basic information about what’s going on, but this is exactly what you need if you are an experienced git user.
C.5.2 Editing files
When all looks well, you may want to start doing some work with your project. This usually involves editing existing files, but you may also want to add or delete other files (see below).
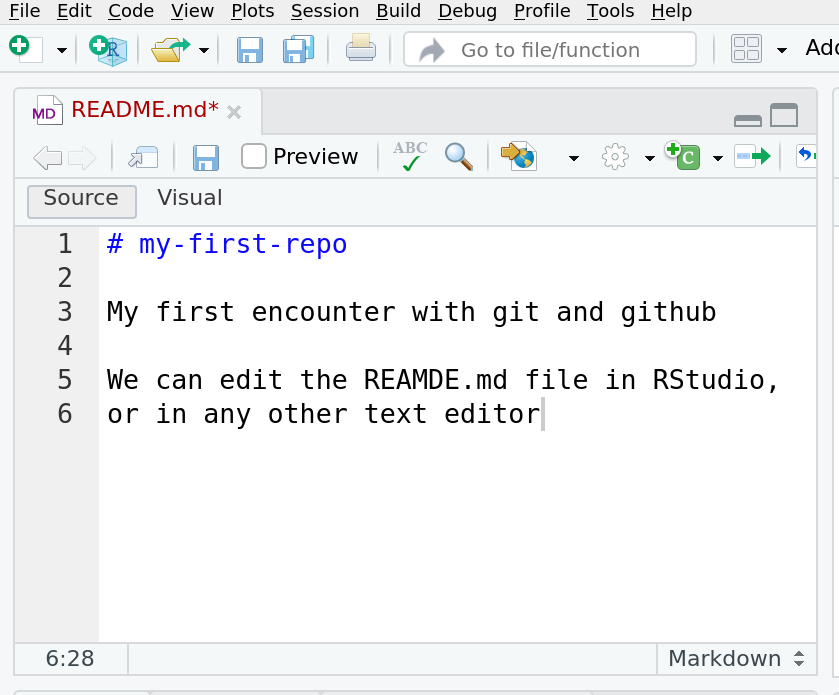
Editing the README.md file in RStudio. You can open existing files
with Ctrl-O, when done, you have to save it with Ctrl-S. (Only
the top-left panel shown.)
You can use any text editor to edit the files. Here is an example how
editing the README.md file will look like in RStudio. Remember to
save the file when done, git will keep track only of saved files!
Editing is typically the most complex part of your project because this is where you have to figure out what to do–either write and debug your code or write the analysis. Git is no substitute to understanding what to do.
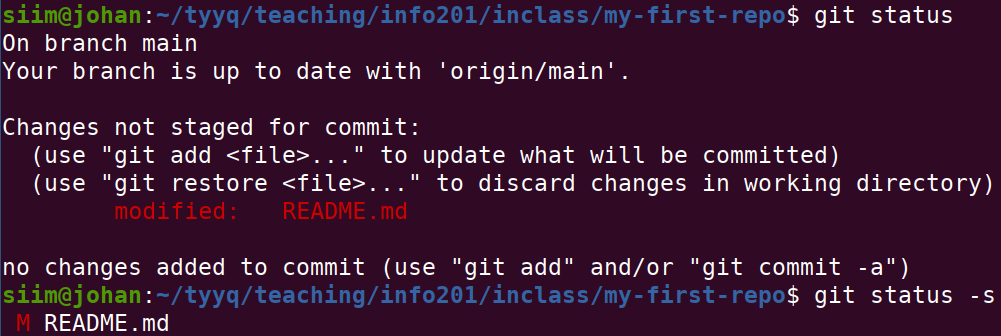
After editing, git status should show you that the file has been modified
When you are done with some editing, you should check git status
again. Just git status should list which files you modified, and
give some additional information. git status -s will only shouw the
names of the modified files togegher with red M, the marker that
these files are modified.
C.5.3 Adding and deleting files
But it is normally not enough to just make changes in the readme file. You want to add more files, potentially images, or your code, or your analysis. This should be done in two steps: first by creating the file, and second by telling git to take care of (track) that file too.
There are many ways how to add new files to the project. You can,
obviously, copy an existing file, e.g. an image, into the project
folder. Alternatively, you can simply create a new file in text
editor. For instance, in RStudio you can choose from the menu File
-> New File -> Markdown File, edit it (and save!). You can
also create an empty file from command line with touch command, e.g.
will create an empty file names menu.md, and thereafter you can edit it.
Exercise C.1 Use RStudio (or another editor if you prefer) to create a new file books.md inside your repo directory. It should contain a list of three books you like. Make sure you save the changes to your file!
After you have create the file, it is a good idea to check with ls
that the file is indeed in your repo directory. You can also print
its content using cat if you are not sure.
When you now run git status again (and you should do it!), then you
should see that git now list your new file under “untracked” files.
This is because by default, git only tracks (i.e. keeps track of
historic versions) of those files that we explicitly asked to be
tracked. We haven’t told git to track the new file, hence it is
listed as untracked.
Exercise C.2 Create a new file and use the short form of git status–git status -s. How does the short form mark untracked files?
Now it is time to tell git that we want to keep track of the new file
again. This can be done by git add command:
replacing filename with the name/path of the file/folder you want
to add, e.g. git add menu.md.
Some sources suggest you
to use git add .. This is not a command we can recommend before you
are fluent with git and command line. It will add everything in
your current directory (. mean “current directory” in shell)
to your git repo, unless ignored through the
.gitignore file (see below). This may include your top secret passwords,
gigabytes of data, all your illegally ripped dvds, and just files that are
unnecessary to upload. Use git add -u if you want to explicitly add
all your changes for committing.
Now, when checking the status, you can see that our new file menu.md is listed under changes to be committed as a “new file”. This is exactly what we wanted. From now on, git will keep track of that file, but you can still edit it if you want.
Deleting a file from git is very straightforward too. You can just
delete it, either from file manager or from command line (using
rm). Git is smart enough to understand that missing files should be
removed. You can also use a dedicated git deleting command, git rm. For instance, you can delete README.md with
Exercise C.3 Delete the readme file using git rm. How is this reflected in git status? How is it reflected in git status -s?
Note that even if we remove a file from the working copy, its historical versions are still there in the repo. If you wish, you can get an older version of the file back, given it was committed to the repo.
This includes files you do not want to show to the others. If you
have uploaded sensitive data by mistake, e.g. your password, then
deleting it from the working copy by git rm will not delete it from the
repo. Someone can just browse the old files and retrieve the password.
C.5.4 Committing
As we discussed above,
git does not automatically save the current
state of your project. You have to tell it explicitly–you have to
commit. This can be achieved by git commit. However,
committing also requires you to submit commit message–a brief
description about what did you do.
Committing can be done in different ways, we commend to use the form
It is a single line that commits all the changes you have done,
including edited, added and deleted files (this is what the -a
option does). It also allows you to include the message in the same
line (this is what -m does, on command line you
can usually combine two options -a -m into -am).
Obviously,
the “<your message here>” should be replaced with a short message
saying what did you do.
This “commits” the current state of your repo. You can imagine that git makes a snapshot, i.e. just copies the files in their current stage to the database. (Although what happens is actually more complex.) Later, you can look at previous commits, including the timestamps and commit messages, and decide if you want to retrieve an old version of certain files. This is why informative commit messages are useful. Hence your commit messages should be informative and tell something about what did you do before you committed. “stuff” is not a good commit message. “Fix a critical authorization error” is a good commit message. The prime reason to add commit messages is to see later what was changed when, and possibly walk back individual changes, or grab old versions of some files. Message “commiting today’s work” does not help the reader at all to see if a critical bug was introduced here…
Your team may also require a specific commit message format. Finally, be sure to be professional in your commit messages. They may be read by your professors, bosses, coworkers, and other developers on the internet. Don’t join this group!
After you’ve committed your changes, it is a good idea to check git status again. It should now say that there is nothing to commit!
WARNING: If you forget the -m
option, git will put you into a command-line text editor so that you
can compose a message (then save and exit to finish the commit). If
you haven’t configured your shell in a different way then you may
be dropped into the vi editor. Type :q (colon then
q) and hit enter to get out of vi and remember the -m option!
Don’t panic: getting stuck in vim happens to everyone.
C.5.5 Pushing and pulling
Now you have committed you changes–it means you have saved the snapshot of your project files in the repository in your computer. This is all well–you can now come back to these files later and retrieve their version as of today. But the edits your made are not yet on Github, and hence your team-mates cannot incorporate your edits into the version they are working with. This is where pushing comes to play. Pushing means to upload your edits in your local repository to the remote. As we created and cloned a repository that was made on Github, the remote will be on Github. Normally you push as
Git will ask your Github username and password. This means your Github username and access token, not your Github password, even if git tells you to enter your “password”. So you should copy your access token and paste it at the prompt. Note that nothing is visible when you enter password in shell, not even asterisks. It feels as if the keyboard is not working. But it is still working, just you do not see anything. So ensure you paste your access token only once.
If all goes well then git replies with messages about what is being uploaded. If you cloned your own repository from Github, and you are working on it alone, then all should be well. If there are any issues then it will also suggest how to get around the problem.
One of the main reasons why pushing may not go well is that your team-mates were quicker than you and already uploaded their changes to Github. Now git refuses to push a with message “rejected”: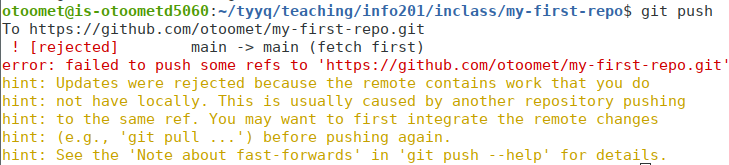
Git refusing to push because the changes at the remote were not
incorporated. Use git pull to download changes from the remote.
The problem here is that git refuses to upload your changes to the
remote repository, unless you have incorporated the changes from there
first. This is to ensure that there no incompatible edits: maybe you
edited a file your team-mates deleted? Or maybe both of you changed the title
of your document, but in a different way? In order to avoid such
problems, you should download the changes first by git pull. Note
that git does not care if these were your team-mates who changed the
remote. Even you can change remote if you go and edit files directly
on github. If this is what you did then you still need to pull those
changes to your local computer first. Learn more in
D.1 below.
C.5.6 Working with repo: summary
This cycle of “edit files”, “commit changes” and “pushing” is the standard “development loop” when working with git. When working in teams, we also need to pull your other team-member’s changes, and possible resolve conflicts (see below in Section C.11.1, if there are incompatible edits.
Typically, you’ll make lots of changes to your code (edit files, and and delete a few, run and test your code, etc). Then once you’re at a good “break point”—you’ve got a feature working, you’re stuck and need some coffee, you’re about to embark on some radical changes—you will add and commit your changes to make sure you don’t lose any work and you can always get back to that point.
This completes the basic overview of how to work with git and github. You’ll learn more below, and in Sections C.10 and D. Next, we discuss a few additional topics, including using git to get “back in time”.
C.6 Additional git topics
This section includes a few additional topics that are not necessary for basic work with git, but are extremely handy.
C.6.1 Getting help
Git is a complex piece of software, and learning it takes time. Here is a list of resources you can try to learn more about git.
- Git and GitHub in Plain English
- Atlassian Git Tutorial
- Try Git (interactive tutorial)
- GitHub Setup and Instructions
- Official Git Documentation
- Git Cheat Sheet
- Ignore DS_Store on a Mac
Git also has its built-in help. For instance, to get a brief help of options for committing, you may do
This produces a brief overview and explanations of the various options. However, this is not a suitable source for learning to use git. It is designed to be a reminder for experienced users who understand what the explanations mean.
C.6.2 Commit History: git as Time Machine
One of the most important reasons to use git is its ability to roll
back your changes and take you back to an earlier shapshot of your
project.
The starting point of going back in history is understanding what is
there in history. This can be achieved by taking a look at the
commit history using git log. This shows all the commit messages in
your repo and the corresponding timestamps:
You can view the history of commits you’ve made:
It will give you output along the lines:
commit bb1539b98fd5fecb7612db2650a1a77f69fc7bfd (HEAD -> git)
Merge: 1e71d04 8722cc4
Author: Ott Toomet <otoomet@uw.edu>
Date:   Sun Apr 4 20:20:58 2021 -0700

    merged the version where build is not under VC

commit 1e71d0498d5edfd1a8092151b9f5df671aeb5081
Author: Ott Toomet <otoomet@uw.edu>
Date:   Sun Apr 4 20:19:24 2021 -0700

    fixed git push, git add, commiting
This will give you a list of of commits you’ve made (or everyone who has been working with the repo has made), in chronological order: you can see who made what changes and when (this is why you need to tell your name and email when configuring git). The first commit is also labeled as HEAD, this refers to the state of current working copy. Typically the working copy corresponds to the most recent commit, but if you go back in history, then you can retrieve old files as the working copy instead.
Note that each commit is listed with its hash code (the random numbers and letters) that you can use to identify each commit.
Now maybe you found that an earlier version
of a file from months ago contained some valuable text that is lost
now. Maybe you discover that your code does not work in a specific
case but you know it did for some time ago. In such cases you can
“check out” an earlier version of your repo using git checkout <commit hash> where commit hash is the hash code that corresponds
to the commit of interest.
For instance, if we suspect that the last merge (see the example above) messed up the project, we can undo it with
Where 1e71... is the hash for the last commit we want to preserve,
normally just copy-pasted from the commit history.
When doing this, we essentially “undo” all changes done afterwards.
Git will respond with
Note: switching to '1e71d0498d5edfd1a8092151b9f5df671aeb5081'.

You are in 'detached HEAD' state. You can look around, make experimental
changes and commit them, and you can discard any commits you make in this
state without impacting any branches by switching back to a branch.

If you want to create a new branch to retain commits you create, you may
do so (now or later) by using -c with the switch command. Example:

  git switch -c <new-branch-name>

Or undo this operation with:

  git switch -

Turn off this advice by setting config variable advice.detachedHead to false

HEAD is now at 1e71d04 fixed git push, git add, commiting
We can confirm that we are “in the past” by looking at the files, and
also git log will now display
commit 1e71d0498d5edfd1a8092151b9f5df671aeb5081 (HEAD)
Author: Ott Toomet <otoomet@uw.edu>
Date:   Sun Apr 4 20:19:24 2021 -0700

    fixed git push, git add, commiting
Note that the most recent log message, the one about merging, is gone, and the previous message is now the first one in the list (and is marked HEAD).
We stress here that going back in time means git will change the files: your working copy–your files–is now in the state as it was back at the particular commit. This normally means that the content of files has changed, some files may have been deleted and others added. This is important if you are also using other software, such as text editors, that get confused if files suddenly change on disk.
We may just forget the changes we undid (the one with merge) and continue our work from this stage. We can also copy the content of the files and use them later, or we can run tests and see if certain problems in our software are here or not.
In order to get “back to the future” we need git checkout main, or
git checkout <branch> if your came from a different branch. (See
Section C.10 below for more about branches.)
C.6.3 The .gitignore File: Certain Files Should Not Tracked
When you run git status, git always lists all “untracked files”, the
files that are there but not under git control. This information is
designed to warn you about the useful files that you want to keep
under git but have forgotten to add. However, there are many
legitimate reasons to have files not under git in your project.
For example, if you use a Mac and you tend to organize your files in
the Finder, the operating system will create a hidden file in that
folder named .DS_Store (the leading dot makes it “hidden”) to track
the positions of icons, which folders have been “expanded”, etc.
There is no reason to keep track of your window and icon placement as
a part of a common project!
Alternatively, many
text editors create backup files, e.g. the old version of readme.md
may be preserved as readme.md~. Again, as git preserves the old
version of files anyway, there is no reason to put the text editor’s
backup into the repo.
You can tell git to ignore files like these by creating a special file
in your project directory called .gitignore
(see Section C.5.3 above about how to
create files with RStudio).
Note also the leading dot in the file name–it is required (and it
makes the file “hidden”).
This file contains a list of files or folders that git should “ignore”
and pretend don’t exist. The file uses a very simple format: each line
contains the path to a directory or file to ignore; multiple files are
placed on multiple lines. And every line starting with hash sign #
is comment and is ignored by git.
For example:
# This is an example .gitignore file
# Mac system file; the leading # marks a comment
.DS_Store

# example: don't check in passwords or ssl keys!
secret/my_password.txt

# example: don't include large files or libraries
movies/my_four_hour_epic.mov
You have to create a new
file, called .gitignore directly inside your repo. .gitignore
should be added and committed to the repo in a similar fashion as any
other file.
.gitignore can also be created by selecting the corresponding
checkbox on GitHub when you create the repo there. RStudio will
automatically create .gitignore when you create a new R project
inside of and existing directory that is under git control.
You may want to ignore certain files in all your repositories. For instance, if you are on a Mac, we strongly suggest globally ignoring your .DS_Store file. There’s no need to ever share or track this file. To always ignore this file on your machine, simply run these lines of code:
# Run these lines on your terminal to configure git to ignore .DS_Store
git config --global core.excludesfile ~/.gitignore
echo .DS_Store >> ~/.gitignore
See this article for more information.
C.7 GitHub and Remotes
C.7.1 Forking and Cloning
In order to use GitHub, you’ll need to create a free GitHub account, which you should have done as part of setting up your machine.
Next, you’ll need to download a copy of a repo from GitHub onto your own machine. Never make changes or commit directly to GitHub: all development work is done locally, and changes you make are then uploaded and merged into the remote.
Start by visiting this link. This is the web portal for an existing repository. You can see that it contains one file (README.md, a Markdown file with a description of the repo) and a folder containing a second file. You can click on the files and folder to view their source online, but again you won’t change them there!
Just like with Imgur or Flickr or other image-hosting sites, each GitHub user has their own account under which repos are stored. The repo linked above is under the course book account (info201). And because it’s under our user account, you won’t be able to modify it—just like you can’t change someone else’s picture on Imgur. So the first thing you’ll need to do is copy the repo over to your own account on GitHub’s servers. This process is called forking the repo (you’re creating a “fork” in the development, splitting off to your own version).
To fork a repo, click the “Fork” button in the upper-right of the screen:

This will copy the repo over to your own account, so that you can upload and download changes to it!
Students in the INFO 201 course will be forking repos for class and lab execises, but not for homework assignments (see below)
Now that you have a copy of the repo under your own account, you need to download it to your machine. We do this by using the clone command:
This command will create a new repo (directory) in the current folder, and download a copy of the code and all the commits from the URL you specify.
You can get the URL from the address bar of your browser, or you can click the green “Clone or Download” button to get a popup with the URL. The little icon will copy the URL to your clipboard. Do not click “Open in Desktop” or “Download Zip”.
Make sure you clone from the forked version (the one under your account!)
Warning also be sure to
cdout of thegit_practicedirectory; you don’t want tocloneinto a folder that is already a repo; you’re effectively creating a new repository on your machine here!
Note that you’ll only need to clone once per machine; clone is like init for repos that are on GitHub—in fact, the clone command includes the init command (so you do not need to init a cloned repo).
C.7.2 Pushing and Pulling
Now that you have a copy of the repo code, make some changes to it!
Edit the README.md file to include your name and then
commit the changes to the repo (don’t forget the message!).
Although you’ve made the changes locally, you have not uploaded them to GitHub yet—if you refresh the web portal page (make sure you’re looking at the one under your account), you shouldn’t see your changes yet.
In order to get the changes to GitHub, you’ll need to push (upload) them to GitHub’s computers. You can do this with the following command:
This will push the current code to the origin remote (specifically to its master branch of development).
- When you cloned the repo, it came with an
origin“bookmark” to the original repo’s location on GitHub!
Once you’ve pushed your code, you should be able to refresh the GitHub webpage and see your changes to the README!
If you want to download the changes (commits) that someone else made, you can do that using the pull command, which will download the changes from GitHub and merge them into the code on your local machine:
Because you’re merging as part of a pull, you’ll need to keep an eye out for merge conflicts! These will be discussed in more detail in chapter 14.
Pro Tip: always pull before you push. Technically using git push causes a merge to occur on GitHub’s servers, but GitHub won’t let you push if that merge might potentially cause a conflict. If you pull first, you can make sure your local version is up to date so that no conflicts will occur when you upload.
C.8 Course Assignments on GitHub
For students in INFO 201: While class and lab work will use the “fork and clone” workflow described above, homework assignments will work slightly differently. Assignments in this course are configured using GitHub Classroom, which provides each student private repo (under the class account) for the assignment.
Each assignment description in Canvas contains a link to create an assignment repo: click the link and then accept the assignment in order to create your own code repo. Once the repository is created, you should clone it to your local machine to work. Do not fork your asssignment repo.
DO NOT FORK YOUR ASSIGNMENT REPO.
After cloning the assignment repo, you can begin working following the workflow described above:
- Make changes to your files
- Add new files to the repo (
git add <file name>) - Commit the changes you did to take a repo (
git commit -am "commit message") - Push changes back to GitHub (
git push) to turn in your work.
Repeat these steps each time you reach a “checkpoint” in your work to save it both locally and in the cloud (in case of computer problems).
C.9 Command Summary
Whew! You made it through! This section has a lot to take in, but really you just need to understand and use the following half-dozen commands:
git statusCheck the status of a repogit add <file>Add file to the repo (but not commit)git commit -am "message"Commit changesgit pushUpload changes to GitHubgit pullDownload changes from GitHubgit cloneDownload and set up a repo to local machine
Using git and GitHub can be challenging, and you’ll inevitably run into issues. While it’s tempting to ignore version control systems, they will save you time in the long-run. For now, do your best to follow these processes, and read any error messages carefully. If you run into trouble, try to understand the issue (Google/StackOverflow), and don’t hesitate to ask for help.
C.10 Git Branches
While git is great for uploading and downloading code, its true
benefits are its ability to support reversability (e.g., undo) and
collaboration (working with other people). We already discussed how
to get back to the past using git in Chapter Git and
Github. But in order to effectively utilize these capabilities, you need to understand git’s branching model, which is central to how the program manages different versions of code.
This section will cover how to work with branches with git and GitHub, including using them to work on different features simultaneously and to undo previous changes.
So far, you’ve been using git to create a linear sequence of commits: they are all in a line, one after another).

Each commit has a message associated with it (that you can see with git log), as well as a unique SHA-1 hash (the random numbers and letters), which can be used to identify that commit as an “id number”.
But you can also save commits in a non-linear sequence. Perhaps you want to try something new and crazy without breaking code that you’ve already written. Or you want to work on two different features simultaneously (having separate commits for each). Or you want multiple people to work on the same code without stepping on each other’s toes. In the world without version control you would make another copy of your code and perform the edits there. If your experiment turns out not to lead anywhere then you can just delete the copy. But what if it works well? If no-one has worked with the “main” copy of the code then it is not a big deal either–you can just replace the main copy with your experiment. But in case of a large software project it is hardly the case–your collaborators continue writing text and adding code to the main copy. Your experiment is now outdated because it does not contain those edits! You have to re-do your experiment in the fresh copy of your project over the weekend again and hope that no-one will change anything meanwhile.
C.10.1 What are branches
This is where git branches (because you can have commits that “branch off” from a line of development) come in super useful. The idea with branches is as follows. Instead of just creating a copy, you create a new branch for your experiment. Branches are in many ways like copies, but there are some important differences, in particular they are tracked by git, and git also facilitates information exchange (merging) between the branches.
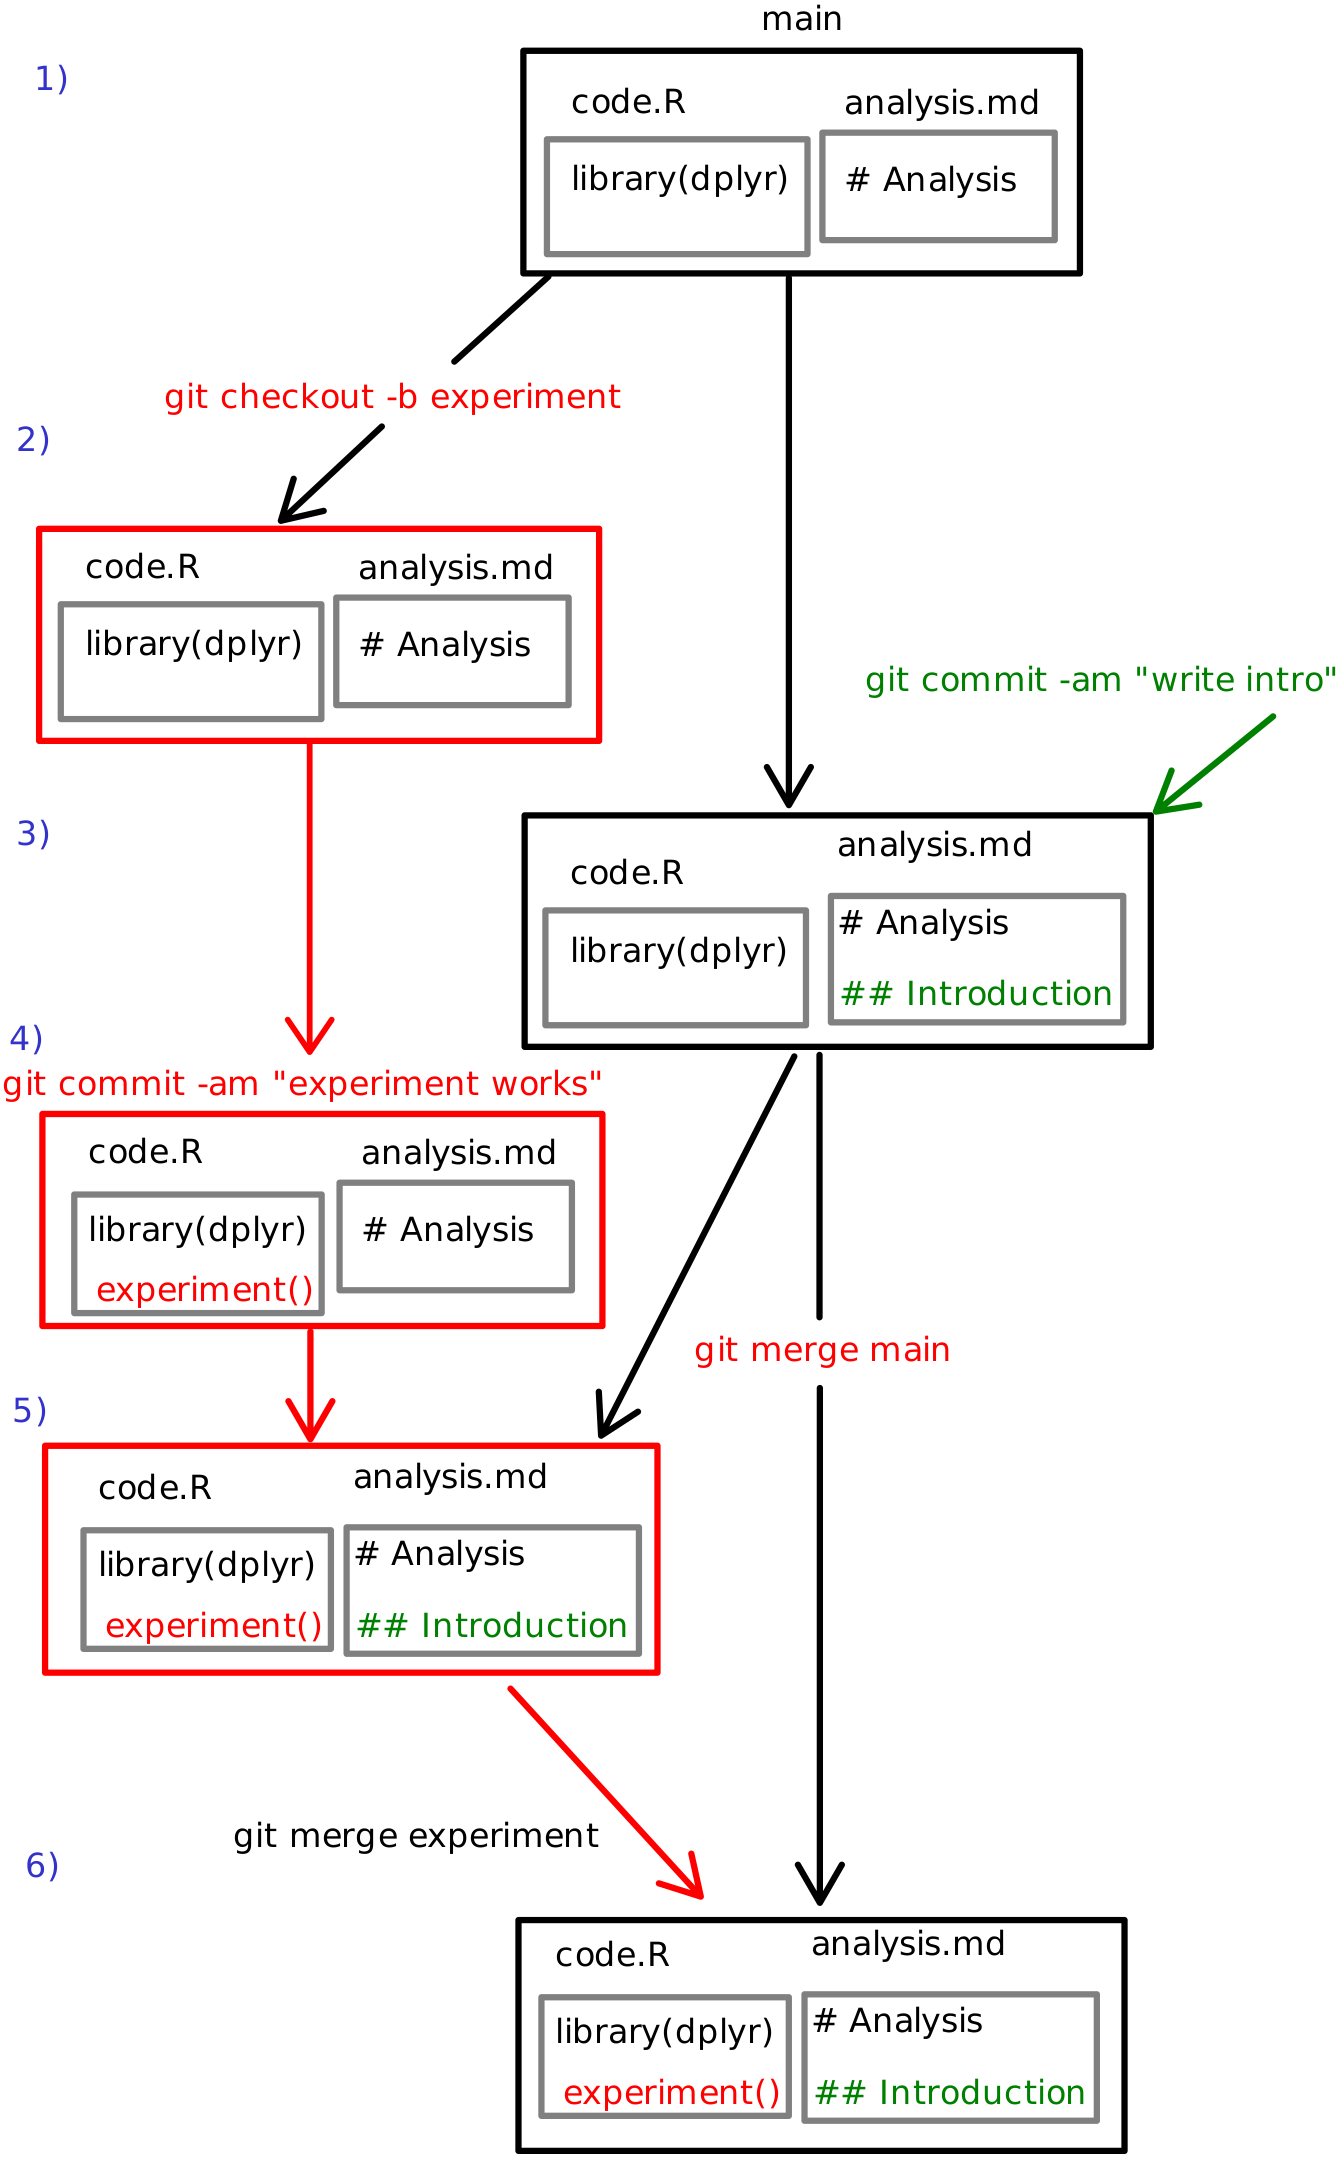
Consider the figure. Imagine you and Tian are working together on a report. You get a great idea that you want to experiment with but you know that Tian will continue working on the analysis too.
- Initially the project only has main branch that contains two files: code.R and analysis.md. The main branch is colored black.
- After you got the idea, you create a new branch called experiment
(denoted red on the figure).
You use
git checkout -b experimentto create it. It will be essentially a copy of the original main branch. experiment-branch and operations there are colored red. - Meanwhile, Tian writes introduction to the report and commits the changes to the main branch. Tian’s edits are marked in green.
- Now you create your experimental code and find it works very well. You commit your new code. At this stage there are two branches in the repo, each of which contains information that the other branch does not have. This is exactly the dreaded situation we described above.
- Fortunately git has tools to “merge” changes from the other branch
into your branch. You can get all new things (more precisely, new
commits) from the main branch into your branch with
git merge main. Now your red experimental branch also contains the new introduction that Tian wrote at 3. - Finally, when you are happy with your experiment, you can merge the
results back to main with
git merge experiment. All your experiment’s code is now in the main, and you may delete your experiment branch if you wish.
git merge propagates the green “Introduction” to the red
experiment-branch, and the following git merge propagates the red
“experiment()” code to the main branch.
While the general idea of branches is not hard, there are many details your should be aware of.
First, while the repo can have a large number of branches, there is currently just one branch that is “active” in your working copy. This means when you switch from one branch to another, git will change the files, potentially adding and deleting those that are present only in one branch!
Second, merging works in a way that your merge another branch into
the current branch. Hence merging the main branch into experiment
with git merge main must be issued while experiment branch is
active (this is why it is written in red), and merging the
experiment branch into main branch with git merge experiment
must be issued while the main branch is active (this is why it is
written black).
Third, as switching branches involves changing files, you cannot switch branches if you have un-committed changes. You have to commit your edits before you switch, otherwise git cannot keep track on those. (But you don’t have to push.)
C.10.2 Creating branches and switching between branches
You can view a list of current branches in the repo with the command
(The highlighted item with the asterisk (*) is the “current branch”
you’re on. The latest commit of the branch you’re on is referred to as
the HEAD.)
You can use the same command to create a new branch:
This will create a new branch called branch_name (replacing [branch_name], including the brackets, with whatever name you want). Note that if you run git branch again you’ll see that this hasn’t actually changed what branch you’re on. In fact, all you’ve done is created a new reference (like a new variable!) that refers to the current commit as the given branch name.
You can think of this like creating a new variable called
branch_nameand assigning the latest commit to that! Almost like you wrotenew_branch <- my_last_commit.If you’re familiar with LinkedLists, it’s a similar idea to changing a pointer in those.
In order to switch to a different branch, use the command (without the brackets)
Checking out a branch doesn’t actually create a new commit! All it does is change the HEAD (the “commit I’m currently looking at”) so that it now refers to the latest commit of the target branch. You can confirm that the branch has changed with git branch.
You can think of this like assigning a new value (the latest commit of the target branch) to the
HEADvariable. Almost like you wroteHEAD <- branch_name_last_commit.Note that you can create and checkout a branch in a single step using the
-boption ofgit checkout:
Once you’ve checked out a particular branch, any new commits from that point on will be “attached” to the “HEAD” of that branch, while the “HEAD” of other branches (e.g., master) will stay the same. If you use git checkout again, you can switch back to the other branch.
- Important checking out a branch will “reset” your code to whatever it looked like when you made that commit. Switch back and forth between branches and watch your code change!

Note that you can only check out code if the current working directory has no uncommitted changes. This means you’ll need to commit any changes to the current branch before you checkout another. If you want to “save” your changes but don’t want to commit to them, you can also use git’s ability to temporarily stash changes.
Finally, you can delete a branch using git branch -d [branch_name]. Note that this will give you a warning if you might lose work; be sure and read the output message!
C.11 Merging
If you have changes (commits) spread across multiple branches, eventually you’ll want to combine those changes back into a single branch. This is a process called merging: you “merge” the changes from one branch into another. You do this with the (surprise!) merge command:
This command will merge other_branch into the current branch. So if you want to end up with the “combined” version of your commits on a particular branch, you’ll need to switch to (checkout) that branch before you run the merge.
IMPORTANT If something goes wrong, don’t panic and try to close your command-line! Come back to this book and look up how to fix the problem you’ve encountered (e.g., how to exit vim). And if you’re unsure why something isn’t working with git, use
git statusto check the current status and for what steps to do next.Note that the
rebasecommand will perform a similar operation, but without creating a new “merge” commit—it simply takes the commits from one branch and attaches them to the end of the other. This effectively changes history, since it is no longer clear where the branching occurred. From an archival and academic view, you never want to “destroy history” and lose a record of changes that were made. History is important: don’t screw with it! Thus we recommend you avoid rebasing and stick with merging.
C.11.1 Merge Conflicts
Merging is a regular occurrence when working with branches. But consider the following situation:
- You’re on the
masterbranch. - You create and
checkouta new branch calleddanger - On the
dangerbranch, you change line 12 of the code to be “I like kitties”. You then commit this change (with message “Change line 12 of danger”). - You
checkout(switch to) themasterbranch again. - On the
masterbranch, you change to line 12 of the code to be “I like puppies”. You then commit this change (with message “Change line 12 of master”). - You use
git merge dangerto merge thedangerbranch into themasterbranch.
In this situation, you are trying to merge two different changes to the same line of code, and thus should be shown an error on the command-line:

This is called a merge conflict. A merge conflict occurs when two commits from different branches include different changes to the same code (they conflict). Git is just a simple computer program, and has no way of knowing which version to keep (“Are kitties better than puppies? How should I know?!”).
Since git can’t determine which version of the code to keep, it stops the merge in the middle and forces you to choose what code is correct manually.
In order to resolve the merge conflict, you will need to edit the file (code) so that you pick which version to keep. Git adds “code” to the file to indicate where you need to make a decision about which code is better:

In order to resolve the conflict:
Use
git statusto see which files have merge conflicts. Note that files may have more than one conflict!Choose which version of the code to keep (or keep a combination, or replace it with something new entirely!) You do this by editing the file (i.e., open it in Atom or RStudio and change it). Pretend that your cat walked across your keyboard and added a bunch of extra junk; it is now your task to fix your work and restore it to a clean, working state. Be sure and test your changes to make sure things work!
Be sure and remove the
<<<<<<<and=======and>>>>>>>. These are not legal code in any language.Once you’re satisfied that the conflicts are all resolved and everything works as it should, follow the instructions in the error message and
addandcommityour changes (the code you “modified” to resolve the conflict):This will complete the merge! Use
git statusto check that everything is clean again.
Merge conflicts are expected. You didn’t do something wrong if one occurs! Don’t worry about getting merge conflicts or try to avoid them: just resolve the conflict, fix the “bug” that has appeared, and move on with your life.
C.12 Undoing Changes
One of the key benefits of version control systems is reversibility: the ability to “undo” a mistake (and we all make lots of mistakes when programming!) Git provides two basic ways that you can go back and fix a mistake you’ve made previously:
You can replace a file (or the entire project directory!) with a version saved as a previous commit.
You can have git “reverse” the changes that you made with a previous commit, effectively applying the opposite changes and thereby undoing it.
Note that both of these require you to have committed a working version of the code you want to go back to. Git only knows about changes that have been committed—if you don’t commit, git can’t help you! Commit early, commit often.
For both forms of undoing, first recall how each commit has a unique SHA-1 hash (those random numbers) that acted as its “name”. You can see these with the git log --oneline command.
You can use the checkout command to switch not only to the commit named by a branch (e.g., master or experiment), but to any commit in order to “undo” work. You refer to the commit by its hash number in order to check it out:
This will replace the current version of a single file with the version saved in commit_number. You can also use -- as the commit-number to refer to the HEAD (the most recent commit in the branch):
If you’re trying to undo changes to lots of files, you can alternatively replace the entire project directory with a version from a previous commit by checking out that commit as a new branch:
This command treats the commit as if it was the HEAD of a named branch… where the name of that branch is the commit number. You can then make further changes and merge it back into your development or master branch.
IMPORTANT NOTE: If you don’t create a new branch (with -b) when checking out an old commit, you’ll enter detached HEAD state. You can’t commit from here, because there is no branch for that commit to be attached to! See this tutorial (scroll down) for details and diagrams. If you find yourself in a detached HEAD state, you can use git checkout master to get back to the last saved commit (though you will lose any changes you made in that detached state—so just avoid it in the first place!)
But what if you just had one bad commit, and don’t want to throw out other good changes you made later? For this, you can use the git revert command:
This will determine what changes that commit made to the files, and then apply the opposite changes to effectively “back out” the commit. Note that this does not go back to the given commit number (that’s what checkout is for!), but rather will reverse the commit you specify.
This command does create a new commit (the
--no-editoption tells git that you don’t want to include a custom commit message). This is great from an archival point of view: you never “destroy history” and lose the record of what changes were made and then reverted. History is important: don’t screw with it!Conversely, the
resetcommand will destroy history. Do not use it, no matter what StackOverflow tells you to do.
C.13 GitHub and Branches
GitHub is an online service that stores copies of repositories in the cloud. When you push and pull to GitHub, what you’re actually doing is merging your commits with the ones on GitHub!
However, remember that you don’t edit any files on GitHub’s servers, only on your own local machine. And since resolving a merge conflict involves editing the files, you have to be careful that conflicts only occur on the local machine, not on GitHub. This plays out in two ways:
You will not be able to
pushto GitHub if merging your commits into GitHub’s repo would cause a merge conflict. Git will instead report an error, telling you that you need topullchanges first and make sure that your version is “up to date”. Up to date in this case means that you have downloaded and merged all the commits on your local machine, so there is no chance of divergent changes causing a merge conflict when you merge by pushing.Whenever you
pullchanges from GitHub, there may be a merge conflict! These are resolved in the exact same way as when merging local branches: that is, you need to edit the files to resolve the conflict, thenaddandcommitthe updated versions.
Thus in practice, when working with GitHub (and especially with multiple people), in order to upload your changes you’ll need to do the following:
pull(download) any changes you don’t have- Resolve any merge conflicts that occurred
push(upload) your merged set of changes
Additionally, because GitHub repositories are repos just like the ones on your local machine, they can have branches as well! You have access to any remote branches when you clone a repo; you can see a list of them with git branch -a (using the “all” option).
If you create a new branch on your local machine, it is possible to push that branch to GitHub, creating a mirroring branch on the remote repo. You do this by specifying the branch in the git push command:
where branch_name is the name of the branch you are currently on (and thus want to push to GitHub).
Note that you often want to associate your local branch with the remote one (make the local branch track the remote), so that when you use git status you will be able to see whether they are different or not. You can establish this relationship by including the -u option in your push:
Tracking will be remembered once set up, so you only need to use the -u option once.
C.13.1 GitHub Pages
GitHub’s use of branches provides a number of additional features, one of which is the ability to host web pages (.html files, which can be generated from R Markdown) on a publicly accessible web server that can “serve” the page to anyone who requests it. This feature is known as GitHub Pages.
With GitHub pages, GitHub will automatically serve your files to visitors as long as the files are in a branch with a magic name: gh-pages. Thus in order to publish your webpage and make it available online, all you need to do is create that branch, merge your content into it, and then push that branch to GitHub.
You almost always want to create the new gh-pages branch off of your master branch. This is because you usually want to publish the “finished” version, which is traditionally represented by the master branch. This means you’ll need to switch over to master, and then create a new branch from there:
Checking out the new branch will create it with all of the commits of its source meaning gh-pages will start with the exact same content as master—if your page is done, then it is ready to go!
You can then upload this new local branch to the gh-pages branch on the origin remote:
After the push completes, you will be able to see your web page using the following URL:
https://GITHUB-USERNAME.github.io/REPO-NAME(Replace GITHUB-USERNAME with the user name of the account hosting the repo, and REPO-NAME with your repository name).
- This means that if you’re making your homework reports available, the
GITHUB-USERNAMEwill be the name of the course organization.
Some important notes:
The
gh-pagesbranch must be named exactly that. If you misspell the name, or use an underscore instead of a dash, it won’t work.Only the files and commits in the
gh-pagesbranch are visible on the web. All commits in other branches (experiment,master, etc.) are not visible on the web (other than as source code in the repo). This allows you to work on your site with others before publishing those changes to the web.Any content in the
gh-pagesbranch will be publicly accessible, even if your repo is private. You can remove specific files from thegh-pagesbranch that you don’t want to be visible on the web, while still keeping them in themasterbranch: use thegit rmto remove the file and then add, commit, and push the deletion.- Be careful not push any passwords or anything to GitHub!
The web page will only be initially built when a repo administrator pushes a change to the
gh-pagesbranch; if someone just has “write access” to the repo (e.g., they are a contributor, but not an “owner”), then the page won’t be created. But once an administrator (such as the person who created the repo) pushes that branch and causes the initial page to be created, then any further updates will appear as well.
After you’ve created your initial gh-pages branch, any changes you want to appear online will need to be saved as new commits to that branch and then pushed back up to GitHub. HOWEVER, it is best practice to not make any changes directly to the gh-pages branch! Instead, you should switch back to the master branch, make your changes there, commit them, then merge them back into gh-pages before pushing to GitHub:
# switch back to master
git checkout master

### UPDATE YOUR CODE (outside of the terminal)

# commit the changes
git add .
git commit -m "YOUR CHANGE MESSAGE"

# switch back to gh-pages and merge changes from master
git checkout gh-pages
git merge master

# upload to github
git push --all
(the --all option on git push will push all branches that are tracking remote branches).
This procedure will keep your code synchronized between the branches, while avoiding a large number of merge conflicts.
Resources
- Git and GitHub in Plain English
- Atlassian Git Branches Tutorial
- Git Branching (Official Documentation)
- Learn Git Branching (interactive tutorial)
- Visualizing Git Concepts (interactive visualization)
- Resolving a merge conflict (GitHub)
Hence it also lists the repo directory,
.gitin the folder. Even if you haven’t added any files, the repo directory will still be there.↩︎