B Command line
B.1 What is command line and why it is useful
The command-line is an interface to a computer—a way for you (the human) to communicate with the machine. But unlike common graphical interfaces that use windows, icons, menus, and pointers, the command-line is text-based: you type commands instead of clicking on icons. The command-line lets you do everything you’d normally do by clicking with a mouse, but by typing in a manner similar to programming!
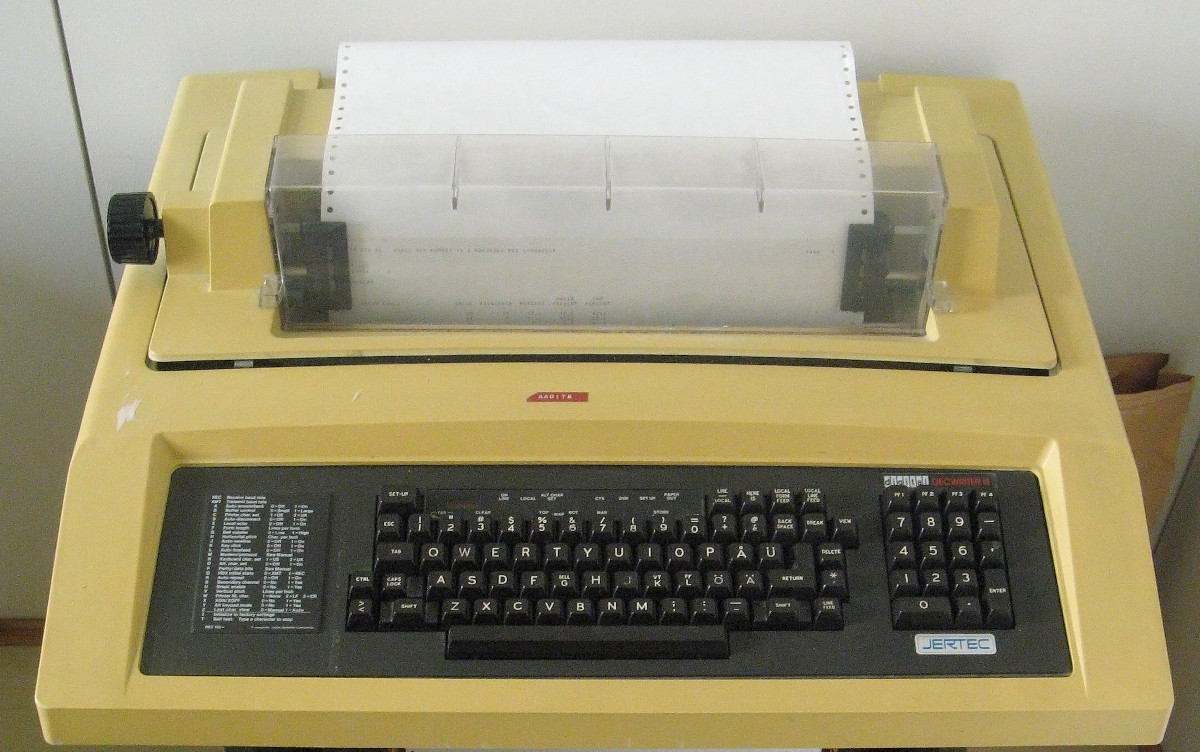
Decwriter computer terminal from 1970-s. (CC SA 3.0) by LPFi, from Wikimedia Commons).
Command line originates form the computer terminals, from times where there were no graphical displays. Instead, computers in 1960-s and 1970-s often had “terminals”, essentially typewriters, connected to them. One had to type the commands on the keyboard, and reply came in the form of printed text.
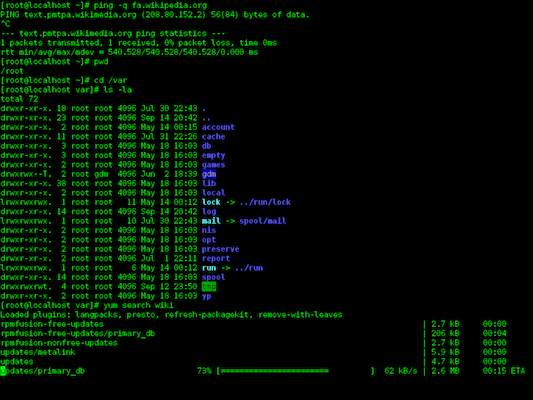 Command line, running in a modern terminal window
Nowadays, it is most common to use command line inside of a window in the graphical desktop. You need to open the appropriate program, still commonly called “terminal”, and you can easily enter the commands there, the computer will then execute the commands. The typical tasks done through command line are often standard computer tasks–moving and renaming files, viewing images, and opening apps. Outside of the personal computer sphere, it is very common to set up servers with no graphical interface whatsoever (frequently without any screens or keyboards either), so one can access those just by command line over internet.
The command-line is not as friendly or intuitive for beginners as a graphical interface: it’s harder to learn and even harder to figure out without learning. However, it has the advantage of being both more powerful and more efficient in the hands of expert users. (It’s faster to type than to move a mouse, and you can do lots of “clicks” with a single command). The command-line is also used when working on remote servers or other computers that for some reason do not have a graphical interface enabled. Thus, command line is an essential tool for all professional developers, particularly when working with large amounts of data or files.
Command line has a number of advantages over graphical interfaces:
- Commands tend to be more powerful and faster to use. While simple things are easy to do using the mouse, complex tasks tend to be easier using dedicated commands.
- Commands can be easily recorded, copied, edited, and repeated. You can write commands down as a list and then execute all of them in the list. If you notice that something went wrong in the process, then you can edit your list and repeat again, until all goes well. (This is called “shell scripting”.) In contrast, such complex tasks may need dozens of mouse clicks and movements, and if something goes well then you cannot just edit an individual click–you have to start all over again.
- Commands are also easier to explain in a text-based medium. Explaining menus and dialogs often needs images or video tutorials.
But for beginners, command line tends to be much harder:
- Commands are not as “discoverable” as menus and icons you can just click on. While you often can figure out how to perform basic tasks in a new app just be navigating around in the menus and dialog windows, this is hardly possible with commands. Usually, you have to start with reading the manuals and tutorials.
- Basic computer education these days does not include any command line experience. So encountering command line the first time may feel quite intimidating, in particular if you are thrown at it with no training.
- Command line often provides less visual feedback. For instance, you typically do not have access to the list of files, unless you explicitly ask for it. This contrasts with graphical file managers, where navigation automatically shows file and folder icons.
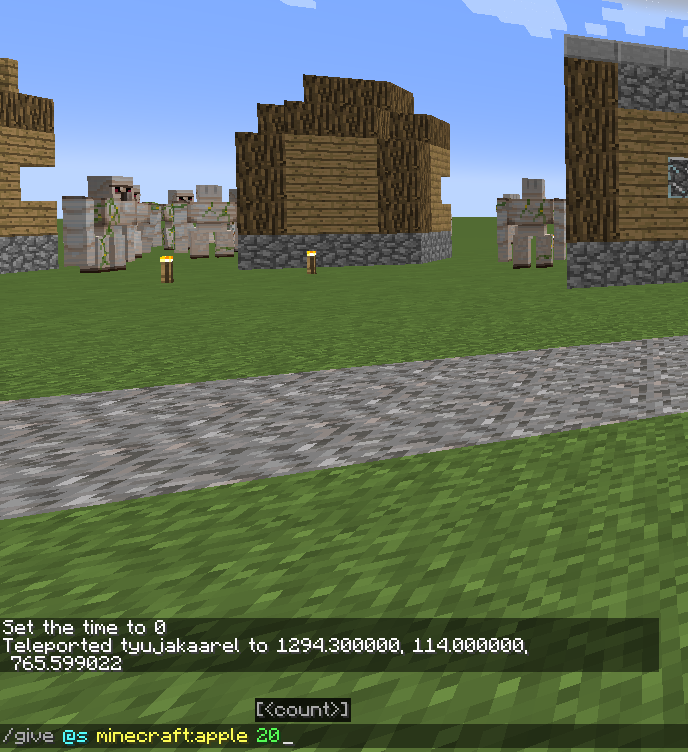
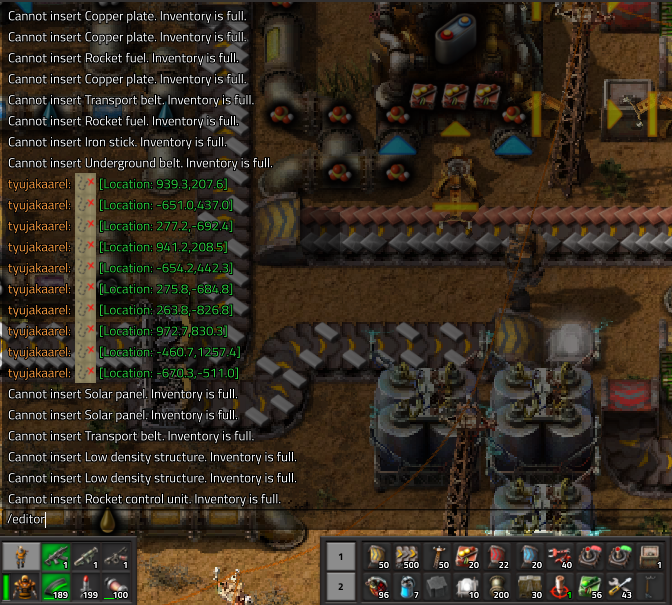
The popular games Minecraft (left) and Factorio (right) have
built-in command shells. In Minecraft, /give @s minecraft:apple 20 means to give 20 apples to the selected player.
Above, one can see the results of previous commands: setting time and
teleporting to a given location. One can also see a small hint above
“20”, explaining that the command expects a count in that place. In
Factorio, /editor switches you to the map editor.
This chapter will give you a brief introduction to basic tasks using the command-line: enough to get you comfortable navigating the interface and able to interpret commands.
B.2 Accessing the Command-Line
Normally you use the command-line tools through a command shell (a.k.a. a terminal). This is a program that provides the interface to type commands into. You should have installed a command shell (hereafter “the terminal”) as part of setting up your machine. Besides a dedicated terminal, there are other options, e.g. RStudio can run a terminal in one of its “tabs” (see Section 1.3 for more).
Once you open up the shell (Terminal or Git Bash), you should see something like this (red notes are added for reference):
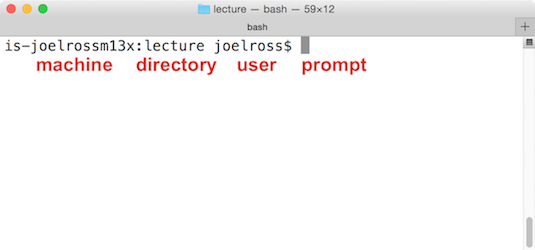
This is the textual equivalent of having opened up Finder or File Explorer and having it show you the user’s “Home” folder. The text you see (typically called command prompt or shell prompt) tells you:
- What machine you’re currently interfacing with (you can use the command-line to control different computers across a network or the internet).
- What directory (folder) you are currently looking at (
~is a shorthand for the “home directory”). - What user you are logged in as.
After that you’ll see the prompt (typically denoted as the $
symbol), which is where you will type in your commands. Note that
prompt may mean two different things: either only the $-symbol, or
the whole line of response you see in your shell.
B.4 File Commands
Once you’re comfortable navigating folders in the command-line, you can start to use it to do all the same things you would do with Finder or File Explorer, simply by using the correct command. Here is an short list of commands to get you started using the command prompt, though there are many more:
| Command | Behavior |
|---|---|
mkdir |
make a directory |
rm |
remove a file or folder |
cp |
copy a file from one location to another |
open |
opens a file or folder (Mac only) |
start |
opens a file or folder (Windows only) |
cat |
concatenate (combine) file contents and display the results |
history |
show previous commands executed |
Warning: The command-line makes it dangerously easy to permanently delete multiple files or folders and will not ask you to confirm that you want to delete them (or move them to the “recycling bin”). Be very careful when using the terminal to manage your files, as it is very powerful.
Be aware that many of these commands won’t print anything when you run them. This often means that they worked; they just did so quietly. If it doesn’t work, you’ll know because you’ll see a message telling you so (and why, if you read the message). So just because you didn’t get any output doesn’t mean you did something wrong—you can use another command (such as ls) to confirm that the files or folders changed the way you wanted!
B.4.1 Learning New Commands
How can you figure out what kind of arguments these commands take? You can look it up! This information is available online, but many command shells (though not Git Bash, unfortunately) also include their own manual you can use to look up commands! But if you are using a shell where built-in manual is not available, there is always the option to enter the manual command in google search. The results are probably fairly similar, although you may end up reading manual of a slightly different version.
Will show the manual for the mkdir program/command.
Because manuals are often long, they are
opened up in a command-line viewer called less. You can
“scroll” up and down by using the arrow keys and space bar. Hit the q key to quit and return to the command-prompt.
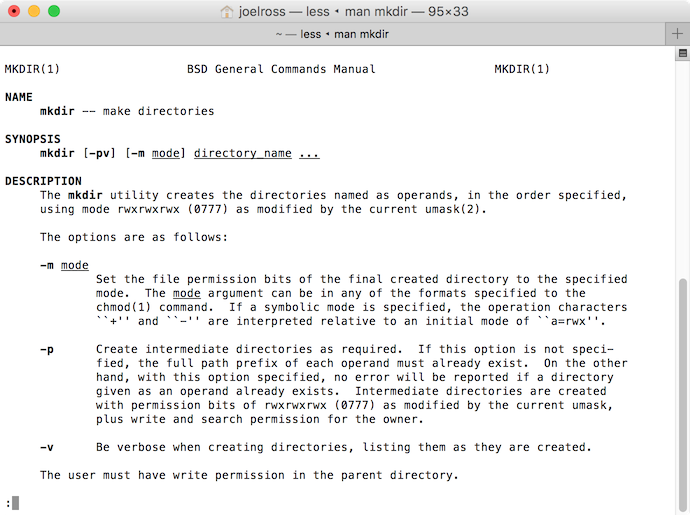
If you look under “Synopsis” you can see a summary of all the different arguments this command understands. A few notes about reading this syntax:
Recall that anything in brackets
[]is optional. Arguments that are not in brackets (e.g.,directory_name) are required.“Options” (or “flags”) for command-line programs are often marked with a leading dash
-to make them distinct from file or folder names. Options may change the way a command-line program behaves—like how you might set “easy” or “hard” mode in a game. You can either write out each option individually, or combine them:mkdir -p -vandmkdir -pvare equivalent.- Some options may require an additional argument beyond just indicating a particular operation style. In this case, you can see that the
-moption requires you to specify an additionalmodeparameter; see the details below for what this looks like.
- Some options may require an additional argument beyond just indicating a particular operation style. In this case, you can see that the
Underlined arguments are ones you choose: you don’t actually type the word
directory_name, but instead your own directory name! Contrast this with the options: if you want to use the-poption, you need to type-pexactly.
Command-line manuals (“man pages”) are primarily designed for those who are well familiar with the commands and are looking for just some additional details, e.g. how exactly do certain options work. These are not good introduction texts for beginners. If you consult the manual then start by looking at just the required arguments (which are usually straightforward), and then search for and use a particular option if you’re looking to change a command’s behavior.
For practice, try to read the man page for rm and figure out how to delete a folder and not just a single file. Note that you’ll want to be careful, as this is a good way to break things.
B.5 Dealing With Errors
Note that the syntax of these commands (how you write them out) is very important. Computers aren’t good at figuring out what you meant if you aren’t really specific; forgetting a space may result in an entirely different action.
Try another command: echo lets you “echo” (print out) some text. Try echoing "Hello World" (which is the traditional first computer program):
What happens if you forget the closing quote? You keep hitting “enter” but you just get that > over and over again! What’s going on?
- Because you didn’t “close” the quote, the shell thinks you are still typing the message you want to echo! When you hit “enter” it adds a line break instead of ending the command, and the
>marks that you’re still going. If you finally close the quote, you’ll see your multi-line message printed!
IMPORTANT TIP If you ever get stuck in the command-line, hit ctrl-c (The control and c keys together). This almost always means “cancel”, and will “stop” whatever program or command is currently running in the shell so that you can try again. Just remember: “ctrl-c to flee”.
(If that doesn’t work, try hitting the esc key, or typing exit, q, or quit. Those commands will cover most command-line programs).
Throughout this book, we’ll discuss a variety of approaches to handling errors in computer programs. While it’s tempting to disregard dense error messages, many programs do provide error messages that explain what went wrong. If you enter an unrecognized command, the terminal will inform you of your mistake:
However, forgetting arguments yields different results. In some cases, there will be a default behavior (see what happens if you enter cd without any arguments). If more information is required to run a command, your terminal will provide you with a brief summary of the command’s usage:
Take the time to read the error message and think about what the problem might be before you try again.
B.6 Running R from command line
It is possible to issue R instructions (run lines of code) one-by-one at the command-line by starting an interactive R session within your terminal. This will allow you to type R code directly into the terminal, and your computer will interpret and execute each line of code (if you just typed R syntax directly into the terminal, your computer wouldn’t understand it). This is very similar to how we work with shell. However, for working with data, this is usually not the best approach, but may come occasionally handy for installing packages or performing a quick calculation.
If you have R installed, you can start an interactive R session on a
Mac (or linux) by typing R into the terminal (to run the R
program). On Windows you need to run the “R” desktop app program
(Running R in terminal on windows needs a little configuration).
This will start the session and provide you with lots of information about the R language:
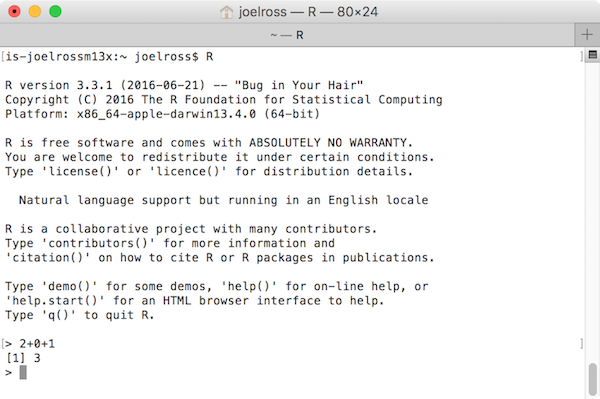
Notice that this description also includes suggestions on what to do next_—most importantly "Type 'q()' to quit R.".
Always read the output when working on the command-line!
Once you’ve started running an interactive R session, you can begin entering one line of code at a time at the prompt (>). This is a nice way to experiment with the R language or to quickly run some code. For example, try doing some math at the command prompt (i.e., enter 1 + 1 and see the output).
RStudio also includes an interactive console that provides the exact same functionality.
It is also possible to run entire scripts from the command-line by using the RScript program, specifying the .R file you wish to execute:

Entering this command in the terminal would execute each line of R code written in the analysis.R file, performing all of the instructions that you had save there. This is helpful if your data has changed, and you want to reproduce the results of your analysis using the same instructions.
On Windows, you need to tell the computer where to find the R.exe
and RScript.exe programs to execute—that is, what is the
path to these programs. You can do this by specifying the absolute path to the R program when you execute it, for example:

If you plan to run R from the command-line regularly (not a
requirement for this course), a better solution is to add the folder
containing these programs to your computer’s PATH
variable. This is a
system-level variable that contains a list of folders that the
computer searches when looking for programs. The reason the computer knows where to find the git.exe program when you type git in the command-line is because that program is “on the PATH”.
In Windows, You can add the R.exe and RScript.exe programs to your computer’s PATH by editing your machine’s Environment Variables through the Control Panel:
Open up the “Advanced” tab of the “System Properties”. In Windows 10, you can find this by searching for “environment”. Click on the “Environment Variables…” button to open the settings for the Environment Variables.
In the window that pops up, select the “PATH” variable (either per user or for the whole system) and click the “Edit” button below it.
In the next window that pops up, click the “Browse” button to select the folder that contains the
R.exeandRScript.exefiles. See the above screenshot for one possible path.You will need to close and re-open your command-line (Git Bash) for the
PATHchanges to take effect.
However, in this course we run R through RStudio.
B.7 Cheatsheet
Here is a quick summary of the most important resources in this section.
B.7.1 Most important commands
pwd: print working directorycd: change directoryls: list files. Check out how to list in long form (option-l) and how to list in temporal order (options-t)mkdir: make a directorycp: copy a file from one location to anothermv: move (rename) a file from one location to another
B.7.2 Shell keyboard shortcuts
- Tab-completion: write a few first letters of the file name or
command and hit
. This will complete the file name (without any typos!). If the letters are ambiguous, e.g. Do may mean both Documents and Downloads, then hit tab twice, and it displays the available options. - browsing history: arrow-up key walks back in shell command history and allows you to select and edit previous commands.
- Stopping a command:
Ctrl-c(holdCtrland pressc) stops the command that takes too long. (Does not always work).
A note about file systems and case sensitivity. Neither Mac nor Windows file systems are case sensitive by default, so Yucun might also use
cd uworcd Uwor cduW, all of which will result in the same working directory. However, on linuxuw,UWandUwdenote three different folders. Hence a lot of web servers and docker containers use case-sensitive files systems. We recommend to consistently use the correct case in file names, otherwise it may happen that code that works perfectly on your computer refuses to run when you upload it to the web, e.g. as a shiny app (see Section E).↩︎
