Sight (Vision)

The Blind Spot

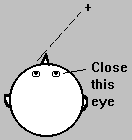
One of the most dramatic experiments to perform is the demonstration of the blind spot. The blind spot is the area on the retina without receptors that respond to light. Therefore an image that falls on this region will NOT be seen. It is in this region that the optic nerve exits the eye on its way to the brain. To find your blind spot, look at the image below or draw it on a piece of paper:

o                                  +
To draw the blind spot tester on a piece of paper, make a small dot on the left side separated by about 6-8 inches from a small + on the right side. Close your right eye. Hold the image (or place your head from the computer monitor) about 20 inches away. With your left eye, look at the +. Slowly bring the image (or move your head) closer while looking at the +. At a certain distance, the dot will disappear from sight...this is when the dot falls on the blind spot of your retina. Reverse the process. Close your left eye and look at the dot with your right eye. Move the image slowly closer to you and the + should disappear.
Here are some more images that will help you find your blind spot.


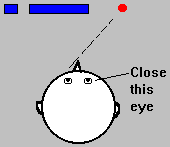
For this image, close your
right eye. With your left eye, look at the red 
circle. Slowly move your head closer to the image.  At a certain 
distance, the blue line will not look broken!!   This is because your
brain is "filling in" the missing information. 

This next image allows you to see another way your brain fills in the blind spot. Again, close your right eye. With your left eye, look at the +. Slowly move your head closer to the image. The space in the middle of the vertical lines will disappear.

In the next two images, again close your right eye. With your left eye, look at the numbers on the right side, starting with the number "1." You should be able to see the "sad face" (top image) or the gap in the blue line (bottom image) in your peripheral vision. Keep your head still, and with your left eye, look at the other numbers. The sad face should disappear when you get to "4" and reappear at about "7." Similarly the blue line will appear complete between "4" and "7."

Here is another image to show your blind spot. Close your right eye. With your left eye, look at the +. You should see the red dot in your peripheral vision. Keep looking at the + with your left eye. The red dot will move from the left to the right and disappear and reappear as the dot moves into and out of your blind spot.

Materials:

More (lots more) about Blind Spots

Read about the eye.

Calculate the Diameter of Your Blind Spot

Did you know?

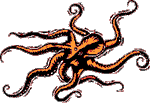
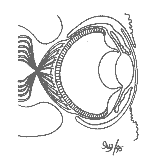
An octopus does not have a blind spot! The retina of the octopus is constructed more logically than the mammalian retina. The photoreceptors in the octopus retina are located in the inner portion of the eye and the cells that carry information to the brain are located in the outer portion of the retina. Therefore, the octopus optic nerve does not interrupt any space of retina.
Octopus Eye (Image courtesy of Biodidac)

---------------------------------------------------------------------

Benham's Disk

For grades 3-12

My FAVORITE illusion! Make colors appear using only black and white!

Make your own Benham Disk

---------------------------------------------------------------------

Depth Perception - I

For grades K-12

Two eyes are better than one, especially when it comes to depth perception. Depth perception is the ability to judge objects that are nearer or farther than others. To demonstrate the difference of using one vs. two eye to judge depth hold the ends a pencil, one in each hand. Hold them either vertically or horizontally facing each other at arms-length from your body. With one eye closed, try to touch the end of the pencils together. Now try with two eyes: it should be much easier. This is because each eye looks at the image from a different angle. This experiment can also be done with your fingers, but pencils make the effect a bit more dramatic.

Materials:

  • Pencils (but your fingers make a good substitute)

---------------------------------------------------------------------

Drop IT! - Depth Perception - II

For Grades 3-12

Here's another demonstration of the importance of two eyes in judging depth. Collect a set of pennies (or buttons or paper clips). Sit at a table with your subject. Put a cup in front of your subject. The cup should be about two feet away from the subject. Have your subject CLOSE one eye. Hold a penny in the air about 1.5 ft. above the table. Move the penny around slowly. Ask your subject to say "Drop it!" when he or she thinks the penny will drop into the cup if you released it. When the subject says "Drop it," drop the penny and see if it makes it into the cup. Try it again when the subject uses both eyes. Try it again with the cup farther away from the subject. Try it again with the cup closer to the subject. Compare the results of "10 drops" at each distance.

Questions:

  • Is there improvement with two eyes?
  • Is there improvement with the cup is closer to the subject?

Materials:

  • Cup (yogurt cup or drinking cup)
  • Drop objects (pennies, buttons, paper clips, clothes pins)
OR TRY THIS GAME

Get a piece of paper and draw a target similar to the one on the right. The actual dimensions of the circles are not too important and you don't have to color the circles. Place the target on the ground about five feet in front of you. Have a friend stand near the target. Have your friend hold out an ink marker with the tip pointing down. Close one eye. Tell your friend to move forward or backward or side to side until you think the marker would hit the center of the target if it was dropped. Tell your friend to drop the marker when you think the marker is over the target center. The marker should leave a spot where it hit the target. Try it 10 times with one eye closed and add up the "score" for the 10 drops. Now try it with both eyes opened (get a different color marker when you use 2 eyes to see the difference on the target). Is your score better when you use two eyes?

Materials:

  • Paper for target
  • Markers (two colors)

---------------------------------------------------------------------

Shifting Backgrounds, Shifting Images

For grades K-12

Here's another way to demonstrate how different images are projected on to each eye. Look at an object in the distance (20-30 feet away), such as a clock on the wall. Close one eye, hold up your arm and line up your finger with the object. Now without moving your finger or your head, close the opened eye and open the closed eye. The object in the distance will appear to jump to the side...your finger will no longer be lined up. This shows that different images fall on each eye.

Materials:

  • NONE

---------------------------------------------------------------------

Dark Adaptation

For grades 3-12

There are two types of photoreceptors in the eye: rods and cones. The rods are responsible for vision in dim light conditions, the cones are for color vision. To demonstrate how the photoreceptors "adapt" to low light conditions, get a collection of objects that look slightly different: for example get 10 coke bottle caps, 10 soda bottle caps, and 10 water bottle caps. They should feel the same, but not look the same. In a bright room, ask students to separate the caps into piles of similar caps. Then turn off the lights so the room is very, very dim. Ask them to separate the caps again. Turn off the lights and look at the results...there should be many mistakes. Count the number of errors. Then dim the lights again and talk/discuss about dark adaptation or about the animals that can see in the dark. The technical explanation for dark adaptation is not necessary for small children. Plan to talk and discuss for about 7-10 minutes...this will be enough time for a least partial adaptation of the photoreceptors. After the discussion (7-10 minutes), ask the students to separate the caps again in the same very, very dim conditions as before. Count the number of errors. There should be fewer errors this time because the photoreceptors have adapted to the low light conditions.

Materials:

  • Three sets of bottle caps (or other similar items)

---------------------------------------------------------------------

Visual Illusions

Grades 4-12

Many of these illusions are available as interactive shockwave games in the
Neuroscience for Kids Gallery of Visual Illusions.

What you see is not always what is there. Or is it? The eye can play tricks on the brain. Here are several illusions that demonstrate this point.

  1. The Magic Cube

    Look at the center cube. What side is the front? Is the front as shown on the cube on the right side or is the front as shown on the cube on the left side or is there no front at all?

  2. Which of the lines shown below is longer?

    Muller-Lyer Illusion

    Measure them. You may be surprised to find out that they are the same length. We see the lines as different because we have been "taught" to use specific shapes and angles to tell us about size.

  3. Stare at the middle of picture with black squares 15-30 seconds. Are those really dots that appear at the corners of the squares? What happens if you focus on a dot? Now look at the middle of the picture with the white squares. Do you see dots again? What color are they?

    Here is another example of the same illusion.

    Are the locations of the spots different in these two pictures? Why?

  4. Do you see a vase or a face in the figure below? This type of picture was first illustrated by psychologist Edgar Rubin in 1915. Notice that it is very difficult to see both the faces and the vase at the same time. This may happen because we tend to focus our attention on only one part of the image...either the faces or the vase.

  5. Afterimages

    Try this interactive demonstration of afterimages. You will need a JAVA-capable browser.

    Stare at the yellow + in the middle of figure for 15-30 seconds. Then move your gaze off to the white square on the right. Did the colors really reverse themselves? This is an example of an "afterimage".

  6. Here's another example of creating an afterimage. Can you put the fish in the bowl? Try this. Stare at the yellow stripe in the middle of the fish in the picture below for about 15-30 sec. Then move your gaze to the fish bowl. You should see a fish of a different color in the bowl. It helps if you keep your head still and blink once or twice after you move your eyes to the bowl. The afterimage will last about five seconds.

    Try these two interactive demonstrations (using JAVA-capable browsers) of afterimages:

What's Happening: in the retina of your eyes, there are three types of color receptors (cones) that are most sensitive to either red, blue or green. When you stare at a particular color for too long, these receptors get "tired" or "fatigued." When you then look a different background, the receptors that are tired do not work as well. Therefore, the information from all of the different color receptors is not in balance. Therefore, you see the color "afterimages."

Stare at the + for about 15 seconds, then shift your gaze to the right side of the image.
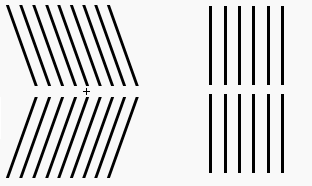
Do the lines on the right side of the image look straight? Are they really straight?

7. The Poggendorff Illusion was created by Johann Poggendorff in 1860. Are the lines behind the rectangles straight or not? It looks as if it does not go straight across, but does it?
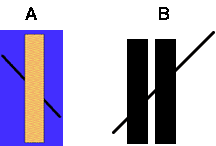
Poggendorff Illusion

8. Hmmm...is the center circle on the right the same size as the center circle on the left? For many people it appears that the circle that is surrounded by the small circles is larger that the circle that is surrounded by the larger circles. However, I know that they are the same size....I copied and pasted the same exact circle into the middles!!
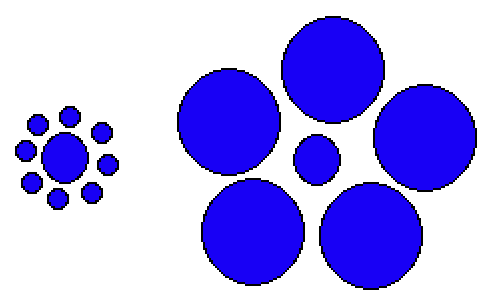
Titchener Illusion

This illusion shows that our brains judge size by comparing objects to things in the surroundings.

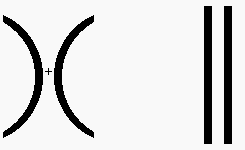
9. The Jastrow Illusion. Which arc is larger? You might see that the top one is smaller, but they are the same size. The top one looks smaller because the shorter arc of the top figure is next to the large arc of the bottom figure.
10. Is this book opening toward you or away from you?

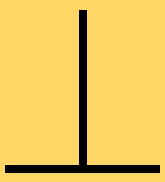
11. To tee or not to tee...that is the question. This inverted "T" has two lines....are they the same length? You bet they are...I copied one line and pasted it on the bottom of the first line. Measure them yourself.
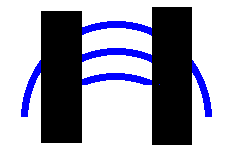
12. Which arc comes from the circle with the largest diameter?
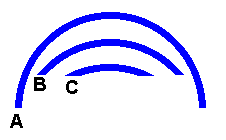
It probably looks like arc C is part of the largest circle. However, all the arcs are actually from the SAME circle. Look at the same figure again - however, this time I have blocked the right and left sides of the larger two arcs. Each arc comes from a circle of identical size.
13. Subjective Contours: Filling the gap. Your brain tries to fill in these four pictures with images that really are not there. Do you see a:

Cube?
Triangle?
Square?
Rectangle?

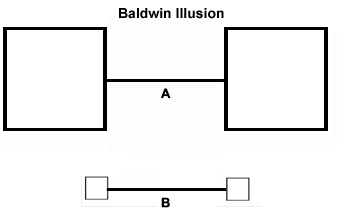
14. Baldwin Effect: The distance between the two large boxes is the same as the distance between the two small boxes. For many people, the distance between the small boxes appears larger.
For pages of more illusions with their physiological explanations, see:

  1. SandlotScience.com
  2. Impossible Figures
  3. Fun Visual Tricks & Optical Illusions

There is also a page devoted to the famous artist M.C. Escher who is known for his drawings of illusions and impossible figures.

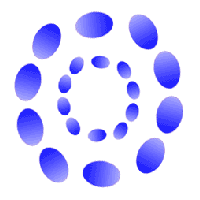
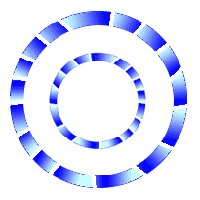
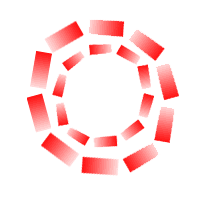
15. Movement Illusion: these two dimensional objects produce the illusion of movement. Look at the center of these images to see the circles of images rotate.

---------------------------------------------------------------------

Context Effect

For Grades K-12

How does the surrounding picture influence what we see? Find out with this interactive picture. You must have a browser that supports "JAVA scripts".

---------------------------------------------------------------------

Simultaneous Contrast

For Grades K-12

How does the surrounding color influence what we see? Find out with this interactive picture. You must have a browser that supports "JAVA scripts".

---------------------------------------------------------------------

Don't Jump to Conclusions

For Grades 3-12

How does your brain prepare you to see something? Find out with this interactive picture. You must have a browser that supports "JAVA scripts".

---------------------------------------------------------------------

Cow Eye Dissection

For Grades 9-12

The Exploratorium in San Francisco has a worthwhile virtual Cow Eye Dissection to check out.

---------------------------------------------------------------------

See It to Believe It - Visual Discrimination

For Grades 3-12

How good are you at seeing different colors? Let's find out. Put equal amounts of water into 5 to 10 different containers (paper cups, drinking glasses, yogurt containers all work well). Then put one drop of FOOD COLORING into one of the containers of water. Put two drops of food coloring into the next container, 3 drops of food coloring into the next container and so on. Label the cups with a secret code so you know how many drops of food coloring went into each cup.

Questions and Comparisons

  1. Have students arrange the colors from lightest to darkest. Keep track of where mistakes are made.
  2. Try different colors of food coloring.
  3. Start with more or less water in the container to make it more or less difficult to tell the colors apart.
  4. Try different lighting conditions:
    • Dim vs Bright Light
    • Outside (natural) vs Inside (artificial) Light
    • Fluorescent vs Incandescent Light
Materials:
  • Food coloring: red, blue, yellow (mix them to make more colors)
  • Water
  • Containers
  • Eyedropper

---------------------------------------------------------------------

X-Ray Vision??

Grades 3-12

Do you have "X-Ray Vision?" You may be able to see through your own hand with this simple illusion. Roll up a piece of notebook paper into a tube. The diameter of the tube should be about 0.5 inch. Hold up your left hand in front of you. Hold the tube right next to the bottom of your left "pointer" finger in between you thumb (see figure below).

Look through the tube with your RIGHT eye AND keep your left eye open too. What you should see is a hole in your left hand!! Why? Because your brain is getting two different images...one of the hole in the paper and one of your left hand.

Materials:

  • Notebook paper

---------------------------------------------------------------------

Star Light, Star Bright

Grades 3-12

Have you ever noticed that it is easy to see a star in the sky by NOT looking directly at it? It is actually easier to see a dim star at night by looking a bit off to the side of it. Try it! This is because the two types of photoreceptors (rods and cones) in the retina perform different functions and are located in the retina in different locations. The cones, which are best for detail and color vision, are in highest concentration in the center of the retina. The rods, which work better in dim light, are in highest concentration in the sides of the retina. So if you look "off-center" at the star, its image will fall on an area of the retina that has more rods!

Materials:

None

---------------------------------------------------------------------

Color Cards

Grades K-3

Here is a fun way to introduce and explore the sense of vision. Get a variety of sample "color cards" from your local paint store. These cards are about the size of index cards and show the variety of paint that is available. Bring them back to class and have students match up similar colors. You can also use samples of gift wrap or wall paper to make color or pattern cards. Just glue the wrap or wall paper to a piece of card board to get yourself a "Color Card."

Materials:

  • Sample color cards from a paint store
  • Wall paper samples
  • Gift wrap
  • Scissors, glue and cardboard (if you will make your own cards)

---------------------------------------------------------------------

Color Spy

Grades K-3

Color Spy is a variation of the "I Spy" game. Divide players into teams. Write the words "blue", "red", "yellow", "orange" and "green" on separate pieces of paper. Have one member of each team pick a paper. The color picked will be the name of the team.

When someone says "Go," the teams will have 10 minutes to look around the room for objects that have their team's color. Teams must make a list of all the objects they find. After the 10 minute search period, the teams come back together and the lists of objects are read. Each team gets one point for each object found. After the lists are read, each team will get five minutes to search the room for colored objects that the other teams did NOT find. For example, if the red team did not find a red apple, another team that DID find the red apple will get one point. The team with the most total points after both searches is the winner.

Materials:

  • Pencils and paper

---------------------------------------------------------------------

Seeing in the Dark

Grades K-12

Of course you cannot see if it is completely dark, but you can see a bit in dim light. In dim light, the receptors in your eyes called rods are doing most of the work. However, the rods do not provide any information about color. The other photoreceptors in your eye, called cones, are the ones that are used for seeing color. The cones do not work in dim light. That's why you cannot see colors in dim light. Check it out for yourself:

Get five pieces of paper of different colors (such as different colored typing paper or construction paper). Dim the lights until you can just barely see. Wait about 10 minutes (maybe listen to some music while you wait). Then write on each piece of paper the color you think that paper is. Turn on the lights and see if your guesses were correct. Did everyone in your class mix up the same color or did everyone get the colors correct?

Materials:

  • Pencils or pens
  • Colored paper (about five different colors)

---------------------------------------------------------------------

Accommodating Accommodation

Grades 3-12

When light enters the eye, it is first bent (refracted) by the cornea. Light is bent further by the lens of the eye in a process called accommodation. To bring an image into sharp focus on the retina, the lens of the eye changes shape by bulging out or flattening. A flatter lens refracts less light. Here's how to demonstrate accommodation:

Close one eye and stare at a point about 20 feet away. It should be in focus. Keep focusing on the point and raise one of your fingers into your line of sight just below the point. Your finger should be a bit blurred. Now, change focus: look at the tip of your finger instead of the point 20 feet away. Your finger will come in focus, but the distant point will be blurred.

Materials:

None

---------------------------------------------------------------------

More vision related resources from "Neuroscience for Kids":

The Eye
The Retina
The Visual Pathway
Do you wear glasses? Find out why!
Eye Safety Tips
Lesson Plan about the Eye
Lesson Plan about Color Vision
Lesson Plan about Depth and Motion
Does the COLOR of Foods and Drinks Affect Taste?
Common Eye Diseases and Disorders

The National Eye Institute has a GREAT page with activities related to the eye called See All You Can See for kids; and aearn about "stereograms."

---------------------------------------------------------------------

[Back to Top]

GO TO: Hearing Smell Taste Touch Vision Working Together

BACK TO: The Senses Experiments and Activities Table of Contents

[email]
Send E-mail

Get Newsletter

Search Pages

Donate to
Neuroscience for Kids