 | Sight (Vision) | |
| To draw the blind spot tester on a piece of paper, make a small dot on the left side separated by about 6-8 inches from a small + on the right side. Close your right eye. Hold the image (or place your head from the computer monitor) about 20 inches away. With your left eye, look at the +. Slowly bring the image (or move your head) closer while looking at the +. At a certain distance, the dot will disappear from sight...this is when the dot falls on the blind spot of your retina. Reverse the process. Close your left eye and look at the dot with your right eye. Move the image slowly closer to you and the + should disappear. | 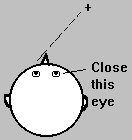 |
|
Here are some more images that will help you find your blind spot.
  For this image, close your
right eye. With your left eye, look at the red
circle. Slowly move your head closer to the image. At a certain
distance, the blue line will not look broken!! This is because your
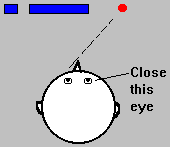
brain is "filling in" the missing information. For this image, close your
right eye. With your left eye, look at the red
circle. Slowly move your head closer to the image. At a certain
distance, the blue line will not look broken!! This is because your
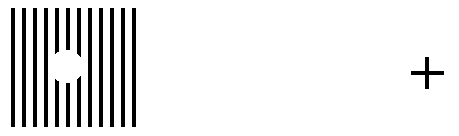
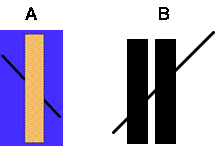
brain is "filling in" the missing information. This next image allows you to see another way your brain fills in the blind spot. Again, close your right eye. With your left eye, look at the +. Slowly move your head closer to the image. The space in the middle of the vertical lines will disappear.
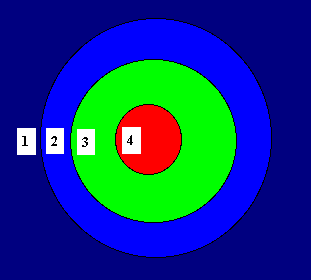
 In the next two images, again close your right eye. With your left eye, look at the numbers on the right side, starting with the number "1." You should be able to see the "sad face" (top image) or the gap in the blue line (bottom image) in your peripheral vision. Keep your head still, and with your left eye, look at the other numbers. The sad face should disappear when you get to "4" and reappear at about "7." Similarly the blue line will appear complete between "4" and "7."
Here is another image to show your blind spot. Close your right eye. With your left eye, look at the +. You should see the red dot in your peripheral vision. Keep looking at the + with your left eye. The red dot will move from the left to the right and disappear and reappear as the dot moves into and out of your blind spot.
More (lots more) about Blind Spots Read about the eye.
| ||
Did you know?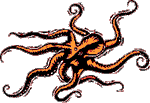 | An octopus does not have a blind spot! The retina of the octopus is constructed more logically than the mammalian retina. The photoreceptors in the octopus retina are located in the inner portion of the eye and the cells that carry information to the brain are located in the outer portion of the retina. Therefore, the octopus optic nerve does not interrupt any space of retina. | 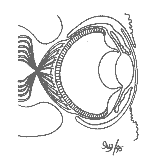 Octopus Eye (Image courtesy of Biodidac) |

|
|
|
|
|
| |||||||||||||||||||
Stare at the + for about 15 seconds, then
shift your gaze to the
right side of the image. |
Stare at the + for about 15 seconds, then
shift your gaze to the
right side of the image.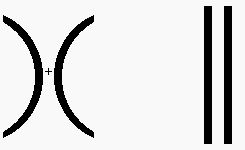 |
| Do the lines on the right side of the image look straight? Are they really straight? | |
7. The Poggendorff Illusion was created by Johann Poggendorff in 1860. Are the lines behind the rectangles straight or not? It looks as if it does not go straight across, but does it?
8. Hmmm...is the center circle on the right the same size as the center circle on the left? For many people it appears that the circle that is surrounded by the small circles is larger that the circle that is surrounded by the larger circles. However, I know that they are the same size....I copied and pasted the same exact circle into the middles!!
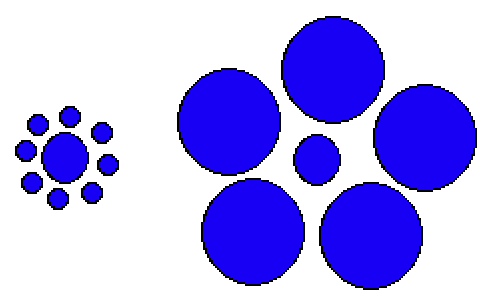
This illusion shows that our brains judge size by comparing objects to things in the surroundings.
9. The Jastrow Illusion. Which arc is larger? You might see that the top one is
smaller, but they are the same size. The top one looks smaller because
the shorter arc of the top figure is next to the large arc of the bottom
figure.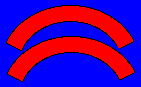 |
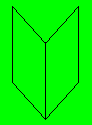
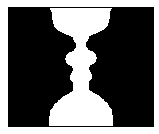
10. Is this book opening toward you or away from you?
 | |||||||||
11. To tee or not to tee...that is the question. This
inverted "T" has two lines....are they the same length? You bet they
are...I copied one line and pasted it on the bottom of the first line.
Measure them yourself.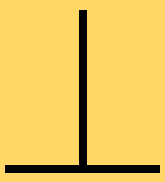 |
12. Which arc comes from the circle with the largest
diameter?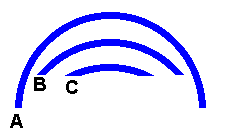 It probably looks like arc C is part of the largest circle. However, all the arcs are actually from the SAME circle. Look at the same figure again - however, this time I have blocked the right and left sides of the larger two arcs. Each arc comes from a circle of identical size.
 | |||||||||
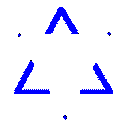
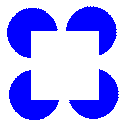
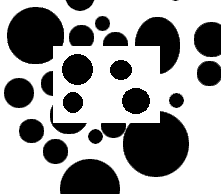
| 13. Subjective Contours: Filling the gap. Your brain
tries to fill in these four pictures with images that really are not
there. Do you see
a:
|
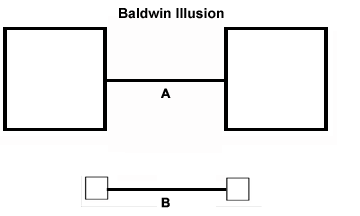
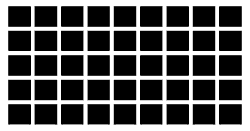
14. Baldwin Effect: The distance between the two large boxes
is the same as the distance between the two small boxes. For many
people, the distance between the small boxes appears larger.
 For pages of more illusions with their physiological explanations, see: There is also a page devoted to the famous artist M.C. Escher who is known for his drawings of illusions and impossible figures. | |||||||||
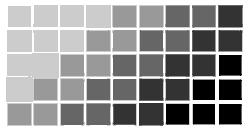
Context EffectHow does the surrounding picture influence what we see? Find out with this interactive picture. You must have a browser that supports "JAVA scripts". |
Simultaneous ContrastHow does the surrounding color influence what we see? Find out with this interactive picture. You must have a browser that supports "JAVA scripts". |
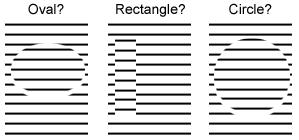
Don't Jump to ConclusionsHow does your brain prepare you to see something? Find out with this interactive picture. You must have a browser that supports "JAVA scripts". |
|
|
|
|
|
|
|
|
More vision related resources from "Neuroscience for Kids":
 The Eye
The Retina
The Visual Pathway
Do you wear glasses? Find out
why!
Eye Safety Tips
Lesson Plan about the
Eye
Lesson Plan about Color
Vision
Lesson Plan about Depth
and Motion
Does the COLOR of Foods
and Drinks Affect Taste?
Common Eye Diseases and
Disorders
The National Eye Institute has a GREAT page with activities related to the eye called See All You Can See for kids; and aearn about "stereograms."
| GO TO: | Hearing | Smell | Taste | Touch | Vision | Working Together |
| BACK TO: | The Senses | Experiments and Activities | Table of Contents |
![[email]](./gif/menue.gif) Send E-mail |
 Get Newsletter |
 Search Pages |
 Donate to Neuroscience for Kids |
 The Blind
Spot
The Blind
Spot
 Materials:
 Questions:
 Get a piece of paper and draw a target
similar to the one on the right. The actual dimensions of the circles are
not too important and you don't have to color the circles. Place the
target on the ground about five feet in front of you. Have a friend stand
near the target. Have your friend hold out an ink marker with the tip
pointing down. Close one eye. Tell your friend to move forward or
backward or side to side until you think the marker would hit the center
of the target if it was dropped. Tell your friend to drop the marker when
you think the marker is over the target center. The marker should leave a
spot where it hit the target. Try it 10 times with one eye closed and add
up the "score" for the 10 drops. Now try it with both eyes opened (get a
different color marker when you use 2 eyes to see the difference on the
target). Is your score better when you use two eyes?
Get a piece of paper and draw a target
similar to the one on the right. The actual dimensions of the circles are
not too important and you don't have to color the circles. Place the
target on the ground about five feet in front of you. Have a friend stand
near the target. Have your friend hold out an ink marker with the tip
pointing down. Close one eye. Tell your friend to move forward or
backward or side to side until you think the marker would hit the center
of the target if it was dropped. Tell your friend to drop the marker when
you think the marker is over the target center. The marker should leave a
spot where it hit the target. Try it 10 times with one eye closed and add
up the "score" for the 10 drops. Now try it with both eyes opened (get a
different color marker when you use 2 eyes to see the difference on the
target). Is your score better when you use two eyes?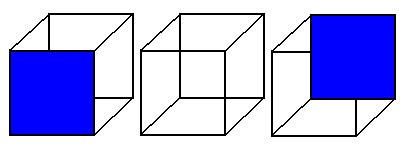


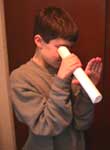 Do you have "X-Ray
Vision?" You may be able to see through your own hand with this simple
illusion. Roll up a piece of notebook paper into a tube. The diameter of
the tube should be about 0.5 inch. Hold up your left hand in front of
you. Hold the tube right next to the bottom of your left "pointer" finger
in between you thumb (see figure below).
Do you have "X-Ray
Vision?" You may be able to see through your own hand with this simple
illusion. Roll up a piece of notebook paper into a tube. The diameter of
the tube should be about 0.5 inch. Hold up your left hand in front of
you. Hold the tube right next to the bottom of your left "pointer" finger
in between you thumb (see figure below). Have you ever
noticed that it is easy to see a star in the sky by NOT
looking directly at it? It is actually easier to see a dim star at night
by looking a bit off to the side of it. Try it! This is because the two
types of photoreceptors (rods and cones) in the retina perform different
functions and are located in the retina in different locations. The
cones, which are best for detail and color vision, are in highest
concentration in the center of the retina. The rods, which work better in
dim light, are in highest concentration in the sides of the retina. So if
you look "off-center" at the star, its image will fall on an area of
the retina that has more rods!
Have you ever
noticed that it is easy to see a star in the sky by NOT
looking directly at it? It is actually easier to see a dim star at night
by looking a bit off to the side of it. Try it! This is because the two
types of photoreceptors (rods and cones) in the retina perform different
functions and are located in the retina in different locations. The
cones, which are best for detail and color vision, are in highest
concentration in the center of the retina. The rods, which work better in
dim light, are in highest concentration in the sides of the retina. So if
you look "off-center" at the star, its image will fall on an area of
the retina that has more rods!