BRAIN AWARENESS WEEK LESSONS
Developed by Ms. Lynne Bleeker, Middle School
Science Teacher/Consultant; Ankeny, IA |
 |
The following lesson ideas are intended to give teachers a head start
in planning classroom activities during Brain Awareness Week. However,
these ideas can be used anytime that a class is studying the nervous
system. These lessons can be rearranged according to your specific
objectives and time constraints. Six main topics of study related to the
brain and nervous system are included, lettered A through F. Ready-to
print lessons, black line masters, assessments, etc can be found in the
web page addresses referenced in each lesson. The topics are:
- Anatomy of the Brain
- Protecting the Brain
- The Nervous System
- Neurons
- Meet a Neuroscientist
- Optional Topics
|

Topic A: Anatomy of the
Brain
Objectives: In this lesson sequence,
students will learn a few basic facts about the anatomy of the human
brain.
Key terms include: brain stem, medulla, frontal lobe, parietal lobe,
occipital lobe, temporal lobe. They will learn that an adult human brain
weighs about 3 pounds, and is about the size of two fists pressed
together.
 Materials needed:
- Overhead and/or black
line copies of a diagram of the human brain (the simpler the better)
- Colored pencils
- Optional: modeling clay (optional); potato flakes,
sand,
gallon-sized ziploc bags and red food coloring (optional); brain molds and
jello
Methods:
- To introduce the
lesson, stress that the brain is a marvelously
complex and intricate organ of the body and that neurologists are learning
new things about its workings every day. However, there are some things
that we do already know about the brain's structure and function. This
lesson will be a brief introduction to this amazing control center of our
bodies. Those who are interested can find a great deal more information
on the Neuroscience for Kids web pages Introduction to the
Nervous System.
Other good resources include various coloring
books, magazines and articles.
- Show students an overhead or pass out copies made from the brain diagram.
The brain is divided into 3 main areas:
- the brain stem, responsible for basic body functions such as heartbeat
regulation;
- the cerebellum, responsible for things such as balance and muscular
coordination and
- the cerebrum, made of two distinct hemispheres and
responsible for higher brain functions including thinking and emotions.
You could have students color and label these regions as you speak, if you
chose to hand out an unlabeled diagram. Or they could make a clay brain,
following the guidelines found on the brain modeling page.
- To make a nice, cheap, portable model of the brain, have students put
their two fists together. This represents the two hemispheres of the
brain with their fissures (folds). The wonderful thing is that two fists
together are about the size of an individual's brain! Stress that brain
size in humans is not related to intelligence. If you do a later lesson
on neurons (Topic C) you will expand on this idea in more depth.
Students will likely ask questions about the roles and functions of the
right brain and the left brain. For more information on these topics,
see, one brain or two.
The front parts of the brain (thumb side, if your brain is positioned as
though its owner were looking at you) are called the frontal lobes.
These lobes are responsible for reasoning and higher brain functions.
The upper middle lobes (around the middle fingers) are the parietal lobes,
responsible for touch. The lower middle lobes, the backs of the hands
(nearest the ears in a person) are the temporal lobes, responsible for
hearing. Finally, the back lobes (pinkie fingers) are the occipital
lobes, responsible for vision.
Another nice model can be found in the lesson plan called Potato Head. This lesson was originally from
the Brain Power program at the Pacific Science Center and Group Health.
In this lesson, you mix potato flakes, sand, warm water and food coloring
in a ziploc bag. The resulting mixture is about the size, weight, and
color of an adult human brain. This activity also has a remarkable "WOW!"
effect on students. If you have lots of time and money, you can have
students in groups make their own potato head brains. Otherwise, make up
1-4 yourself to pass around the room. They can be rewarmed in the
microwave for later classes, to save on material costs. They can be added
to a worm bin or garden for disposal.
Another nice activity if you have a small class or lots of time is to make
up jello brains using a jello mold. There are several companies that sell the jello brain mold.
If you are going to do brain activities for a full week (or even if not!),
you should seriously consider assigning the
creative video assignment. You may also wish to tell students ahead
about the next lesson, Brain Drop, so that they can practice and prepare
ahead at home. You will certainly get better-thought-out designs this way
and increase students' anticipation.
Here is a ten-point multiple choice quiz on today's lesson. It could be
done right on paper and graded as is or done on a Scantron form, according
to your preference. You might choose to make it open-note to reward those
students who took good notes as you were using the overhead, or it could
be closed-note.
QUIZ ON BASIC BRAIN ANATOMY
NAME: _________________________ Date: _______________ Period:____________
Refer to the following diagram of a brain to answer the following
questions. If you are writing directly on this quiz paper, circle the
letter of the answer that you feel best answers the question. If you are
using a scantron form, find the number of each question on the form and
use a Number 2 pencil to color in the letter of the option that you feel
best answers each question.
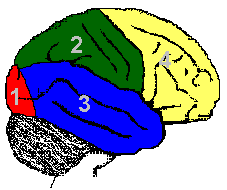
1.  The lobe of the brain important for vision is called:
	a.  the temporal lobe		c.  the parietal lobe
	b.  the occipital lobe		d.  the frontal lobe

2.  The lobe of the brain important for the sense of touch is called:
	a.  the temporal lobe		c.  the parietal lobe
	b.  the occipital lobe		d.  the frontal lobe

3.  The lobe of the brain important for hearing is called:
	a.  the temporal lobe		c.  the parietal lobe
	b.  the occipital lobe		d.  the frontal lobe

4.  The lobe of the brain important for reasoning is called:
	a.  the temporal lobe		c.  the parietal lobe
	b.  the occipital lobe		d.  the frontal lobe

5.  The lobe on the diagram labeled 1 is:
	a.  the temporal lobe		c.  the parietal lobe
	b.  the occipital lobe		d.  the frontal lobe

6.  The lobe on the diagram labeled 2 is:
	a.  the temporal lobe		c.  the parietal lobe
	b.  the occipital lobe		d.  the frontal lobe

7.  The lobe on the diagram labeled 3 is:
	a.  the temporal lobe		c.  the parietal lobe
	b.  the occipital lobe		d.  the frontal lobe

8.  The lobe on the diagram labeled 4 is:
	a.  the temporal lobe		c.  the parietal lobe
	b.  the occipital lobe		d.  the frontal lobe

9.  An adult brain weighs approximately:
	a.  1 lb.       b.  3 lb.     c.  5 lb.    d.  7 lb.

10.  A person's brain is about the size of:
	a.  their heart	  b. their stomach   c. 1 fist	 d. 2 fists

Answers:  1.b  2.c  3.a  4.d  5.b  6.c  7.a  8.d  9.b  10. d
Topic B: Protecting the
Brain
Objectives: students will think about the
fragility of the brain inside its skull and the importance of protecting
it with helmets when hard impacts are possible.
Materials needed:
- Brain drop "Mr. Egghead" lesson
plan
- Eggs - one per student or team, plus some spares!
- Various containers
- Various insulating materials such as
newspaper and packing material
- Possibly, a ladder and permission to drop eggs in containers from a
tall spot in your school building. Some teachers have even gotten local
fire departments to bring a truck and a firefighter to do the
dropping!
Methods: Review the parts and
characteristics of the brain which students learned yesterday. Remind
students of the Potato Head model of the brain that they felt. What was
its texture? They should bring up how soft and pliable (squishy) it was.
Ask them to think about what would happen if that brain were dropped or
hit hard. Ask what structure we have around the brain to protect it (the
skull). Do they think that the brain pushes up right against the skull?
Actually, there is a space in between the brain and skull that is filled
with fluid (cerebrospinal fluid) to cushion the brain. However, there are
limits to how much even these can protect the fragile, ESSENTIAL organ we
call the brain. Today they are going to experiment to see what effect a
hard impact has on the brain and how that impact can be minimized through
protective headgear. A raw egg will model the brain and the challenge is
to build a container that will best protect it from damage.
Please refer to
http://faculty.washington.edu/chudler/chmodel.html for the actual
activity.
To close the lesson, discuss the container designs that best protected the
eggs. How are these like helmets? Press students to be very specific.
Here's the place to preach helmet use for bicycles, in-line skating,
skateboarding, contact sports, etc!
Topic C: The Nervous
System
Introduction: This day's lesson is a
brief introduction to the parts of the nervous system. As with the lesson
on the brain, it is not intended to be comprehensive but simply a
discussion of the gross anatomy of the nervous system. Students will
learn the locations and functions of the Central Nervous System (brain and
spinal cord) and the Peripheral Nervous System. After some brief direct
instruction, they will make outlines of their bodies on butcher paper on
the floor, fill in the nervous system, view some slides, overheads, videos
and/or videodisc clips about the nervous system and possibly experiment
with some optical illusions or other experiments related to one of the
senses. Classes with computer access might also spend some time exploring
the Neuroscience for Kids web pages or other recommended neuroscience
pages from the newsletters.
Objectives: Students will learn the
locations and functions of the Central Nervous System (brain and spinal
cord) and the Peripheral Nervous System. As an option, they might also
explore the ways that our eyes relay information to the brain and
experiment with ways to "trick" the system.
Materials:
- Overhead and/or student
copies of a clear, simple black line
diagram of the central and peripheral nervous system or the other
recommended resources for a master)
- Butcher paper and markers
- Optional: overheads, slides, videos or videodiscs about the nervous
system; computer or computer lab with Internet capability
Introduction: (Review the size, location,
parts and characteristics of the brain.) What other parts of the body are
needed for the brain to receive and process information? (Most students
will eventually arrive at "Nerves and spinal cord".) In this lesson, we
will learn where these parts are located and how they connect to one
another. For more background information, please refer to:
Divisions of the nervous system.
The nervous system right down the
middle
Functional divisions of the brain
Lobes of the brain
Neurons
- Show an overhead of the nervous system and point out the central
nervous system (brain and spinal cord) as well as all the other nerves
radiating from the brain and spinal cord, collectively called the
Peripheral Nervous System. Show how these other nerves make possible
contact from each part of the body with the brain and spinal cord. If
students have copies, have them color in the central nervous system in one
color and the peripheral nervous system in another and label both
parts.
- At this point, you may choose to show some segments from the more
detailed overheads, slides, videos or videodiscs illustrating and
reinforcing what you have explained. For older students, it might be
worthwhile to briefly discuss processing of sensory input via the brain or
the spinal cord (e.g., reflex arcs). Anticipate lots of questions about
paralysis - use the diagrams to point out why injuries at various sites
would affect certain areas.
- For a great activity that will bring this up close and personal for
students, pull out the butcher paper and markers and have them outline their bodies, then draw in the locations of
the brain, spinal cord and nerves. Circulate among the students and
ask them questions about what part likely does what. Can they locate
approximate locations of various nerves on their actual bodies? What do
they do?
- An easy and fascinating exploration of the sensory nerves can be done
using the sense of sight. There are
numerous optical illusion posters and books, as well as the Magic Eye
posters. Have students experiment with how they alter the sensory input
to "trick" the brain into processing information differently. It's fun to
draw a picture on an overhead transparency and have students just stare at
it for minute or so, then remove the overhead. They will see the same
image, but in a complementary color, as they have temporarily "burned out"
the cones for the original color. This can be done with construction
paper squares on white copier paper, too.
- Another popular and relatively inexpensive activity on this subject is
to have students dissect a preserved cow's eyeball to see the parts.
There is a good description of this activity at the
Exploratorium.
- Various experiments on peripheral vision and blind spots help make the
point that the spot on the retina where the optic nerve exits the eye is
devoid of photoreceptors (rods and cones) and not capable of processing
input. Ask why we do not normally notice this blind spot.
- Check the Neuroscience for Kids web site for:
- Interesting facts about the nervous
system.
- More activities about the nervous system.
Topic D: The
Neuron
Key concepts of this lesson:
- a nerve cell is called a neuron
- a neuron consists of a cell body, an axon, dendrites and a myelin
sheath
- message transmission between neurons occurs through special chemicals
called neurotransmitters
- learning occurs as more and stronger connections are made between
neurons
Materials needed:
- Blackline overhead and/ or copies of a typical neuron or
one from your textbook series or from one of the
resources referenced in earlier lessons
- Slides, videodiscs, video clips
- Computer with access to Internet
- Optional: prepared slides of nerve tissue and microscopes or
videomicroscope
- Pipe cleaners and clear drinking straws
Methods: Briefly review the lessons done
to date on the nervous system. If someone called you a "neuron", how
would you feel? To be called a neuron would actually be a compliment,
because a neuron is a nerve cell - the kind of cells in your brain and
nerves.
- Show students the diagram of a neuron, or pass
out their copies (ideally, do both!) Point out the main structures:
axons, dendrites, cell body and myelin sheath. If your students have
already studied cells, you might also point out that the cell body is
where most of the organelles are located: nucleus, mitochondria, etc.
- EMPHASIZE the unique shape of the nerve cell - long and thin. Ask
students what the main job of a nerve cell is. (Receiving and
transmitting messages.) How does that long, thin shape help it do its job
quickly? An analogy that has worked well with my students is to make a
comparison with telephone wires. What do we use in everyday life to
communicate with people across town or across the country? (Telephone)
People (and, increasingly, computers) are able to communicate rapidly and
clearly through the use of telephones. How is the signal sent? Over a
long, thin wire. This is a very efficient shape for message transmission
- in the outside world and in our bodies.
- In the early 1900s, scientists were astonished to discover that nerve
cells do not actually touch one another, but that there are tiny gaps
between nerve cells called "synapses". Neurons produce tiny quantities of
powerful chemicals (neurotransmitters) that are released into the synapse
as a message is being sent from one cell to the next. The neurotransmitter
is released by an axon terminal, crosses the synapse and attaches to a
receptor on the other side (in most cases, a dendrite, but synapses are
found on axons and cell bodies too). These neurotransmitters are an
important area of study in neuroscience and scientists are learning more
about these amazing chemicals all the time.
(Note: With high school students, one might want to discuss the
electrochemical nature of the neurotransmitters as well as different types
of neurons and different types of synapses. More
information on neurotransmitters
- Another thing that neuroscientists have learned in recent years is
that new dendrites actually sprout to make connections with other neurons,
and this is how learning takes place - in the connections between the
neurons! This is very encouraging, because it means that as long as you
have neurons, you can always continue learning, even into very old age.
However, to make these connections occur, you have to continue to have new
experiences, whether they be actual experiences or through reading,
computer work etc. This is what school is about: providing new
experiences so that new connections can form in your brains!
- Depending on what you want to emphasize, you can go on at this point
to one of several different activities to reinforce this direct
instruction.
For this model, each student will need: scissors and pipe cleaners.
To make the model of a neuron:
- Take one pipe cleaner and roll it into a ball. This is will be the
cell body.
- Take another pipe cleaner and attach it to the new "cell body" by
pushing it through the ball so there are two halves sticking out. Take
the two halves and twist them together into a single extension. This will
be the axon.
- Take other pipe cleaners and push them through the "cell body" on
the side opposite the axon. These are dendrites. These can be shorter
than your axon and you can twist more pipe cleaners to make more
dendrites.
- Wrap small individual pipe cleaners along the length of the
axon. These will represent the myelin sheath.
Different colored pipe cleaners can be used to model different parts of
the neuron. This activity doesn't take long, but is a powerful visual
picture of a simple neuron. Review what each part represents and what
each does. Emphasize again the long, slender shape with the branches for
connections. One class of my students had so much fun with it, they
decided to link all of their neurons together into a long nerve. We hung
it up in the classroom and it stretched all across the ceiling!
- Depending on your time and resources, you can now make other
observations of neurons, either
- in the Gallery of Neurons
- using prepared slides of nerve tissue and either student microscopes
or a videomicroscope
- using slides, videos or videodiscs your
school has access to.
- To model transmission of messages, students can use their bodies as
model neurons. Have them pull one arm up to their shoulder and spread out
their fingers to represent the axons. The other arm should be
outstretched, and fingers also spread out. As they connect to one
another, they can send a "message" from one person to another. See if
students can point out a drawback of this model. (Our fingers can't
squirt out neurotransmitters between people.)
- For another variation on this message transmission activity, visit message transmission or build the giant rope neuron.
- Review the parts of the neuron, shape, role of connections, and
importance of neurotransmitters.
- You may wish to use the following quiz to review and/or assess student
learning about neurons.
Quiz on Neurons
1.  A neuron is another name for :
	a. person with below average intelligence
	b.  a nerve cell
	c.  a skin cell
	d.  a new car being developed by Ford

Refer to the following diagram to answer the following questions:
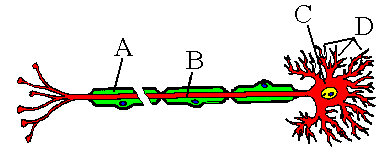
2.  The part of the neuron labelled "A" is:
	a.  an axon		c.  the myelin sheath
	b.  a dendrite		d.  the cell body

3.  The part of the neuron labelled "B" is:
	a.  an axon		c.  the myelin sheath
	b.  a dendrite		d.  the cell body

4.  The part of the neuron labelled "C" is:
	a.  an axon		c.  the myelin sheath
	b.  a dendrite		d.  the cell body

5.  The part of the neuron labelled "D" is:
	a.  an axon		c.  the myelin sheath
	b.  a dendrite		d.  the cell body

6.  The role of the axon is:
	a.  to receive messages
	b.  to send messages

7.  The role of the dendrite is:
	a.  to receive messages
	b.  to send messages

8.  A synapse is:
	a.  a special chemical that goes between neurons
	b.  the shorter part of the neuron, next to the cell body
	c.  the longer part of the neuron, extending out from the cell
	    body
	d.  a gap between two neurons

9.  Neurotransmitters are:
	a.  the outer covering of the dendrite
	b.  chemicals that go between nerve cells
	c.  the structure that causes new learning to occur

10.  One way for new learning to occur:
	a.  the synapses have to become closer together
	b.  the cell body has to become wider
	c.  new dendrites have to sprout
	d.  the myelin sheath has to thin out

Answers: 1.b  2.c  3.a  4.d  5.b  6.b  7.a  8.d  9.b  10.c
Topic E: Meet a
Neuroscientist
Introduction: Inviting guests into one's
classroom can be stressful and risky: it takes extra time to coordinate,
and there's always the question of how the guest will relate to one's
students. However, the payoff is tremendous, and I would highly recommend
working to find a neuroscientist who can come and speak to your students.
They have access to cutting-edge research and materials that we could
never get as classroom teachers, and students always benefit from seeing
real live scientists as normal people to help dispel some of the
stereotypes that exist.
What you work out with "your" neuroscientist will depend on the time
available, his/her interests and desires for what to do and share,
resources available to you and him/her etc. However, a day that would
move along quickly and likely make a big impression on students might
include most of the following:
- Introduction of the scientist (2-5 minutes)
- Brief explanation of the scientist's area of research, with
connections to what you have already studied (10 - 15 minutes)
- A neuroscience activity from these lesson plans or the web
pages, or (even better) one that the person has done before with
kids with you and the person co-teaching. (20+ minutes)
- Touch a real human brain (if the scientist can bring one in)
(10 - 20 minutes)
- Miscellaneous neuroscience questions (10+ minutes)
Here are some tips to making the day a huge success:
- To find a neuroscientist, contact a local college/university or
hospital. You can define a neuroscientist loosely as anyone whose work
includes study of the nervous system. Consider practicing neurologists
and anesthesiologists as well as scientists who actively do research each
day. Also, graduate students often have a more flexible schedule than
professors and are eager to work with students; they are scientists too in
the minds of students, though they are not titled so in official scientist
hierarchy! Brain Awareness Week is a terrific excuse to persuade someone
to volunteer some time in the school. Be aware that their time is a very
valuable commodity and the nature of some people's research makes it
easier or harder for them to be gone for a few hours or a day. If you
teach for multiple periods in one prep, and the person can't stay for all
of them, consider videotaping the presentation. It will not have the same
impact as the flesh-and-blood person, but at least students will know that
you tried to give them the same experience as their classmates in earlier
periods had.
- As you are making contact with "your" neuroscientist, try to find out
what their area of research is as well as a little about who they are as a
person. Do they have children who attend school in your school district?
(Note: if they have a child who is a student in your class, make sure
he/she is comfortable having the scientist introduced as his/her parent
before you do so! Some of my middle schoolers thought it was great to
have their parents introduced that way and others preferred to stay more
anonymous.) Unique hobbies? etc. If you know something about them as a
person, you can model in your introduction an adult collegial
relationship; students will be more open to listening to someone they know
their regular teacher likes and respects.
- Ask the scientist to dress the way they normally would go to work
(unless they really do wear a lab coat and pocket protector every day!)
Blue jeans and tennis shoes are terrific if they wear those to work, as
many career scientists do. It helps students to see that scientists are
normal, warm-blooded people, not the "mad scientist" stereotype that many
students laugh about, but still secretly believe in.
- Ask the scientist to prepare a 10-15 minute explanation of their area
of research, using the smallest words possible. Students are easily
intimidated by multisyllabic words, even when they are very logical and
descriptive. The more visuals the scientist can bring in, the better
(pictures such as overheads and slides as well as research tools). Let
them know what subjects you have already studied and what terms they can
expect students to be familiar with. If their research involves animals,
they should be prepared for some questions about animal care. Have them
emphasize the potential benefit to people of their area of study - a
possible new drug to help treat some disorder, etc. In a college setting,
people are used to lecturing and then taking questions afterward.
Students in a K-12 setting usually cannot wait that long, so if they can
entertain questions as a part of the presentation, that is ideal. You
might even consider "planting" a few questions to help break students'
shyness.
- Tell the scientist a little about the developmental level of the
students he/she will be working with, as well as what you have studied so
far in science. This will help him or her tailor the talk to the correct
level for your students. Consider ordering the "survival guide"
referenced at the bottom of this plan.
- Let the students know ahead of time that you will have a very special
guest the next day who is taking time from a busy schedule to spend time
with them, and who can help answer lots questions that you can't. Remind
them that you expect them to show excellent behavior and make a good
impression of their school on this person.
- You might plan to have the scientist lead the class in one of the
neuroscience activities you have not had time for to date. This will keep
the talk from getting too long and "losing" the students. Often
scientists will jump at the chance to do science with kids, and they can
add interesting real-life applications as well as model tremendous
curiosity and enthusiasm for neuroscience topics. Your presence will help
keep students from a "substitute teacher" mentality and help maintain good
classroom management as well as model an adult collegial relationship.
- If it is at all possible, see if the scientist can bring in a
preserved human brain and lots of boxes of gloves (even if this is not
their particular area of research). Other brains are interesting, too,
but here is something magical for students in seeing a brain that once
controlled the body and entire identity of a living person. If they can
actually put on gloves and touch the brain, the effect is magical!
However, I would do this after the person has spoken about their work so
as not to detract from students' attention from that talk.
- If the scientist is comfortable with it, have students share what they
have learned so far and then open up the floor for any questions about the
brain and nervous system. Kids will likely ask: "Why do we dream? What
is a coma? How does a person get paralyzed? Why are some people smarter
than others? Why are some people left-handed and others right-handed?"
etc. Write down all the questions on the overhead or butcher paper for
future study. Hopefully the scientist will have some insights on some of
the questions but will also model an attitude of, "I don't know. How do
you suppose we could find out?" and point kids toward other resources or
people who study particular areas different from their own area of
study.
- An outstanding resource for those teachers and scientists is:
"Sharing Science With Children: A Survival Guide for Scientists and
Engineers" from:
The North Carolina Museum of Life and Science
P.O. Box 15190
Durham, North Carolina 27704
Attn: Georgiana M. Searles, Director of Education
Note: They also have a guide for Teachers and for Parents, both
excellent too.
Hopefully this day will be the beginning of a nice partnership between
you and "your" scientist!
Topic F: Optional
Topics
Introduction: This day (or beginning of
an additional unit of study on
the brain and nervous system) features a potpourri of ideas about
neuroscience-related topics of high interest to students. You will want
to pick and choose from among these ideas, but perhaps the tips and ideas
will give you a starting point!
- An excellent use of another day of study would be to have students do
oral presentations on their video assignment (Movie Review Lesson
recommended in the February NFK Newsletter). Because I did not come up
with that lesson, I don't mind saying that I think it is a highly
creative and excellent assignment idea! I'd suggest having students in
groups prepare oral reports on the video they chose to watch, being sure
to include the answers to the suggested questions in their presentations.
This method of reporting (with the possible addition of a written report,
according to your preferences) would have three major benefits: a)
students would get valuable practice in speaking in front of a group,
something many of them dislike intensely, but a skill they will need in
their adult lives; b) students will learn about videos other than the one
they personally chose to view; and c) your grading time will be reduced
dramatically, especially if you make a scoring guide/rating scale. You
will be able to get most of it done in class! I'd suggest that the
rating scale include components for a) presentation skills (eye contact,
volume etc.); b) completeness (answering all of the questions for their
video); c) accuracy (correctly stating events and conclusions from the
video); and d) creativity, with greater points being assigned to the
completeness and accuracy components.
- Another topic we tend to not spend enough time on with students is
LEARNING. As students gain better metacognitive skills about their own
learning, they become better learners. There are many good resources for
this subject, including learning style surveys to test whether one is more
strongly a visual, auditory or kinesthetic learner. The Brain Power
curriculum from Pacific Science Center and Group Health is quick and easy.
If you don't have one in your files, you might also check with a school
counselor or Advisory teacher. However, the BEST resource I have found on
the subject of learning is a new GEMS (Great Explorations in Math and
Science) guide called Learning About Learning. They state the level as
Grades 6 - 8, but it could easily be used with older students as well.
The guide has sections on Tactile Mazes, Sensory Information, How we as a
community of humans work together, Health-related mysteries (including
product safety issues), How the scientific community learns, Effects on
humans of being raised in isolation (based on a true story), "Brain
research" based on impoverished and enriched environments (again, based on
actual research but explained at kids' level), Benefits and costs of
various kinds of research in humans, animals and in vitro. It has many
simulations based on real-life situations and very engaging activities,
and like all of the GEMS activities, is highly motivating to students. The
Hexacarbon solvent mystery in particular received rave reviews from a
teacher in the latest issue of GEMS Network News. The cost is
unfortunately $25.50 plus $4 shipping and handling - but at 205 pages of
excellent lessons, I think it is a worthwhile guide for your school to
invest in. To order it, call (510) 642-7771 or write to GEMS, Lawrence
Hall of Science, University of California, Berkeley, CA 94720-5200.
- Other topics of great interest to students include: sleep, dreams,
comas, pain, stress, handedness, creativity... their questions will prompt
all sorts of study! The Neuroscience for Kids web
pages are filled with information and ideas about these subjects.
- Another great whole-class activity would be to have students bring up
all the disorders of the brain and nervous system they can think of. (If
they have done the videos assignment, they will have a lot of examples
from that, too.) Start a list and add more that they may not have heard
of: ex. Multiple sclerosis, Bell's Palsy, Brain Tumors, Epilepsy,other
seizure disorders, Alzheimer's Disease, Parkinson's Disease,
Manic/Depressive Disorder etc. Have students work in small groups to
choose a disease to study and research the disease, symptoms, causes,
treatments currently available, research going on, etc. They should use
the library, the neuroscience web sites (and more general browsing), local
and national agencies/ support groups, hospitals and universities etc to
find out the available information. They can then report to the class on
what they find - again, in a written and oral report with a scoring guide.
Everyone will learn a great deal from this assignment!
- This is also a great time to kick off one's anti-drug unit, using
resources from DARE, your health curriculum, the web pages, or any other
source. I found that my students still remember the "This is your brain
on drugs" slogan from TV many years ago. Take advantage of Brain
Awareness Week to preach the benefits of taking care of this priceless
resource each of us carries inside our skull!
Suggested Schedule of Activities
If
you have just ONE DAY to devote to this subject,
it should probably be the basic Brain Anatomy Lesson (Topic A).
For TWO DAYS, a good sequence would be the Brain
Anatomy Lesson plus either: Protecting the Brain, Nervous System, or
Neurons (depending on your curricular goals and the age level of your
students). Younger students would likely do better with the Protecting
the Brain Lesson, while high school students should be able to handle the
more abstract concepts of neuron anatomy and physiology.
A nice THREE DAY sequence would be:
- Brain Anatomy Lesson, Nervous System and Neurons OR
- Brain Anatomy, Nervous System and Meet a Neuroscientist if you can
recruit a neuroscientist. It would be good for students to have some
basic background about the area of research of the scientist.
If you have FOUR DAYS to devote to Brain Awarenss
Week, consider
doing:
- Brain Anatomy, Nervous System, Neuron and Neuroscientist or
- Brain Anatomy, Protecting the Brain, Nervous System and Neuron
Best of all would be to devote the ENTIRE WEEK to
this important subject and do the following: Brain Anatomy, Protecting
the Brain, Nervous System, Neuron and Neuroscientist or Optional Topics if
no neuroscientist can be found.
HAVE A GREAT BRAIN AWARENESS
WEEK!
[Back to the Main Brain Awareness Page]
![[email]](./gif/menue.gif)


