
Welcome to The UW Shoulder Site @ uwshoulder.com
Please note that information on this site was NOT authored by Dr. Frederic A Matsen III and has not been proofread or intended for general public use. Information was intended for internal use only and is a compilation for random notes and resources.
If you are looking for medical information about the treatment of shoulders, please visit shoulderarthritis.blogspot.com for an index of the many blog entries by Dr. Frederick A Matsen III.
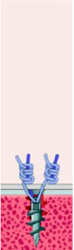
SMC Knot
Images and instructions taken from the CONMED site.
The SMC Knot is a unique sliding knot that utilizes a self-locking loop to achieve good initial knot security. The SMC knot is low profile and there is minimal or no slack once the knot is secured.
Note that the SMC Knot cannot be used if the sutures do not easily slide through the soft tissues. If there is any doubt about the freedom of suture passage, then another knot should be used.
Instructions
 |
 |
 |
 |
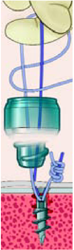
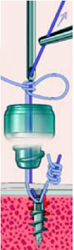
| 1. Thread the knot pusher on the post strand (held in the left hand) and place a clamp on the post. Pass the knot pusher into the joint to ensure that there are no twists or obstructing soft tissue. Arrange the suture so that the original post suture is short, with only 10cm of the suture outside of the cannula. | 2. Pinch the two strands together between the thumb and index finger, crossing the loop strand over the post. | 3. Pass the loop suture under and then over both strands. | 4. Pass the loop strand under the post strand between the two sutures and over the top of the post strand in a direction away from the pinching fingers. There will be a triangular interval formed between the two previous loops over the post strand (red arrow). |
 |
 |
 |
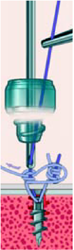 |
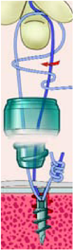
| 5. Feed the free end of the loop strand from bottom to top through this interval under the post strand. As the suture is pulled through, a "locking loop" is created (blue arrow). | 6. Release the thumb and index finger and place the left index finger into the "locking loop" from bottom to top to keep it open. Remove all slack (dress the knot) from the sutures with the index finger in place to avoid tightening the "locking loop" prematurely. | 7. Pull on the post strand and use the knot pusher to guide the knot down to the tissue. Do not pull on the loop strand until the knot is seated. Maintain tension on the post strand and back off the knot pusher to assess the knot. | 8. Once satisfied that the knot is well seated, tighten the "locking loop" by pulling on the loop strand while maintaining pressure on the knot with the knot pusher |
 |
 |
 |
|
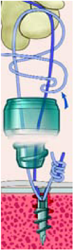
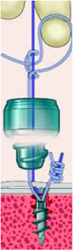
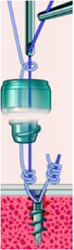
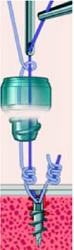
| 9. The "locking loop" will slide over the knot pusher and secure the knot. For further security, an underhand halfhitch is worked down the post suture. | 10. An overhand half-hitch is next placed on the post and worked down into position onto the knot stack. | 11. Suture tails are cut with microscissors. |