
Welcome to The UW Shoulder Site @ uwshoulder.com
Please note that information on this site was NOT authored by Dr. Frederic A Matsen III and has not been proofread or intended for general public use. Information was intended for internal use only and is a compilation for random notes and resources.
If you are looking for medical information about the treatment of shoulders, please visit shoulderarthritis.blogspot.com for an index of the many blog entries by Dr. Frederick A Matsen III.
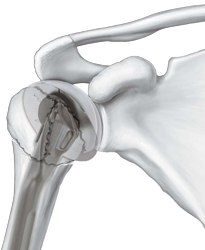
Exactech Proximal Humeral Fracture Repair Technique Guide
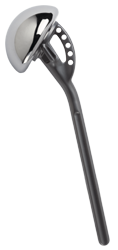
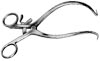
Equipment Needed
Setup
Ensure that you do a good job of inspecting the skin of the extremity you are repairing for open lesions. Also inspect the axilla for Candidal lesions
Place templated x-rays, clinic notes and progress note on x-ray box.
Prefill-out orders and setup pt in a beach chair position. The operative arm should be able to hang off bed as shown below.
.png)
.png)
You should circumferentially wrap cloth tape around the patient's chest and table to prevent pulling the patient off of the table during the surgery. This taping is in addition to use of the patient's normal safety belt.
You should NOT be using the old RA table of Beachchair attachment for this case. If for some reason you are using these systems (such as to help with fluoro) DO NOT REMOVE THE SHOULDER SUPPORT! Removing the shoulder support under the operative side may seem like a good idea but the patient will eventually migrate off of the table.
The anesthesia team and ortho team should work together to tape the patient's head down. You may need to use a clipboard to support the head (if using the RA table or Beachchair attachment). We do not secure the head in a brace as shown above.
A 1010 drape should be secured around the patients neck and the free end secured to the tape holding the patients head. Securing the free end prevents it from falling onto the sterile field when prepping.
In a revision setting, ROM of the operative shoulder should be measured and recorded on the board in the following order: FE, ER, IRA, ERA, CBA. In acute fracture cases, of the operative shoulder should NOT be measured and recorded as normal since the motion will be through the fracture and manipulation can cause further injury/bleeding.
Double Prep
A member from the ortho team needs to wash and gown and prep the patient's operative side. ChloraPrep is the prep of choice.
Prep from the middle of the chest out to the wrist, followed by armpit, followed by wrist, hand and fingers. This should be done a total of three times.
The first drape is setup under the patients head, operative arm and over the patient's waist. If possible, the drape should be tucked under the patient's belt. This draping is done by the nursing staff or other member of ortho team.
The first set of gloves are removed and the second prep is performed in the same manner as the first.
The second drape is setup over the first in the same manner.
Draping
After the two initial drapes are placed under the head shoulder and over the waist, one drape is place over the chest and feet. This should go from the patient's armpit to the patient's neck.
Another drape is placed over the head and overlaps across the chest drape.
The three corners where these drapes come together are stapled. There is no need to staple the drapes directly to the patient.
The arm should be covered with a stockinet and a dry sponge placed in the patient's axilla.
|
A clear adhesive plastic is used to cover all exposed skin.
At some point a timeout will be performed by the circulating nurse, attending and anesthesia team. The room should otherwise be free from any talking or other distracting noises during the timeout. |
Approach
Prior to making an incision, a formal timeout will be performed by the attending circulating nurse, and anesthesia team. The room should otherwise be free from any talking or other distracting noises during the timeout.

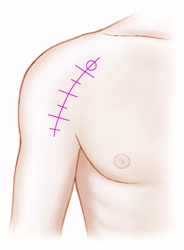
Make your incision from the coracoid down, 10 cm or so.
|
 After incision through the dermis, two interposing
Gelpi retractors should be used to separate the two skin edges and to pull them away from the muscle bed. After incision through the dermis, two interposing
Gelpi retractors should be used to separate the two skin edges and to pull them away from the muscle bed.
A scalpel should be used until the surgeon reaches muscle. Mayo scissors are then used to dissect through fascia to locate the cephalic vein and deltopectoral interval.
The deltopectoral interval should be blunt dissected with the surgeon's index finger, taking the vein laterally. Make an effort to preserve as much deltoid muscle as possible. |
The motion interface under the deltoid and pectoralis should be freed up and the conjoined tendon located.
Remember to free up the conjoined tendon on its lateral side so that the tendon can be retracted medially. Incising into anything medial to the lateral border of the conjoined tendon can result in musculocutaneous nerve injury.
When the lateral border of the conjoined is freed up, use a medium Richardson retractor to pull the conjoined medially. Use a Balfour to expose the rotator cuff /superior humerus.
Bursa should be removed to better visualize the subscapularis and humerus. Locate and identify the bicipital groove.
Humeral Head Inspection
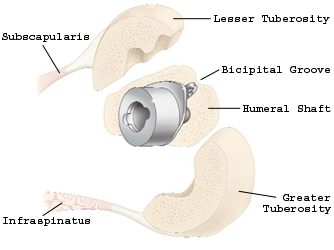 Inspect the humeral head and assess the fracture. It may be necessary
to fracture the head at the bicipital groove. Inspect the humeral head and assess the fracture. It may be necessary
to fracture the head at the bicipital groove.
|
|
The articulating surface of the humeral head will need to be removed to allow space for the prosthetic head. Save all bone for bone grafting later in the case.
Determine the approximate size of the shaft according to the templated xray. Assess the size of the humeral shaft to determine if this size seems appropriate. |
Humeral Shaft Prep and Prosthesis Size Determination
Ream the humeral shaft with the proper sized reamer. Reamers are 1 mm larger than the size of the prosthesis to allow for a 0.5mm cement mantle.
Prostheses come in size 7mm, 9.5mm and 12mm. Reamers come in size 8mm, 10.5mm and 13mm.
|
Expect to use small stems in petite people and very muscular men. Larger ones will be often needed in older individuals. |
Trial the component.
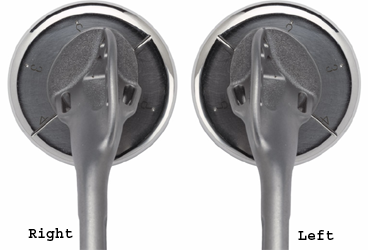 Ensure that you are using the proper side by
ensuring the lateral dorsal fin matches up with where the bicipital groove is expected
to be. Of note, the trial stem has been enlarged to simulate a 5mm cement
mantle (1 cm greater diameter). Ensure that you are using the proper side by
ensuring the lateral dorsal fin matches up with where the bicipital groove is expected
to be. Of note, the trial stem has been enlarged to simulate a 5mm cement
mantle (1 cm greater diameter). |
|
Note: there is a little debate as to the proper positioning of the humeral component. The manufacture recommends 20° of retroversion, others recommend that you attempt to align the head as close to anatomical as possible and our service feels that 30° of retroversion is ideal. |
 A trial reduction tool is provided in the Exactech kit, but will not likely
be used by our service. These are specific to each size of prosthetic
trial component and the label of the side (Right or Left) should readable when
placed anteriorly against the humeral shaft. A trial reduction tool is provided in the Exactech kit, but will not likely
be used by our service. These are specific to each size of prosthetic
trial component and the label of the side (Right or Left) should readable when
placed anteriorly against the humeral shaft. |
|
Holes in the tool allow you to reposition the tool up or down with need to re-K-Wire the tool. |
|
Another helpful tip is to measure up 5.6 mm above the top of the pec major tendon, which should be an approximate guide to the correct height of the top of the humeral prosthesis. |
Now determine the head height and position Then trial your head and pay particular attention to the position of the head in relation to its eccentricity.
 Use the patient's head to determine the approximate humeral head size you
will need. Note that all heads larger than 41mm have a 1.5mm offset. Use the patient's head to determine the approximate humeral head size you
will need. Note that all heads larger than 41mm have a 1.5mm offset. |
Heads come in three heights: Short, Tall and Expanded.
| Head Size | Short Head | Tall Head | Expanded Head |
| 38 | 16 | 19 | |
| 41 | 16 | 20 | |
| 44 | 17 | 21 | |
| 47 | 18 | 22 | 26 |
| 50 | 19 | 23 | 27 |
| 53 | 20 | 24 | 28 |

After the correct shaft and head combination has been selected, the shaft should be prepared for cement and with suture. Do a good job of washing the shaft out and testing the bottom of the medullary canal. If no bottom is noted, the shaft should be rereamed or fitted with a cement plug.
 Two holes should be drilled with one on each side of the bicipital groove for
your "North-South" sutures. Two holes should be drilled with one on each side of the bicipital groove for
your "North-South" sutures. |
 Run
a #5 Tevdek through the posterior hole and and a #5 Fiberwire through
the anterior hole, and clamp them off. These will be the greater
tuberosity and lesser tuberosity "North South" sutures. Run
a #5 Tevdek through the posterior hole and and a #5 Fiberwire through
the anterior hole, and clamp them off. These will be the greater
tuberosity and lesser tuberosity "North South" sutures. |
Irrigate and suck out the shaft and place a vag pac in the canal.
 The
actual prosthesis should be assembled with attention to positioning of
the eccentric head. The best way to do this is to place the
Exactech stem in a DePuy Global Advantage Delrin impaction stand.
This can be done with one person if the Exactech stem is firmly seated
in the Delrin stand, but is safer with one person holding the stand and
another person holding the mallet and impactor. Give three good
blows to the impactor with a mallet. The
actual prosthesis should be assembled with attention to positioning of
the eccentric head. The best way to do this is to place the
Exactech stem in a DePuy Global Advantage Delrin impaction stand.
This can be done with one person if the Exactech stem is firmly seated
in the Delrin stand, but is safer with one person holding the stand and
another person holding the mallet and impactor. Give three good
blows to the impactor with a mallet.
Since we have not done during an actual case, we are not sure it the stem will bottom out or get trapped in the stand. All sizes, left and right seem to fit in the stand. |
|
|
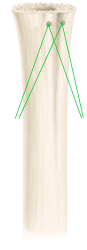
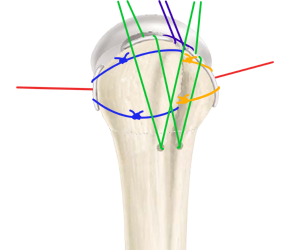
PreThreading the Prosthetic Fins
 You will want to place a number 5
Fiberwire suture through each of the
prosthetic fins (as shown left). This will be used as the final cerclage
(FC), AKA "Around-The-World" (ATW) tie. You will want to place a number 5
Fiberwire suture through each of the
prosthetic fins (as shown left). This will be used as the final cerclage
(FC), AKA "Around-The-World" (ATW) tie. |
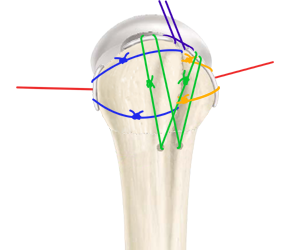
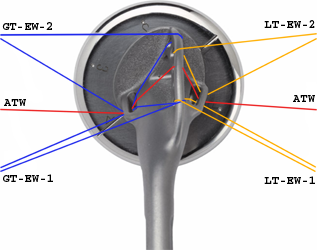 Preplace
2 #5 green Tevdex through the posterior prosthetic fin (greater
tuberosity fin) the the lateral (dorsal) fins as shown. These will
be the greater tuberosity (GT) sutures. Preplace
2 #5 green Tevdex through the posterior prosthetic fin (greater
tuberosity fin) the the lateral (dorsal) fins as shown. These will
be the greater tuberosity (GT) sutures.
Preplace 2 #5 Blue Ticrons through the anterior prosthetic fin (lesser tuberosity fin) the the lateral (dorsal) fins as shown. These will be the lesser tuberosity (LT) sutures.
If you are not using different colored sutures, you may with to use # 2 sutures for GT and LT sutures so that you don't get them mixed up with the ATW suture.
Clamp off our suture ends so that they don't come undone during impacting of the prosthesis. |
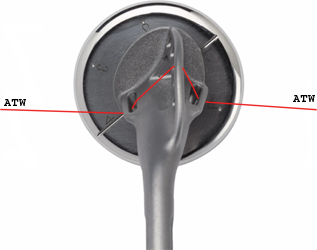
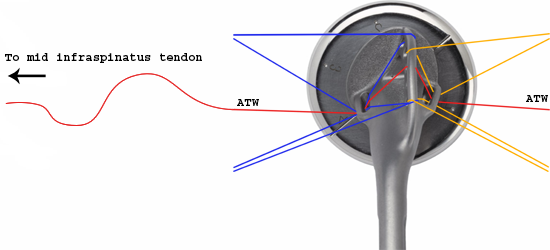
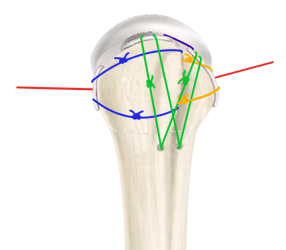
Note: The surgeon may wish to pass the "Around-The-World" and/or the Great Tuberosity "East-West" sutures through the infraspinatus prior to cementing of the prosthesis. If you decide on prethreading your sutures through the posterior cuff, you will need to make sure you are using number 5 sutures since this is less likely to cut into the tuberosities than number 2 sutures.
Optional technique of prethreading fin sutures through posterior cuff tendon
Cementing
One and a half packets of Simplex cement is mixed with two grams of Vancomycin and loaded in a Caulk Gun with a narrow applicator.
The vag pac is removed from the shaft and the canal receives its final suctioning.
The humeral canal is cemented from the bottom of the shaft so that the pressurized cement forces the cement applicator out of the hole. Excessive cement is removed.
|
Ensure that the prosthesis is positioned at 30° of retroversion. |
Excessive cement is removed with a Joker and/or periosteal freer. Check the version again and wait for the cement to harden.
After the cement becomes hard, the shoulder should be inspected and extra cement removed.
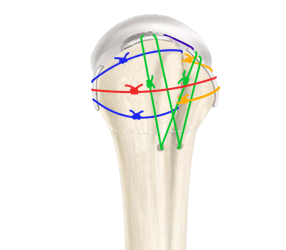
Placement of Ties
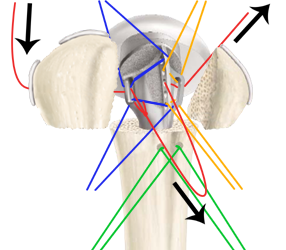
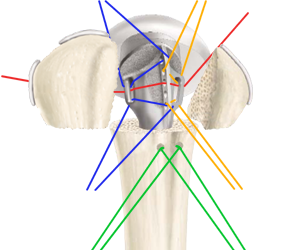
 All ties should be passed through their respective paths and clamped off
prior to tying. This does not need to be done sequentially. All ties should be passed through their respective paths and clamped off
prior to tying. This does not need to be done sequentially. |
 If
you are using uni-color sutures, you should have 1 number five and 4 number two sutures threaded
through the
prosthesis and 2 number 5 sutures through the holes made in the humerus. If
you are using uni-color sutures, you should have 1 number five and 4 number two sutures threaded
through the
prosthesis and 2 number 5 sutures through the holes made in the humerus.
Note: Number five suture is less likely to cut into the tuberosities than number two sutures. Because of this, you will want all sutures used for the final ties to be number five in size. |
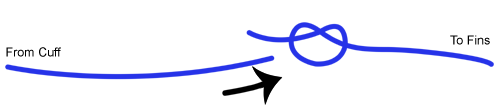
If you did not run the posterior end of the "Around-The-World" suture through the middle of the infraspinatus, you will need to set this up now. Either pass a number 5 Tevdex through the middle of the infraspinatus, or use one of your tag stitches as your tie. With the posterior free end of the "Around-The-World" suture, tie a half hitch around the deep end of your free number five suture.

Note: The knot created by this suture pulling technique may cause unnecessary damage to the cuff if the knot is pulled through the cuff. Because of this, the knot should be pulled through the prosthesis fins instead of the cuff when possible to avoid potential cuff damage.
 After you tie your pull suture around your cuff suture, carefully pull them through each fin, one at a time
so that the new number 5 cuff suture goes through the infraspinatus and all fins
of the prosthesis (as shown left). After you tie your pull suture around your cuff suture, carefully pull them through each fin, one at a time
so that the new number 5 cuff suture goes through the infraspinatus and all fins
of the prosthesis (as shown left). |
 Clamp off this suture. Clamp off this suture. |
If you did not pre-thread your Greater Tuberosity "East-West" through your infraspinatus tendon, you will need to do this now. Either pass two number 5 Tevdex sutures through the superior and inferior portions of the infraspinatus, or use your tag stitches for your ties. With the posterior free ends of the Greater Tuberosity "East-West" sutures, tie a half hitch around the deep end of your free number five sutures.
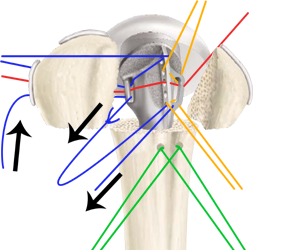 After you tie your pull sutures around your cuff sutures, carefully pull them through each fin, one at a time
so that the new number 5 cuff sutures wrap around the infraspinatus, posterior
fin and lateral dorsal fins of the prosthesis (as shown left). After you tie your pull sutures around your cuff sutures, carefully pull them through each fin, one at a time
so that the new number 5 cuff sutures wrap around the infraspinatus, posterior
fin and lateral dorsal fins of the prosthesis (as shown left). |
 Clamp off these sutures. Clamp off these sutures. |
Either pass two number 5 Tevdex sutures through the superior and inferior portions of the subscapularis, or use your tag stitches for your ties. With the anterior free ends of the Lesser Tuberosity "East-West" sutures, tie a half hitch around the deep end of your free number five cuff sutures.

 After
you tie your pull sutures around your cuff sutures, carefully pull them
through each fin, one at a time so that the new number 5 cuff sutures
wrap around the subscapularis, anterior fin and lateral dorsal fins of
the prosthesis (as shown left). After
you tie your pull sutures around your cuff sutures, carefully pull them
through each fin, one at a time so that the new number 5 cuff sutures
wrap around the subscapularis, anterior fin and lateral dorsal fins of
the prosthesis (as shown left). |
 Clamp
off these sutures. Clamp
off these sutures. |
 Pass the anterior "Around-The-World" suture through the middle of the
subscapularis. If is it not easy to pass on its own, use a tag stitch or
pass a number 2 Tevdex suture through the subscapularis and use this to pull
the anterior free end of the "Around-The-World" suture through the
subscapularis tendon. Clamp the free
ends of this suture together. Pass the anterior "Around-The-World" suture through the middle of the
subscapularis. If is it not easy to pass on its own, use a tag stitch or
pass a number 2 Tevdex suture through the subscapularis and use this to pull
the anterior free end of the "Around-The-World" suture through the
subscapularis tendon. Clamp the free
ends of this suture together. |
 Run the "North-South" sutures through their respective suprspinatus and
superior subscapularis tendons. Clamp them off. Run the "North-South" sutures through their respective suprspinatus and
superior subscapularis tendons. Clamp them off. |
 Run a separate number 5 Tevdex through the anterior supraspinatus and
superior subscapularis so that the free ends exit the inner surface of the cuff
muscles (as show below). This is your Rotator Interval tie and you will
later want your knot to be on the undersurface of the tendons. Clamp it
off. Run a separate number 5 Tevdex through the anterior supraspinatus and
superior subscapularis so that the free ends exit the inner surface of the cuff
muscles (as show below). This is your Rotator Interval tie and you will
later want your knot to be on the undersurface of the tendons. Clamp it
off. |
Make sure that you have all of your sutures set up and prepare to tie.
Tying
After you have double checked that all sutures are set up correctly, it is time to start tying. This must be done sequentially to achieve the best fixations of the tuberosities around and through the prosthesis.
 Fist tie down down the superior GT
"East-West" horizontal tie. Fist tie down down the superior GT
"East-West" horizontal tie. |
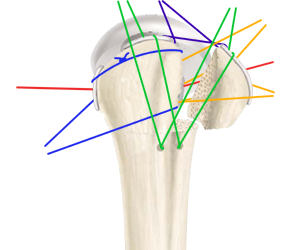
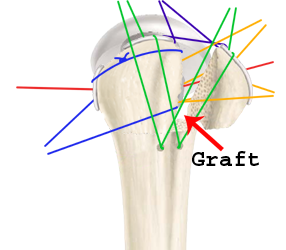 Then pack the space between the greater tuberosity and prosthesis full of bone graft. Then pack the space between the greater tuberosity and prosthesis full of bone graft. |
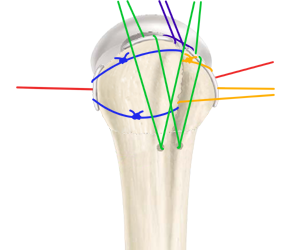
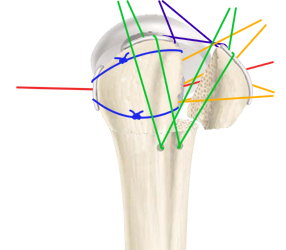 Tie down the inferior GT "East-West" horizontal tie. Tie down the inferior GT "East-West" horizontal tie. |
 Fist
tie down down the superior LT "East-West" horizontal tie. Fist
tie down down the superior LT "East-West" horizontal tie. |
 Then pack the space between the lesser tuberosity and prosthesis full of bone
graft. Make sure you have a good amount of graft in the opening between
the dorsal fin and body of the prosthesis. Then pack the space between the lesser tuberosity and prosthesis full of bone
graft. Make sure you have a good amount of graft in the opening between
the dorsal fin and body of the prosthesis. |
 Tie down the inferior LT "East-West" horizontal tie. Tie down the inferior LT "East-West" horizontal tie. |
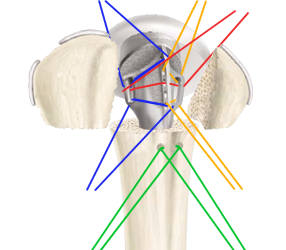
 Tie down the GT
"North-South" and LT "North-South" vertical ties. Tie down the GT
"North-South" and LT "North-South" vertical ties. |
 Then tie down the rotator cuff interval tie, ensuring that the knot is buried
under the cuff. Placing the knot on top of the cuff can create an
irrigating lump and a source of future problems. Then tie down the rotator cuff interval tie, ensuring that the knot is buried
under the cuff. Placing the knot on top of the cuff can create an
irrigating lump and a source of future problems. |
 Tie down the "Around-The-World" tie. Tie down the "Around-The-World" tie. |
Use bone graft to fill in any open spaces as needed and add additional ties as needed. Knots should be buried if possible and the outer surface of the humeral head should be free of significant protrusions if possible.
Closing
Close the delta-pectoral interval loosely. Emplace a drain over deltoid and exit skin a good 7.5cm or more away from incision site. Use staples to close the wound.
Postop
If iodine was used to prep the patient, this should be removed with alcohol immediately after dressing the incision site.
No CPM
Place Pt in sling
For PT - Axillary care and hand to mouth exercises.
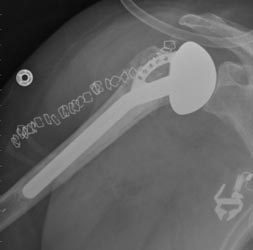
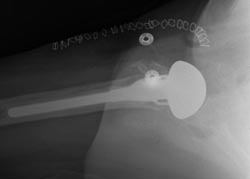
2 view Xrays immediately post op - AP Grashey and Axillary
 The primary surgeon will mark the coracoid and a line from the coracoid down
the deltopectoral interval. This interval can and should be palpated
prior to marking.
The primary surgeon will mark the coracoid and a line from the coracoid down
the deltopectoral interval. This interval can and should be palpated
prior to marking.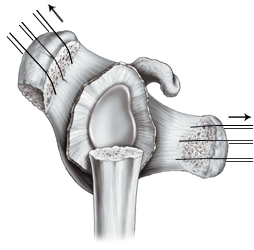 Use three number 2 Tevdeks to tag the greater tuberosity and three #2
Ticrons for the lesser tuberosity. These will be used to retract the larger bone fragments to allow for better exposure to the glenoid and shaft. Later, these can be used to pass suture or be passed through the prosthesis for tuberosity tie down.
Use three number 2 Tevdeks to tag the greater tuberosity and three #2
Ticrons for the lesser tuberosity. These will be used to retract the larger bone fragments to allow for better exposure to the glenoid and shaft. Later, these can be used to pass suture or be passed through the prosthesis for tuberosity tie down.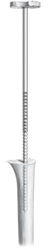 You may need to start with the smallest reamer and work your way up.
The shaft should not be overreamed.
You may need to start with the smallest reamer and work your way up.
The shaft should not be overreamed.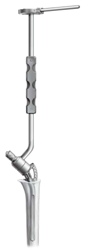 Use the impactor tool shown below to help position and drive the trial into
the humeral canal as needed. You will want to position the prosthesis at
30° of retroversion.
Use the impactor tool shown below to help position and drive the trial into
the humeral canal as needed. You will want to position the prosthesis at
30° of retroversion.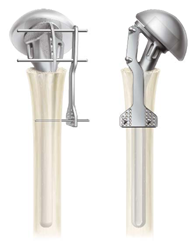 If
the trial reduction tool is used, it should be
centered on the shaft and K-wires are used to hold this in place.
If
the trial reduction tool is used, it should be
centered on the shaft and K-wires are used to hold this in place.