Structural Informatics Group, Department of Biological Structure
Division of Biomedical and Health Informatics,
Department of Medical Education
University of Washington School of Medicine
lober@u.washington.edu
supported by NLM fellowship F38 LM00086
So, what are annotated images, and why would anybody want to serve them? Please Read On...
PAIS is the Personal Annotated Image Server. PAIS, I hope, offers an easy way to add comments to your images, and publish those commented images over the web. It is aimed at medical educators, but the principles are generally applicable to anyone with images.
More precisely, PAIS is a simple system for creating a series of annotated images, in a linked image collection, and making them viewable over the web.
By "annotated images", I mean that, using the PAIS authoring tool, an author can add information to an image. This annotation information is stored independently from the image data, and combined with the image data at display time, which allowing both the author and the user to control how it is viewed. By "linked image collection", I mean that, in addition to annotations, an author can create a navigation structure that will allow the user to easily move from image to image. Finally, by "viewable over the web", I mean that access to the images is through a simple HTML web page, which downloads the image viewing client software.
PAIS is also a research tool to let me experiment with different models of image annotation, as well as a development tool to track the development of the Image Markup Language (IML).
An "annotated image" is the combination of an "annotation file" and its associated image.
The annotation file contains a pointer (relative URL) to the image file, and is considered by PAIS to be the primary object (as opposed to the image being the primary object). These files are created using the authoring tool included with this system. A single image may be referenced by many annotation files.
Annotations are presently text comments pertaining to a region of an image.
The present annotation model is taken directly from that of the UW Digital Anatomist, and is completely compatible with its existing "Frame Format 2.0" annotation schema of those online, interactive atlases. The FF2 model has been implemented as an XML Data Type Definition document, defining the Image Markup Language 1.0 (IML 1.0).
The annotation metaphor is that of gross dissection, with a label connected by a string to a pin, which is stuck in some "structure" in the image. More specifically, each annotation consists of a text "label", a colored "string" connecting the label with a "pin" on the image, and an "outline" - a closed polygon "drawn" over some portion of the image.
Annotations may be either of type "STRUCT", which are regions tied to a text label, or "CONTROL", which are regions linked to another annotation file, similar to "hot" areas on an image map.
Image Markup Language (IML) is an XML syntax for expressing spatially referenced image annotations and other metadata. You can read more about it here.
The IML 1.0 model supports a single text string containing an image caption, and a series of individual image annotations referring to regions of the image.
Implemented in XML, the annotation files are just text files, marked up with a bunch of tag names contained within angle brackets. You can examine the format of these files with a text editor, though you might want to get a sense of what constitutes valid syntax before you greatly change them outside the comfort of the annotation editor.
The next IML revision will substantially extend the current annotation model to allow a richer expression of the annotation concept, and will be continue to be expressed as an XML schema At some point soon, I intend to switch from DTDs to the formal XML Schema syntax for the constraint document.
An image collection or atlas is simply a collection of annotation files and the images to which they refer. Since the file references are relative URLs, both images and annotations files may be arbitrarily organized.
To make an image collection browsable, you need only add a few files which comprise the image client, and put the whole folder in a location accessible by your web server of choice. No special server scripts or programs need to be installed.
The present client looks for an initial annotation file called "index.iml". Any other annotation files must be either directly or indirectly linked though "CONTROL" annotations to be reachable by the client. This restriction will also be relaxed in a subsequent version of the client.
There are two good ways to see PAIS in action.
You can look at the demo page for the IML1.0 version, and see a sample image collection (an anatomic atlas of the knee). If your browser does not have a Java 2 plug-in, you will be asked for permission to down load it from the Sun Microsystems site in either a fully automated (IE), semi-automated (Netscape on Windows), or manual (Netscape on Linux) fashion.
Second, you can download the image collection components yourself, and publish either a different sample collection, or build your own.
How do you do this?
Look at the PAIS Components section to see what components comprise a publishable image collection, and the Requrements section to make sure you've got the both the client and server requirements covered.. After the Download section, the Step-by-step section contains brief instructions for installing the components.
PAIS consists of a client components, test atlas components, and its authoring components, all of which are packaged together in a sample atlas download
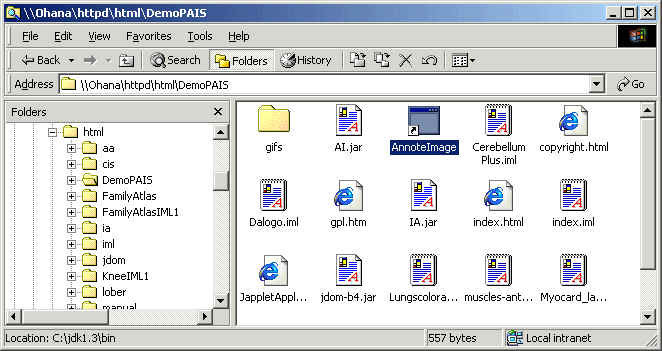
The server side consists of a directory or folder whose files are served by a standard web server. This directory contains the images and annotation files that comprise the published image collection, and at least the following five files:
index.html - a sample HTML home page for an atlas. This does nothing more than jump to the Japplet page.
JappletAppl.PlugIn1.3.html - a sample HTML home page for an atlas. This version was produced with Sun's HTML Converter 1.3, and based on a dynamic check of browser versions, tries to offer a download of the Swing Plug-In, if needed.
IA.jar - a java archive file containing the client viewer applet.
jdom-b4.jar and xerxes.jar - XML support files
DemoPAIS.IML1.zip - contains a simple set of test images and annotations, as well as the executable versions of the client and authoring tools. See "Getting Started", below.
You can view the test image collection online here, if you want to know what it should look like.
The authoring side consists of a Java 2 environment, which you download from Sun, and the following four files. The XML support files are also used by the Client.
AI.jar - a java archive file containing the authoring application.
jdom-b4.jar and xerxes.jar - XML support files
AnnoteImage - a shortcut containing the command line "java -cp AI.jar;jdom-b4.jar;xerxes.jar AnnoteImage".
You'll need to have Java 2 installed for the authoring tool to work. See the requirements.
This section walks you through the requirements for each component, how and what to download, and a step-by-step approach to getting things set up.
The basic requirements for the server, client, and authoring tool are fairly straightforward. Since the client does the work of dynamically rendering the image and its annotations, the load on the server is quite small.
To serve the images, you need only a computer with a standard web server. There are no special language support or scripting requirements for the server. So far, the sample atlas has been tested on Microsoft personal Web server, Microsoft IIS, and the Apache server under Linux. Works fine. The served folders or directories do, however, have to be browsable.
To view the annotated images, you need a client computer with a web browser which either includes Swing for Java, or which can use a Swing Plug-in. Windows is supported with at least IE 5 and Netscape 4.7, I'm pretty sure Netscape 4.5 and IE 4 will work, and maybe earlier versions too. (But, you really should upgrade your browser!) The details of how the plug-in works are to be found on the Sun Java Plug-In page.
The plug-in will load automatically (after obtaining permission) with Internet Explorer and somewhat automatically with Netscape on Windows.
For the authoring code to work, you will need to have Sun's Java Software Development Kit (SDK) or Java Runtime Environment (JRE) installed on your computer. Java 1.1 will work, but you might as well install Java 2. You can find them, and a whole lot of other Java stuff, here for Windows, Solaris, and Linux. I'll get around to posting Mac and Linux instructions soon, I hope.
Let me know if you have problems with this. I have started working on an installer version for Windows, but it is lower on my list than features at the present. If no one can figure out how to run this stuff, that will change. Please let me know.
NOTE: Remember, both source and sample atlas (executables) are about to be replaced with new versions!!! (see note at top of page) Download at your own risk!
The holy grail - tucked away in the middle of the page. Hope there were enough links to get you here easily! This is where you can download a sample atlas, bundled with the client applet and authoring application. (download sample atlas with executables 930 Kbytes).
It is also where you can download the client applet source code (Java 2 - 36 Kbytes) and the authoring application source code (Java 1.1 - 92 Kbytes).
You might want to print a copy of the Slice of Life 2000 conference poster, which has an overview of the steps to create an annotated image collection.
Download the sample atlas. Unzip it. Move the entire folder where your web server expects to see it (C:\Inetpub\wwwroot under Windows 2000 Professional, for example). Access it from your browser by a url like http://yourserver.edu/DemoIML1.
You should be asked about downloading the Java 1.3 Plug-In, and then you should see the client run with a trial image collection of 5 images.
You can view the same test image collection online here, if you want to know what it should look like.
If so, you're all set to make an image collection of your own. Make a copy of the DemoPAIS folder called, for instance MyImages, also located where the web server can see it.
If you don't already have Java, go to http://java.sun.com/j2se, and download either the Java 1.3 standard edition or runtime environment.. Install it.
Go back to your MyImages folder. You should be able to start the annotation tool by clicking on the AnnoteImage shortcut.
Now close the application, and drag some GIF or JPEG images of your choosing into the folder. Open the AnnoteImage application again, and create annotations as you desire. Look to the existing annotations for examples. As with all early release authors, I promise a tutorial will be coming soon...
- If this all looks like Greek to you, and you really want to get an image collection going, show it to a web administrator at your site - it really should not be too hard to get running. If it is, let me know and I'll figure out why.
I don't mean to keep putting off the tutorial, but I wanted to do a good job. Instead, maybe I better just start writing some stuff, and let it evolve into better shape later!
These notes pertain to the authoring tool AnnoteImage IML1(9), and the client tool ImageApplet IML1 (11).
Introduction/Overview
Overall, the best way to create new content is to start with an existing, working image collection. Getting the sample image collection working over the Web is a good starting point. As described elsewhere in this document, download the DemoPAIS sample folder, and rename it to something like MyImages. Put that folder in allocation where your Web browser can serve it and test the Web browser and client by accessing the site with a URL like http://myhost/MyImages
Pitfall: The directory of the Web folder must be browsable through the Web server.
Now you should ensure that the authoring tool works. If you install the Java 1.3 software development set into its default location (C:\jdk 1.3), you should have no trouble. Just click on the AnnoteImage.lnk shortcut in the your image collection folder.
Pitfall: The path to the Java run-time software is hardcoded into that AnnoteImage shortcut. Right click on the shortcut and examine its properties if you need to change the location of the Java interpreter.
Creating Content
The process of creating content for your image collection consists of identifying images, collecting them in the image collection folder, and then creating annotation files (".iml" files) using the AnnoteImage authoring tool. The annotation model was described above, but essentially consists of labeled regions on the image, which are generally may be linked to other annotated images in the same collection.
Drag some GIF or JPEG images of your choosing into the folder.
Both the authoring and client tools handle the image types which Java automatically handles. That circular sounding statement means that neither the authoring nor the client software knows anything about image types, but instead just issue requests to the Java library routines to load files of a given name.
Pitfall: One user reported problems with certain GIF files. I could not repeat those problems, however I am not sure how robust than Java routines are.
Start with an image
Start the authoring tool by double clicking on the AnnoteImage shortcut:
You should first see a black Java console window, followed by the AnnoteImage window shown in the background of the next image.
Create the annotation file
To create a new iml file, select Create New Annotation File from the File menu. Makes sense, no?
The next step is to link a particular image to the annotation file you are about to create. You may wish to change the name of your file to something more descriptive than NEW ANNOTATION.iml. I often give the annotation file the same name as the image it annotates. However, a particular image file may be referred to by many different annotation files.
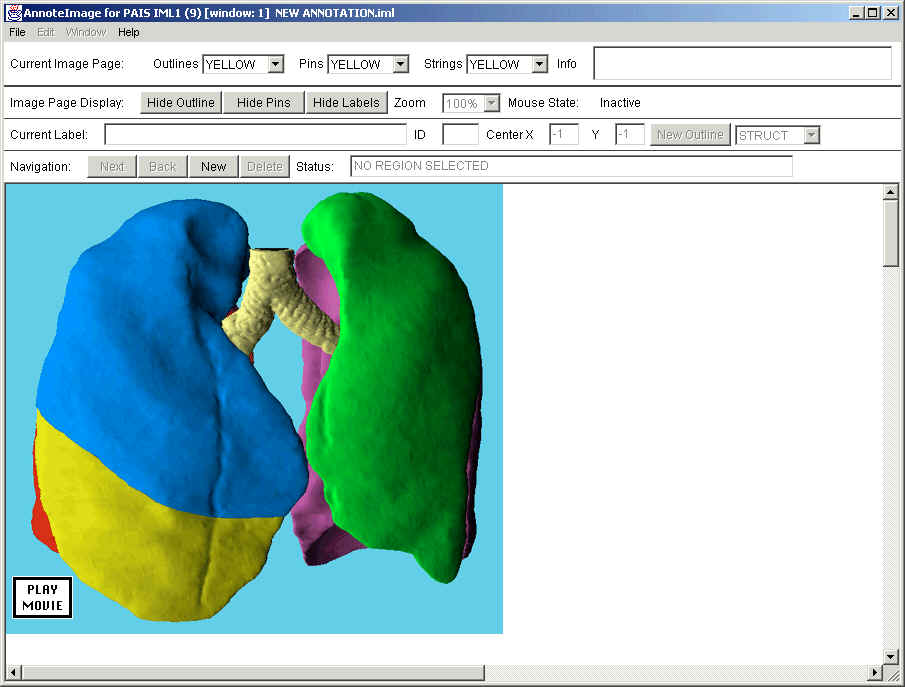
The next step is to link a particular image to the annotation file you just created. You have to do this before you can continue, on the grounds that an annotation file not linked to an image doesn't make very much sense. The following dialog box will come up automatically when you click Save on the Create New Annotation File box. Select the name of an image file and then click Open. You may put the files directly in the image collection folder, or you may put them in a subfolder such as "gifs" in this example.
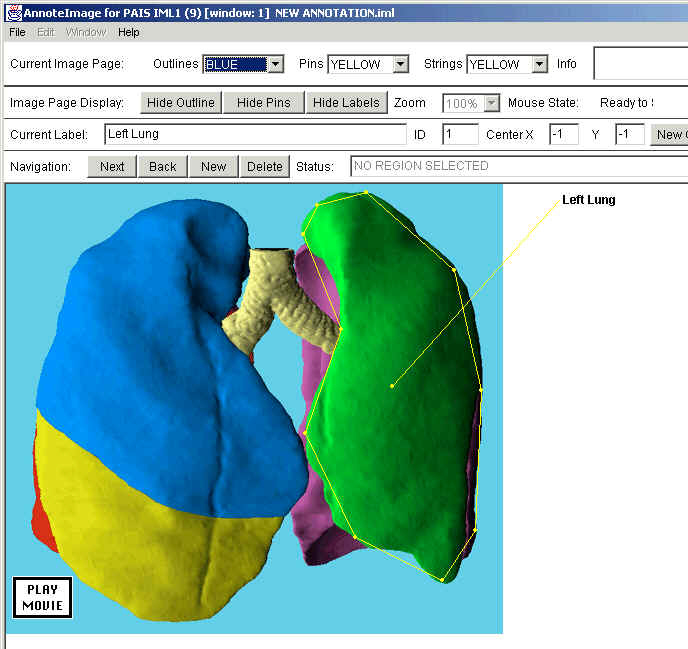
I have selected a picture of the lungs. The image is loaded, though no annotations are present. Ignore the little "Play movie" tagged in the lower left corner, this was just an image I have lying around.
Add an annotation
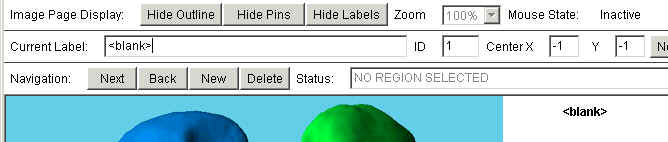
To add an annotation, you may select the New button from the navigation toolbar. This will create a blank invitation, with the word <blank> in the current label field.
The ID field may be ignored as it is both generated automatically by the authoring tool and ignored by the client. Select the word blank and type a label for this annotation. The next step is to create an outline for the annotation. Do this by first clicking on the New Outline button and then moving the mouse over the image. You may look at the mouse state field on the image page display toolbar to get some feedback that you are indeed ready to create an outline.
To draw an outline simply click the mouse in locations where you want the vertices of the outline to be. Each click will add a vertex, as long as the mouse is pressed and released in the same location. Adding a vertex will also add and automatically located centerpoint, and a line to the label. Don't worry about these four right now, but keep on clicking until you create a series of vertices which roughly approximate your region outline. It will be easy to add points, as well as to move the vertex points, in a few moments. When you have a reasonable outline defined, and I usually use somewhere between five and 10 points in this initial step, then double-click the mouse to close the polygon. You should see the mouse state change to "ready to select".
Note that you can change the color of the outline, the center pin, and the string to the label in the top toolbar. The currently selected outline will be highlighted in its inverse color, e.g. yellow for blue, etc., so don't be too surprised if your first outline does not appear colored the way you would expect. Once you have several outlines on the image, this will all become more obvious. Here is a rough outline drawn:
By clicking a vertex, you select it, and can drag it into a new position.
By clicking along a line segment, you can add an additional vertex. You must release the mouse in order to click the new vertex again, select it, and drag it.
By a right clicking a vertex, you should see a pop-up menu which allows you to select Delete Point, to delete a vertex.
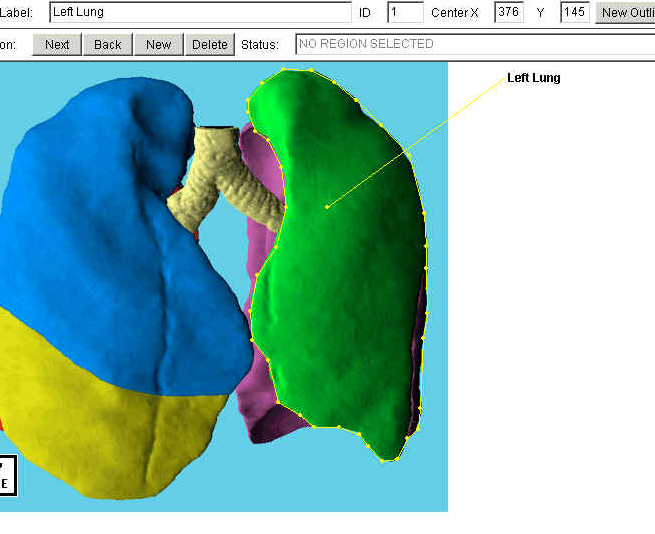
These 3 principles allow you to dynamically improve the registration of your outline by adding points and refining their locations. (These dynamic actions and pop-ups cannot be easily screen captured, so you'll just have to try out!). In the picture below, the tracing of the left lung has been somewhat improved, and the centerpoint has been moved by selecting it and dragging it.
Pitfall: The present algorithm for vertex addition does not work well on vertical or horizontal segments. In addition, the algorithm for vertex detection tends to create problems with short segments. You will discover your own workarounds, however what I often to it is drag problem vertex out of the way to create a longer segment, and then create new points on that segment and slide them into the proper location. Anyway, these problems will decrease as I improve the algorithms. In addition, I do some crude optimization to improve screen redraws so the segments may not be accurately drawn well for tax is being dragged, particularly segments outside of an area fairly close to the vertex. As soon as you release the mouse, the annotations are already drawn from scratch, and all artifacts of the dragging process will disappear.
Edit an annotation
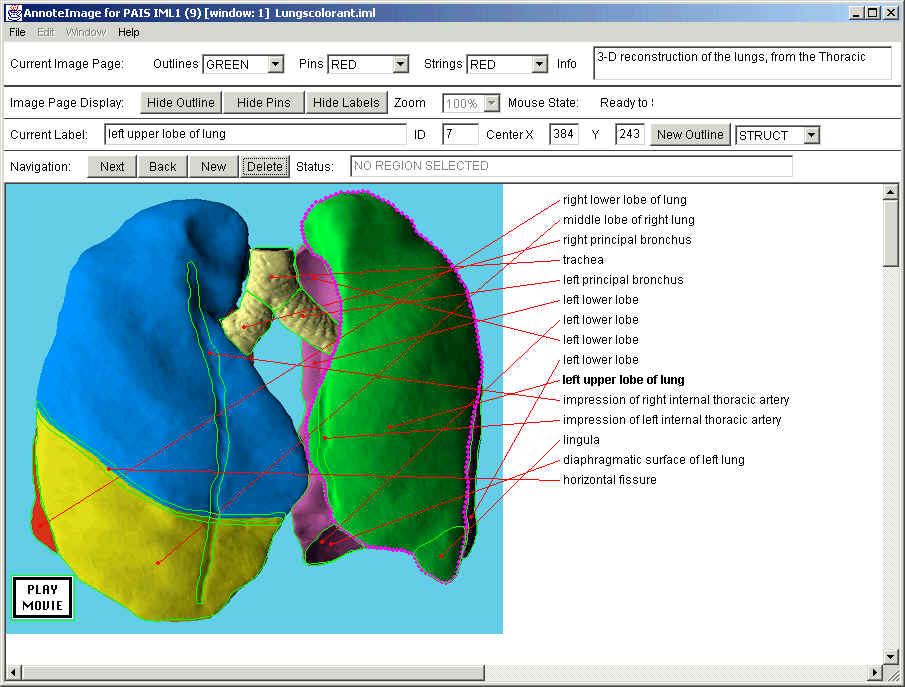
To edit and annotation, you make use of the navigation bar. The example below shows a much richer annotation of the left lung, with one of the annotations selected. That selection can be made by either clicking this centerpoint of the annotation, or by using the next and back buttons on the navigation bar to scroll through the list of annotations. With either technique, the label will be boldfaced, the vertices will be visible, and the outline color will be inverted, for the currently selected annotation.
The currently selected annotation may be deleted with the Delete button on the navigation bar, or it may be edited by typing a new label into the label field, clicking new outline, or deleting or dragging vertices as described above. In addition setting the X and Y coordinates of the centerpoint to -1, -1 in the Current toolbar, will delete the centerpoint, whether automatically generated or manually placed.
Create a link to another annotated image
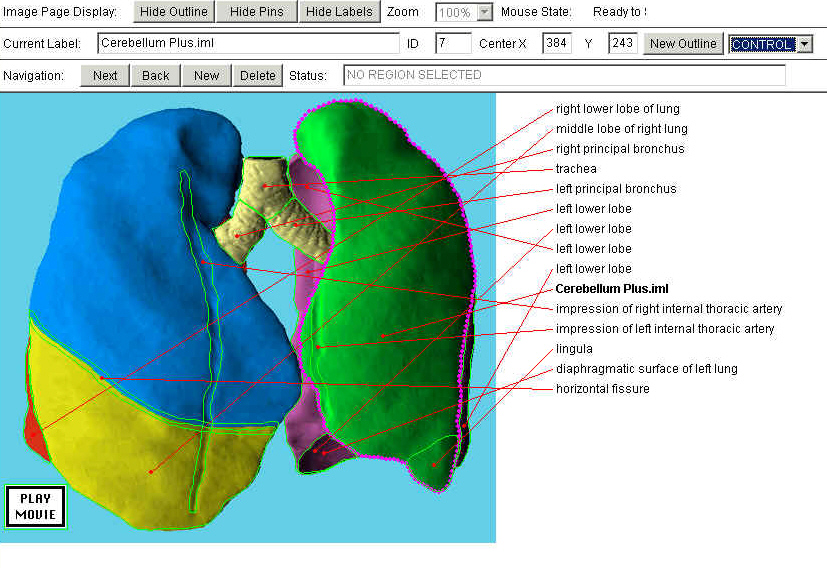
This is where the annotation type listbox is helpful. Under the current annotation model there are essentially two types of annotation. Those of type STRUCT are "plain" annotations, whose labels are simple descriptive text labels. Those of type CONTROL are links, and the label field is used to store the relative path to a new iml file. Interpretation of this relationship is performed by the client. The image applet IML1 (11) client will display links in a different color then labels, and when a mouse click is detected inside and outline which is part of a CONTROL annotation, the new iml file is read and processed, serving to link images.
This example does not really contain useful linked images, however I have created a link from what used to be labeled as the left upper lobe of the lung to an iml file of the cerebellum.
Save an annotation file
If you have made changes to and annotation file, you will be automatically prompted to save it. If you would rather do this explicitly, there are the usual commands under the File menu.
Editing an existing annotation file
As you might expect, Open Annotation File under the File menu opens an existing iml file for editing.
Now. Functional development versions of the authoring application and client image viewing applet are available here. They will get much better, I promise! Both executable (jar files and sample image collection folder) and source downloads are available
Of course there's a mailing list for PAIS. You can sign yourself up here: http://ohana.org/mailman/listinfo/pais. Don't worry, its an extremely low volume list!
See the content frame at the left, near the top.
Release Date Description 8/2000 IML1b (this page) Authoring version IML1 (9) with substantial changes in creating and editing outlines (see tutorial), Client version IML1 (11), intial tutorial on editing. 7/2000 IML1a minor updates to software, big updates to web pages - version shown at Slice of Life/CHES conference, Salt Lake City, June 28, 2000. 6/2000 0.9beta, uses Image Markup Language 1.0,
which I've submitted to the XML.org registry.5/2000 0.7beta, still "IA7" client code, but updates to home page. 3/2000
Original PAIS, using Digital Anatomist Frame Format
The images in the test image collection are copyrighted, as noted above and in the collection itself. The code is available under the GNU public license (GPL). For more information, see: the GNU Project. The code was developed while I was pursuing a fellowship funded by the National Library of Medicine, and while I was employed by the University of Washington. Those two entities may or may not have policies which are either more or less restrictive than the GPL, and those policies may or may not apply to this code. I'll try to find out.
is welcomed. Please contact me either at lober@u.washington.edu, or via the mailing list.
Hope you find this useful,
Bill