CS 161 Lab K - Project Design
Due Fri Apr 24 at noon
Overview
Developing new computer programs (like your final project) from scratch is a sizable endeavor. Not in the least because there are so many moving parts to keep track of: all the different variables, methods, and classes that have to work together. How we organize all the different parts is the design of the program, and is challenging in its own right. So before you dive in and start writing code, it's a good idea to think through the design and plan out what you will be doing and how it will be organized.
For this "lab" you will be doing that design planning--you will be figuring out exactly what your program is going to do and how you will organize it. This plan will give you a place to begin when you actually start writing code, as well as a sense for what components you'll need and where they will go.
You will be documenting this planning in a "design proposal"-- a written document explaining what you are going to do and how you propose to do it. Your proposal will describe what your project is, how the user will interact with your project, what classes your program will contain, and a timeline for how you plan to complete your project.
This lab will be completed with your project partner, or individually if you don't have a partner. If your partner is in a different lab section, you'll end up doing this one on your own and having two different designs. That's okay--multiple ideas is a good thing! (Though you'll need to pick one in the end).
Objectives
- To practice thinking about the interface and interaction of a computer program
- To practice designing multiple interactive classes
- To get started on the final project
Necessary Files
There is no BlueJ project to download for this lab, since you won't be doing any programming! However, you will need to download the Project Design Template. This is a Word document that will organize the different parts of your design proposal. The lab will involve completing this document.
Part 0: The Project Description
With any document about a project, the first thing you should do is describe the project.
- Under Project Title in the Word document, start by giving your project a name (e.g., "Hangman Game"). This is useful for talking about it with other people (like your professor)!
-
Under Project Description in the Word document, include a short paragraph (a few sentences) describing your project. Your description should explain your project to someone who might be encountering your program for the first time (e.g, if you wanted to explain what you are working on to one of your other professors).
- Yes, this could be very similar to the email you sent me pitching your project, though will most likely have a few more details.
- Note that writing this description is a really good time to make sure you're clear about what you're trying to do. What is the goal of your project? What "problem" are you solving?
Part 1: The User Interface
While the code for how a program works is what we ultimately end up spending our time on, the code isn't really the important part of a program. What is important is how the user uses the program--how the program helps someone do something. Thus the important part of the a program is its user interface. For this step, you will be creating a "mockup" of the user interface--an "mock" (or pretend) picture of the interface that shows what your program might look like and explaining how your program will be used.
- A good first step is to actually think about your interface! What will you be showing? What buttons will they have? Where might they go?
-
Under User Interface in the Word document, you should provide a visual mockup (a picture) of what your program might look like when finished. This does not need to be "pixel-perfect"--it can just be a sketch. However, it needs to include enough detail so that:
- (A) It is clear what interactive components your program has (e.g., what buttons and what they do), and
- (B) It is clear how graphical elements will be organized (e.g., where the buttons go)
Basically, your task is to create a picture of your program so you know what you're working towards!
-
There are a couple of different ways to go about making this mockup:
-
You can draw a sketch of your program using pencil and paper. This is fast and easy, and is acceptable for this assignment.
- Put some care into you drawing! Make sure you can read the button text, and think for a moment about how things will be sized and organized. You may want to go through different drafts.
- Take a picture of your drawing using your phone and email it to yourself in order to easily "scan" the image, to put it inside your Word document.
-
For more component-based application (with lots of buttons), you might find it useful to use a program dedicated to making "mock-ups". Online systems such as
Frame Box
or
mockingbird
make it easy to create and position buttons and other elements within a frame.
- Frame Box is very simple to use and has most of the elements you may want to put in your interface. mockingbird is more focused on designing websites, but produces nicer looking mockups (in my opinion).
-
You can "save" your work by taking a screenshot of your drawing to paste inside your design Word document:
- In Windows 7 you can use the Snipping tool found in Start > All Programs > Accessories > Snipping Tool; in older version of Windows you can take a screenshot of your entire desktop by hitting the Print Screen button (hit Alt+PrintScreen to only capture the current window) and then pasting the result into a Word document.
- On a Mac, you can take a screenshot by hitting Cmd+Shift+4 and then selecting the area you want to capture (or hit spacebar to select a single window). The screenshot is saved to your Desktop.
- If you need help with these programs, let me know! That's part of why we're doing this during lab :)
- If your program is mostly graphical (like a Pong game) and so doesn't have any buttons, you can sketch what your program looks like using Paint or Photoshop. You can also find an example picture online to use as a starting point.
- You can also mix-and-match tools. Maybe you use a mockup system to lay out the buttons, and then load that into paint to draw what might be displayed!
-
You can draw a sketch of your program using pencil and paper. This is fast and easy, and is acceptable for this assignment.
-
As you are creating this mockup, think about how you might use
JPanelcontainers andLayoutManagersto organize the different components. Can you think about placing buttons in theCENTER,NORTH,EAST, etc. of aBorderLayout? - Once you have created your drawing, be sure and insert it into the design Word document in the spot indicated.
-
Finally, underneath your image in the Word document, give a short description of the interaction sequence--that is, what are the steps that a user is expected to perform, and especially how the interface will respond. For example, you might describe the
HangmanGamewith:1. The player presses one of the letter buttons. 2. If the letter is correct, the program pops up a window that says "That letter is correct!" and the drawn word shows the letter in the right place 3. If the letter is not correct, a popup says "That letter is no correct!" and a new part of the hangedman is drawn 4. When the player wins or loses, the game pops up "You win!" or "Game over!"
This does not need to be super detailed or precise, but should be enough to explain what the program will do (which is often not clear from a drawing)! You'll want to address points like:
- How does the user interact with the program (especially if there are no buttons)?
- What kinds of changes will occur to the interface (especially if there is a drawing)?
Part 2: The Classes
Now that you've thought through what your program is going do to, it's time to begin thinking about how you'll make it do that! For this part of the lab you'll be create.
But rather than just start coding, you should plan out the high level (e.g., class) organization of your program. This will let you start thinking about what kinds of variables and methods you will need and how those might fit together. Then you'll just need to work on filling in each piece, letting you focus on a single problem at a time to avoid getting overwhelmed or over-thinking the process.
To perform this planning, you will be creating a class diagram which summarizes the classes your program will contain.
- Start by brainstorming what classes your program will have. Maybe jot them down on a piece of scratch paper.
-
Under Class Design in your Word document, add a class diagrams for each of the classes in your program. A class diagram has three parts, as in the below example:
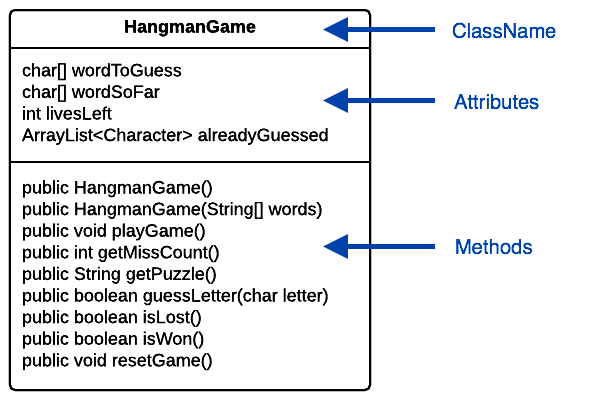
- In the top box write the name of your class. Name classes as nouns that describe what they are/do!
-
In the center box list the attributes (instance variables) of your class. Be careful to give them sensible, descriptive names (so that you can remember what they do later), and think carefully about their type.
-
You'll of course make all instance variables
privateso you can leave that off of your diagram (though you can include it if you like)
-
You'll of course make all instance variables
-
In the bottom box list the methods of your class. Name methods appropriately (e.g., after verbs), so you can remember what you were doing later. Think carefully about the parameters (inputs) and return types (output) of each method.
- It's not a bad idea to include constructors if they will take unusual parameters
- You can include "comments" or other notes in your diagram if needed!
- Note that it is perfectly find to change your classes, attributes, and methods later! This is just a "first pass" at your program's design--a way for you to get started thinking about what your classes will need to look like.
-
Again, you'll need to to do this for each class in your program. (I've included 3 boxes since you need to have at least 3 classes, though you can make more boxes if needed). This means you'll need to think through what those classes will be! You'll need to think about how they might interact (e.g., what methods to give to each one).
- It should be pretty clear how the classes are connected--e.g., which classes have instances of the others as attributes, or which methods take in other class objects as parameters.
-
Nevertheless, you should also include a few sentences explaining how your classes will work together. You'll want to address points like:
- What does each class represent?
- Which classes communicate with each other? How are you using good coupling and cohesion?
- Fun fact: class diagrams are commonly used formal diagrams for explaining class interaction. You'll learn more about these in CS240 Software Engineering; we're just doing a simplified version of them here.
Part 3: The Timeline
The last part of a design document is a proposal for how you'll be able to complete the design within the alloted time: how you will schedule the development. For this project, the scheduling we care about is for the next two deliverables: the Alpha Demo and Beta Demo.
As stated in the project writeup, these demos will occur on Apr 30 and May 06 (respectively), and you should have 50% and 80% of the project done (respectively).
-
Under Development Schedule in your Word document, add a brief description of what functionality you intend to have completed for each demo. This can just be a couple of sentences, but should give me (the professor) a sense for whether you're making good progress.
- If you look at the sample projects in the project writeup, you can see some examples of good development targets. You are welcome to use these directly if you are implementing one of those projects!
- These development targets are important. I will expect you to have reached these milestones by each demo, and not reaching them will lead to a poorer grade (in the "Deliverables & Logistics" category).
- And that's it! Make sure your name(s) are on the Word document and submit it to Moodle (like with any other lab).
Part N: Next Steps
Once you have your design document written, you can get started on programming (and you should if you have more time in lab!)
- Your class diagrams should translate directly to instance variables and method signatures for your program--fill in this skeleton first. Then you can begin adding the implementation details for each method
- Your mockup should let you know how to begin organizing your GUI. Try creating a basic GUI class (e.g., with a
JFrame) and adding buttons and other components in order to produce a non-interactive version of your program. Once you have that, you can begin hooking up all the pieces to logical methods. - You may have come across other questions about designing your program, solving problem, using new Java functions, etc. Be sure and ask (either during lab or soon after) if you need help.
Submitting
- Make sure your name(s) are on your Word document in the designated spot. If your names aren't on your assignment, I can't give you credit!
- You only need to submit the Word document, so there is nothing to compress!
-
Navigate to the course on Moodle
(Lecture Section A),
(Lecture Section B).
Upload your
.docxWord file to theLab K Submissionpage. Remember to click "Save Changes"! You may submit as often as you'd like before the deadline; we will grade the most recent copy. - There is no partner evaluation to fill out for this lab (but let me know if there are any issues).
Grading
This assignment will be graded out of 17 points.
- Project Description (2pt)
- [1pt] You have given your project a title
- [1pt] You have included a short description of the project
- Interface Design (6pt)
- [1pt] You have included a graphical mock-up of your program
- [1pt] Your mockup clearly indicates what interactive components your program has
- [1pt] Your mockup clearly indicates how your graphical elements will be organized
- [1pt] You have included a description of the interaction sequence
- [2pt] Your interaction description explains the interface sufficiently
- Class Design (7pt)
- [3pt] You have included class diagrams for each of your classes
- [1pt] Your class diagrams are properly formatted
- [1pt] Your diagrammed attributes and methods are properly named
- [2pt] You have included sufficient description explaining your classes
- Timeline (2pt)
- [2pt] You have described suitable development targets for the alpha and beta demo