CS 315 Homework 6 - Under a Street Lamp (Part 2)
Due Tues Nov 11 at 11:59pm
Overview
This assignment is a continuation of the last, as you will add further details to your street lamp scene. In particular, you will add textured objects and utilized advanced texturing techniques--specifically, shadow mapping.
You will be adding the following components to your rendered scene:
- A texture-mapped object that is lit by your street lamp. This can be the "ground" you established in the previous homework (e.g., to make it look like a street or cobblestones), or can be an entirely separate object. Or both!
- A texture-mapped object to act as the "background" for your scene.
-
Objects in your scene will cast shadows when lit by (only one of the sun or the lamp needs to produce shadows).
- This means that your objects will need to be positioned so that there are shadows--e.g., one object needs to block another's path to the light.
The first two of these tasks are fairly straight-forward, though see Part 1 for some details. The third task is much more involved, but I'll provide you with lots of guidance!
This assignment should be completed individually.
Objectives
- Be able to work with textures and texture mapping
- Be able to render a scene to an off-screen buffer ('render to texture')
- Be able to work with multiple shaders
- Be able to perform multi-pass rendering
- Use textures to apply shadow-mapping to your scene
Necessary Files
You will need to have a working copy of your previous homework (which should be complete). I recommend you take a short amount of time to "clean up" your code: refactor methods, make sure variables are named sensibly, etc. This will make it easier to modify your work!
You will need to download the
cs315-hwk6.zip file
which contains a updated pass.vert vertex shader (that will give you some support for texture and shadow mapping), as well as a shadow.frag fragment shader that you can use for doing shadow mapping. See below for details.
You will also probably want a copy of the lecture demo-code (for working with textures and buffers) on hand.
Assignment Details
Texturing Meshes
The easiest part of this assignment is to add texture to a model. Again, this can be the "ground" you established in the previous homework (e.g., to make it look like a street or cobblestones), or can be an entirely separate object. Or both!
-
In order to apply a texture, your meshes will need to have texture coordinates associated with each vertex for each face (these are the
vtentries in the.objfiles). Most models you download from the Internet will come with texture coordinates. If not (or if you want to texture a mesh you modeled yourself), you can use Blender to easily add in these coordinates:- Open up the mesh in Blender (either open your .blend file, or Import the .obj).
- Select your mesh (right click) and then hit tab to enter Edit Mode
- Hit u to bring up the "UV Mapping" menu--a list of options for applying UV mapping (texture mapping) to the mesh!
- You are given a few different options for how you want to generate UV mappings. See the blender documentation for details. If you're not sure what to pick, I recommend either Sphere Mapping for generally round objects, or Cube Mapping otherwise. Smart UV Mapping can also produce good results. You can always try different options and see what you like!
-
Finally, re-export your mesh as a
.objfile.- Be sure and check Include UVs (along with Write Normals and Triangulate Faces) in the export menu!
-
It's a good idea to double-check that you can load your updated
.objfile without anything going wrong in your scene!
-
You will then need to modify your
scene.jsfile to support texture mapping.-
You'll need to load the texture, create and bind the buffer, and generate your Mipmaps.
- Remember that texture sizes must be a power of two. You may need to resize any textures you want to use.
-
You can include a check to make sure that the textures are loaded before you render, just like we check that meshes are loaded. For example:
(you'll need to modify this when loading multiple textures!)
if(texture === undefined) {
  console.log("texture not yet loaded");
  requestAnimationFrame(render); //request another frame while we wait
  return;
}
- You'll need handles into the
shaderProgramto pass the texture and the texture coordinates into the shaders. I recommend you also include an additionaluniform1ithat will allow you to specify whether a particular mesh applies a texture. -
You'll need to modify the
drawMesh()method so that you pass in the texture to apply- I recommend giving the method additional parameters of which textures to use, if any
- You'll need to set the
gl.activeTexture()to the texture you want to render with, and to pass in which texture unit to sample! - Don't forget to pass in the texture coordinates as vertex attributes!
-
Finally, you'll need to modify your fragment shaders to use the texture as a source of reflectance values.
- Check if your uniform saying "isTextured" is true, and if so then you can sample the texture to determine the reflectance color.
-
Your textured model should continue to utilize the Phong Reflectance Model! The only different is that instead of getting the
ka, kd, ksfrom a material, you'll be getting them from the texture image!- It's fine to adjust these values: for example, you could assume that a textured mesh doesn't have a specular component. However, your textured mesh should be lit with ambient and directional light (so that it continues to be part of the scene!)
-
You'll need to load the texture, create and bind the buffer, and generate your Mipmaps.
-
Once you've got a single object textured under your lamp, you should add in a textured background object. This can just be a simple rectangle or cube, but with a picture of some kind mapped onto it. You could use a picture of a pleasant sky, or a city skyline, or whatever you want.
- This is basically how matte paintings are used in film!
- This will require you to load multiple textures into your program. You can set each texture to a different texture unit at the beginning of your program, and then simply specify which texture unit to use for each mesh!
- Your textured objects should look correctly lit during both the day AND the night! They should look like a normal part of the scene.
Adding Shadows
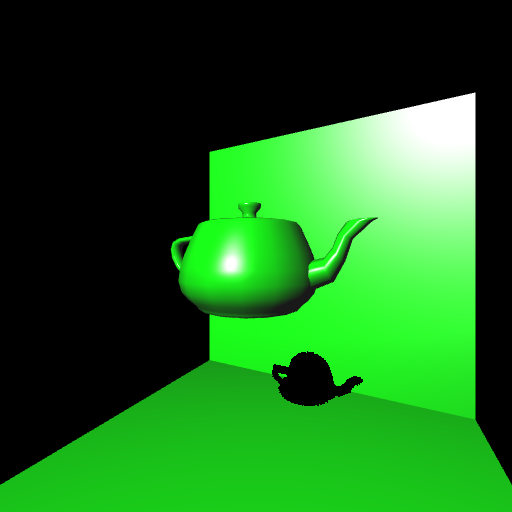
A demonstration of shadow mapping
The hard part of this assignment will be to add shadows. This will involve working with multiple shaders, multiple framebuffers, and multiple renderings. But by the end, you will have mastered the shader pipeline used by OpenGL!
The basic idea: you will modify your program to perform multi-pass rendering: you'll render the scene once from the perspective of the light in order to determine which objects are in front of which, store that information in a texture buffer, then re-render the scene from the camera's utilizing the data in that buffer to figure out which fragments should be drawn in shadow.
There are a lot of different steps, detailed below:
-
Shadow mapping involves two rendering passes: one to determine the depth of each fragment from the light, and one to draw the fragments. Each one will require a different kind of shading. Thus your program will need to have two different shader programs. ((While it is possible to do this in one program using sentinal uniforms, you should use two programs for practice!))
-
You'll need to create a second
shaderProgram(e.g.,shadowProgram). This program will need its own call toShaderUtils.initShaders(), using the existingpass.vertand the providedshadow.frag.- Notice how we can mix and match shaders!
- Your second program will also need its own set of handles (though you won't need all of the ones used by your primary Phong/texture shader!)
-
You can switch which shader is currently being used with the
gl.useProgram()command.-
HELPFUL HINT: I recommend refactoring your original shaderProgram when you reference it in the
init()method and renaming it (e.g.,phongProgram). Then you can assign whichever program you are currently using to the "shaderProgram" variable, and be able to call your drawMesh() method without making any changes! -
Thus your application can "change" shaders via:
gl.useProgram(shadowProgram);
shaderProgram = shadowProgram;
-
HELPFUL HINT: I recommend refactoring your original shaderProgram when you reference it in the
-
You'll need to create a second
-
The
shadow.fragand newpass.vertshaders will require one additional uniform to be passed in:mat4 uLightMVPMatrix. This mat4 is the model-view-projection matrix representing the scene as rendered from the point of view of the light!- The "model" part of this matrix is your object's model matrix, as normal.
- The "view" part of the matrix should be a view matrix with the "eye" at the position of the light source (pick either your sun or your lamp). You can use the
mat4.lookAt()function from glMatrix.js to generate this matrix. -
The "projection" matrix can just be the same one you use in your normal rendering. However, if you're casting shadows from the sun, you may want to use an orthogonal projection instead, e.g.:
mat4.ortho(mat4.create(), -10,10, -10,10, 2,30); //gave me good results
You'll need to pass this value to your shader at the start of your rendering method. Note that the uniform will need its own handle (in both shaders!)
- Remember: you are only required to create shadows from one of the sun OR the lamp. If you have the sun cast shadows, remember to update this variable every frame when the sun moves!
-
Once this is in place, you can test that everything still works by simply setting your application to use the
shadowProgramand then seeing how things look. Note that the shadow depth shader will produce seemingly random colors, but you should be able to see the general structure of your objects!
-
Next is the first tricky part: you'll need to set up your application so that instead of rendering to the normal framebuffer, you can instead render to a separate framebuffer whose output is stored in a texture. This process is called rendering to a texture, and is used for creating effects like mirrors, shadows, and animations that appear on virtual screens (e.g., if your scene showed a TV with a scene on it!)
-
This process is detailed in the textbook in section 7.12 (pg 378); or you can see the
sample code
(html).
You can also check out
this tutorial
(or one of many others) for further information. Overall, the steps you will need to perform are (each taking possibly a few lines of code/method calls):
- Create and bind a framebuffer
- Create a texture to render to (e.g.,
shadowTexture), with appropriate parameters (and mipmaps). This is just like what you did when loading images as textures! - Create and bind a render buffer
- Specify that the framebuffer should use your
shadowTextureas a texture as a buffer for the output color - Bind the null renderbuffer and framebuffer (so that you output to the screen again)
-
Note that you will need to do this once at the start of your program (e.g., from your
init()method). - This setup is hard to test, though you can check that the buffer is "complete" and that everything still loads and renders!
-
This process is detailed in the textbook in section 7.12 (pg 378); or you can see the
sample code
(html).
You can also check out
this tutorial
(or one of many others) for further information. Overall, the steps you will need to perform are (each taking possibly a few lines of code/method calls):
-
Now you have to do the next tricky part: set up your program to do two render passes: the first time through you should render from the point of view of the light (using the depth shader, and rendering to your texture-based framebuffer), and the second time you will render from the camera's view (using the phong shader, and rendering to the screen's framebuffer).
-
I recommend making a new method (e.g.,
multiPassRender()) that can encapsulate this process. You'll need to move your empty-mesh checking and animations into here. Think of it as the "master" rendering method.- Your
render()method will continue to mean "render the scene" (with the current view and shader)--you could even rename it as such!
- Your
-
Your multi-pass rendering should proceed as follows:
- Set the
viewMatrixso that the camera position is at the light's position (be sure and remember the old camera position so you can get back to it!) - Bind the off-screen framebuffer
- Use the shadowProgram shader program
- Call render() to render your scene to the current buffer with the current shader
- Regenerate the mipmaps for your
shadowTexture(bind it, callgl.generateMipmap, then unbind it). - Unbind the off-screen framebuffer (by binding the
nullbuffer instead) - Use your regular shader program
- Set the
viewMatrixso that the camera position is at the camera's normal position - Call render() to render your scene to the current buffer with the current shader
- Set the
-
I recommend making a new method (e.g.,
-
If all goes to plan... you should see absolutely nothing new. Your scene should render as normal. But you've also rendering a version of your scene to the
shadowTextureusing the shadowProgram!-
The best way to test this is---instead of rendering your normal scene at the end---is to render a single rectangle with the
shadowTexturetexture-mapped onto it as if it were a .jpg you loaded! You should then see the rectangle showing a picture of your scene from an alternate view point! An example testing scene that I used is behind the spoiler (you may need to adjust some variable names):function renderTest() { gl.clear(gl.COLOR_BUFFER_BIT | gl.DEPTH_BUFFER_BIT); //clear context gl.uniform3fv(shaderProgram.eyeDirectionHandle, [eye[0]-at[0], eye[1]-at[1], eye[2]-at[2]]); //calc eye direction gl.uniform3fv(shaderProgram.lightPosHandle, light); //light position //model transformations var model = mat4.create(); var s = 10; mat4.translate(model,model,[0,0,-1*s]); mat4.scale(model, model, [s,s,s]); var mesh = meshes['plane']; drawMesh(mesh,model,true,shadowTexture); //draw the mesh with isTextured == true and shadowTexture as what to texture with }
- Note that if you don't switch to the
shadowProgramshader, you should simply see a mini version of your scene be rendered (from the point of view of the light); like you took a picture of it and drew that on the screen. If you do not get this, there are some errors somewhere!
-
The best way to test this is---instead of rendering your normal scene at the end---is to render a single rectangle with the
-
Finally, finally--you can add in the shadows! This will occur during your second rendering pass (using your regular shader).
-
You'll need to pass in the
shadowTextureto your fragment shader so you can access it... so yes, you'll need another uniform and handle (and I recommend a second uniform for "isShadowed" so that you can turn it on and off for testing).- Remember to set and bind the
shadowTextureto a texture unit! I recommend doing this in yourmultiPassRender()method before your final call to render the scene.
- Remember to set and bind the
-
Now you can modify the shader to use this passed-in texture. There are a couple of steps:
-
You'll need to copy/paste the
unpack()method found in the providedshadow.fragshader into your regular fragment shader (it goes above themain()method).- In order to store the 32-bits of depth information, we basically break out different pieces to "pack" them into each of the 8-bit components for a vec4. In order to recover this 32-bit float, we need to "unpack" the components of the vec4---a functionality provided by this method.
-
In order to apply a shadow, you'll need to get the position of the fragment in "light space" (e.g., relative to the light source). This value is passed in by the provided
pass.vertshader asvLightProjPos('varying light projection position').- However, this value is in homogenous coordinates (e.g., with a w != 1). You'll need to convert back to "actual" values by dividing the
xyzcomponents by thewcomponent. - You'll then need to scale the
xandycomponents so they range from 0 to 1, not from -1 to 1. You can find an example of how to do this in theshadow.fragshader.
- However, this value is in homogenous coordinates (e.g., with a w != 1). You'll need to convert back to "actual" values by dividing the
-
Now that you know the xy location of the fragment (from the light's perspective), you can look up the depth of the minimum fragment at that location by sampling the shadow map! This sampling will give you a vec4, which you can then
unpackto get the depth of the fragment closest to the light. - If the actual fragment has a distance greater than this value, then it should be in shadow. You can figure out the distance of the current fragment by looking at the
zcomponent of the fragments position (because in "light space", distance is measured on the z axis!) - If the actual fragment's distance is greater than the distance sampled from the shadow map, then that fragment is in shadow. A fragment in shadow should be colored black (or otherwise made significantly darker)
-
You'll need to copy/paste the
-
You'll need to pass in the
At this point you should have shadows cast from the light! Their may be artifacting due to their depth (which you can fix with a shadow bias). There are lots of options for producing cleaner, crisper shadows (as well as approximating "soft shadows"). See here and here for examples. Cleaning up the shadows is worth extra credit as an extension--but make sure you get the basics working first!
Extensions
There are plenty of options available as extra credit extensions (again, check with me first about any ideas not mentioned here):
- You can try to soften or otherwise clean up the shadow casting
- Perhaps have both of your light sources cast shadows?
- You can add further types of texturing: such as bump-mapping (for a texture that reacts to your moving sun) or reflection-mapping (if you want to have a "mirror-like" object).
Submitting
BEFORE YOU SUBMIT: make sure your code is fully functional! Grading will be based primarily on functionality. I cannot promise that I can easily find any errors in your code that keep it from running, so make sure it works.
Upload your entire project (including the assets/ and lib/ folders) to the Hwk6 submission folder on vhedwig (see
the instructions
if you need help).
Finally, include a filled-in copy of the
README.txt
file in your project directory!
Important note: Be sure and modify the HTML file so that it the page includes sources for all models and textures you use, giving proper credit.
The homework is due at midnight on Tues Nov 11.
Grading
This assignment will be graded out of 20 points. Note that the only components of this assignment's grading that rely on the previous homework are the existance of your scene, the existence (and position) of a light source, and some basic phong shading.
- [3pt] Your scene includes a textured mesh
- [2pt] Your scene includes a textured background, with a different texture than the mesh
- [1pt] Your textured meshes continue to respond to lighting (e.g., they get darker as the light changes)
- [2pt] Your program creates and switches between two different shader programs for shadow mapping
- [2pt] Your program calculates the location of a fragment in "light space", using an appropriate projection
- [2pt] Your program renders to a texture (via a separate framebuffer)
- [3pt] Your program performs multi-pass rendering: once pass to render the shadowmap, and one to render the scene
- [4pt] Your program uses the shadow map to calculate shadows from a single light source and render them in your scene
- [1pt] Coding style (e.g., organized code with explanatory comments)
- [1pt] README is complete