CS 315 Homework 2 - Glyphs
Due Fri Sep 26 at 11:59pm
Overview
In this assignment, you will be creating a simple application that renders a short string of text using WebGL. In particular, you will be rendering a series of glyphs, each representing a single character to display. This will allow you to render a short message on the screen using OpenGL!
Since OpenGL is based on rendering primitives, you will need to model these glyphs using triangles--each student will be assigned a few glyphs to model, so that in the end the entire class will be able to display messages using the whole alphabet.
Once the glyphs are modeled, you will load the models into a format that can be understood and rendered by WebGL, and write the appropriate WebGL calls to render these objects. In order to make an entire sentence fit nicely on the screen, you will also need to modify the provided shaders. Finally, you'll add in the ability to get input from the user for what sentence to render!
This assignment should be completed individually.
Objectives
- Practice modeling objects with graphics primitives and their data structures
- Learn to use basic OpenGL functions and rendering
- Practice working with the OpenGL shader pipeline
- Begin working with OpenGL frames and transformations
Necessary Files
You will need a copy of the cs315-hwk2.zip file which contains some basic code to get you started. The file structure should be similar from the last assignment. I've included a few additional libraries (which will also be found in the rest of the assignments).
-
webgl-utils.jsis a utility library provided by Google and used by our textbook. It contains methods to setup a WebGL canvas. -
shader-utils.jsis a utility library for loading OpenGL shaders (the textbook has a version of this; the provided one has slightly better error reporting). This library is already used in the provided code, so you can see how it works. -
gl-matrix-min.jsis the glMatrix library for doing vector/matrix math in JavaScript, optimized for WebGL. While the textbook provides a similar helper library (e.g., thevec2objects in the examples), this library is much faster, highly tested, and is more of a "standard."
Assignment Details
Modeling the Glyphs
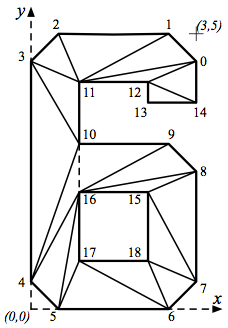
Your first task will be create models of glyphs so that OpenGL can render them. Glyphs are made up of vertices (corners) organized into triangles. For example, to the right is a modeling of the number '6' using vertices and triangles (image by Wayne Cochran).
Each glyph will be represented by a couple of values:
-
An array of 2-D coordinate pairs representing the
verticesof the glyph. Any vertices that lie on the character’s baseline baseline should have a y-coordinate of zero. -
An array of
indices(corresponding to vertices in the array above) that represent a the triangles of the glyph. Vertices should be listed in CCW order (this is important!). For example, vertices 12, 13, and 14 make up a triangle, so the array may look like[12, 13, 14, ...]- Note that you do not need to make this a triangle strip, though that would likely save some space. You may optionally include additional coordinates in triangle strip format if you desire, and then extend your program to use that structure when available.
-
A
sizeof the glyph in terms of your vertice's coordinate system, to be used for scaling. This is effectively the largest x and y values of your vertex coordinates.
You will encode these values in
JSON format.
In particular, you will store the glyphs in .json files named after the glyph. So the 6 would be stored in 6.json, and might look something like this:
{
  "vertices" :  [ 3, 4.5,  2.5, 5,  0.5, 5,  0, 4.5,  0, 0.5,  0.5, 0,  2.5, 0,
                  3, 0.5,  3, 2.5,  2.5, 3,  0.875, 3, 0.875, 4.125,
                  2.125, 4.125,  2.125, 3.75,  3, 3.75,  2.125, 2.125,
                  0.875, 2.125,  0.875, 0.875, 2.125, 0.875
                ],
  "indices" : [ 12, 13, 14,   12,14,0,    12,0,11,    11,0,1,   11,1,2,   11,2,3,
                11,3,10,    3,4,10,   10,4,16,    4,5,16,   16,5,17,    17,5,6,
                17,6,18,    18,6,7,   18,7,15,    15,7,8,   16,15,8,    9,16,8,
                10,16,9
              ],
  "size" : [ 3, 5 ]
}
Put your glyph files in the assets/ folder of your project.
Each student is assigned two (2) letters to model as glyphs, listed below:
| Student | Letters |
| Stephanie |
E M
|
| Lukas |
N G
|
| Schyler |
Z D
|
| Alexia |
W X
|
| Sarah |
Q V
|
| Gabe |
Y O
|
| Casey |
U A
|
| Trevor |
R B
|
| Nate |
C S
|
| Jessica |
H F
|
| Adam |
T J
|
| Eric |
P K
|
-
LandIare extra credit to the first person who claims them! - currently-completed glyphs file from Moodle; check there if anything has changed (this link will update).
I have included a reference document that you can use to help determine the location of vertices in block letters. You are also welcome to come up with your own glyph font if you wish--just make sure they are recognizable as upper case letters!
As soon as you finish modeling your glyphs, submit them to to the professor via email! I will compile the glyphs and make the whole alphabet available, so that you can use entire words in the last part of the assignment.
- Do this soon; your classmates will thank you!
Finally, I have provided a site where you can test your JSON, to make sure that your models are correct. Do test things before you move on; it is tricky enough to debug OpenGL without having faulty models!
Note that you can include additional information in your JSON file if you wish. For example, a colors attribute could store different colors for the vertices (each as an array of rgba values in float format), thereby letting you make multi-colored glyphs! Be careful about using a standard for this format so that other people can easily use your extensions if they wish;
Piazza
is a good place to coordinate this.
Rendering a Single Glyph
Now that you have a glyph or two modeled, it's time to start writing OpenGL and rendering them! I have provided the beginnings of an OpenGL system, but you will have to add in some of the final work.
-
You'll need to load the JSON from the
assetsfiles and store it somewhere (perhaps in the handly globalglyphshash). You can use the providedUtils.loadJSON()method, which will retrieve the specified file and return a JavaScript object of that data.- I recommend making a String of glyphs to load, and then just iterating through the characters in that String. This will let you specify which glyphs are available.
-
After you've loaded the JSON, you will need to create some WebGL Vertex Buffer Objects (VBOs) to store the data-- both the vertices and the indices of the triangles! These are effectively arrays of data that can be easily passed to the GPU in OpenGL.
-
First, you'll want to convert the simple JavaScript Array into a
Float32Array, an explicit array of 32-bit floats (rather than the mixed-types allowed by JavaScript). You can just call theFloat32Arrayconstructor:vertexFloat32 = new Float32Array(myVertexArray)- Triangle indices, on the other hand, will want to use a
Uint16Array--an array of unsigned 16-bit integers.
- Triangle indices, on the other hand, will want to use a
-
Create a buffer by using the
gl.createBuffer()method. I recommend you store this buffer in the sameglyphshash for easy organization. Note that this method only allocates memory for the buffer; it doesn't put any data in there! -
To put data into the buffer, you'll first need to bind it as the "current active buffer" using
gl.bindBuffer(). You can then actually put data into the buffer usinggl.bufferData(). For example:gl.bindBuffer(gl.ARRAY_BUFFER, vertexBuffer); gl.bufferData(gl.ARRAY_BUFFER, vertexFloat32, gl.STATIC_DRAW);
- The first parameter of this method is the type of data that will go in; for vertices, this would be
gl.ARRAY_BUFFER(a simple array), while for triangle indicies this would be agl.ELEMENT_ARRAY_BUFFER. - The
gl.STATIC_DRAWgives OpenGL a hint that the data in this buffer won't be changing as the program runs
- The first parameter of this method is the type of data that will go in; for vertices, this would be
-
You'll also want to store the number of items in the buffer--for example, the number of vertices.
IMPORTANT: this is not the number of elements in the array! For example, each vertex has two coordinates, so while there might be 10 elements in your
verticesarray, there are only 5 vertices! You'll want to store the 5.
Note that this should all happen as part of your program's initialization; don't load the files and process buffers over and over again!
-
First, you'll want to convert the simple JavaScript Array into a
- When you want to actually draw the glyph, you'll need to rebind the buffers so that OpenGL knows to use them. You can do this with the same
gl.bindBuffer()calls you used earlier. This is how you "switch" between buffers and draw multiple glyphs! -
Once you've bound the right buffers as current, you'll need to pass the appropriate data into the shaders. There are two kinds of variables you'll need to pass: vertex attributes (variables that change per vertex, such as position or color), and uniforms (variables that don't change between calls to render a set of vertices).
-
For vertex attributes, you just setup the shader so it's ready for the attributes (the data itself gets passed in momentarily). First you declare the type and format of the attribute, then you "turn on" (enable) OpenGL's use of an array for that attribute:
Note that we're using references (or "handles") to the memory location of the shader variables, which were established in the init() function as provided code.
  gl.vertexAttribPointer(shaderProgram.vertexPositionHandle, 2, gl.FLOAT, false, 0, 0);
  gl.enableVertexAttribArray(shaderProgram.vertexPositionHandle);
-
For uniforms, you make a call to
gl.uniform*, with the * replaced by the type of the variable. So for a single integer uniform, you'd callgl.uniform1i, and for an array (vector) of 2 floats you'd callgl.uniform2fv. Thus you'll have something like:gl.uniform2fv(shaderProgram.glyphSizeHandle, myGlyphSize);
Protip! Your
gl.uniform*formats will need to match the types declared in the shader (generally the vertex shader)! If you're unsure what type to use, check there.
-
For vertex attributes, you just setup the shader so it's ready for the attributes (the data itself gets passed in momentarily). First you declare the type and format of the attribute, then you "turn on" (enable) OpenGL's use of an array for that attribute:
-
Finally finally finally, you can actually draw the elements!
gl.drawArrays()is described in the text and is used for simply drawing arrays of vertex coordinates. However, since we're using indexed vertices (we've specified the triangles, instead of just using every 3 vertices), you'll need to usegl.drawElements():gl.drawElements(gl.TRIANGLES, numberOfIndicies, gl.UNSIGNED_SHORT, 0);-
Things to note: the first argument specified the format of the indicies (
gl.TRIANGLESbecause we're using plain triangles, but you'd usegl.TRIANGLE_STRIPfor a triangle strip). The third argument is the data type of the index data: since we're using 16 bit unsigned integers, those aregl.UNSIGNED_SHORTs.
-
Things to note: the first argument specified the format of the indicies (
Whew! That's a lot of pieces, but one this is in you should be able to see your glyph rendered on the screen! If you have problems, please don't hesitate to ask. Make sure this works before moving on!
Making Everything Fit
At this point, you should be able to load and render a single glyph and have it look nice. But what about rendering an entire String of glyphs?
Basically, each glyph is modeled within it's own coordinate system (a.k.a, it's own basis or frame). The provided shader transforms that glyph into the canonical view frame: the coordinate system used by the OpenGL canvas. This coordinate system has the origin (0,0) at the center of the canvas, and corners are at (-1, -1), (1, -1), (-1, 1), and (1,1).
- Note that this view frame is different than the screen frame, which uses coordinates similar to those you used with the HTML5 canvas, where each pixel is a point.
The positioning of the glyph is determined by how to translate from the glyph's coordinate system to OpenGL's; where does point (2,3) in the glyph's world get mapped to? This is called changing basis.
So in order to make the make all the glyphs appear at the right size and in the right place, you'll need to tell OpenGL how to scale and how to move the coordinate system (frame) that it is using for each
gl.drawElements()
call, before you actualy make that call!
The provided code will calculate a scale factor and an offset (in OpenGL's basis) that you can use to switch frames. But to use these variables, you'll need to make them accessible to the vertex shader, as well as modifying that shader to use them!
-
Start by modifying the shader so it has two additional variables: one for the scale factor and one for the offset.
- Should these be attributes or uniforms? Is the value changing per vertex or per render call?
main()method so that it applies these variables when calculating the vertice's finalgl_Position.- Think about where a particular vertex (e.g., something at (2,3)) gets moved to by the end of the shader. You'll need to be careful about the order of your operations.
-
Scaling should be pretty straightforward; it's the moving that's harder. You'll want to move everything down by (-1, -1) so that the origin goes from the lower corner to the center, and then further move things based on the offset.
- The calculated value for scale factors and offsets works if you move the coordinate frame by
(offset, 1.0 - scale)
- The calculated value for scale factors and offsets works if you move the coordinate frame by
-
In addition to modifying the shader, you'll need to pass values to it from your main script. To do this, you'll need to (1) get the memory location of the variables, and (2) actually put data in that memory location!
- For (1), you'll want to create additional shader handles, similar to those in the provided code. The
gl.getUniformLocation()method basically searches the shader code for the memory location of the given variable! - For (2), simply pass in the appropriate data the same way you passed in the glyph size. Make sure you use appropriate data types!
- For (1), you'll want to create additional shader handles, similar to those in the provided code. The
If all goes well, your single glyph should now be rendered in the center of the screen. If you try rendering a String of glyphs, they should appear in order... and scale down as the string gets longer!
Using Transformations
It may be starting to bother you at this point that you've "hard-coded" the change of basis into your shader. It can make it harder to reuse the shader for other purposes (for example, if you wanted to draw 3D glyphs).
Modify your program and shader so that it uses a transformation matrix to encode the offset used to move the frame of reference, rather than doing that math in the shader (the scaling should still occur in the shader).
-
You can (and should!) use the included
glMatrix library
library to work with matrices. Since OpenGL uses 4x4 matrices to represent basis changes (for reasons we'll talk about in class), start by creating a new
mat4object withmat4.create(). This creates a 4x4 Identity Matrix. -
You can then perform basis changes by composing (i.e., multiplying) matrices. glMatrix has numerous helper methods to make this process fast and easy. Since we're interested in moving the frame--called a translation, you should use the
mat4.translate()
method. Look at it's documentation, and the documentation for the rest of the library for how best to use this. And if you get stuck, ask for help!
- Remember that you can compose multiple matrices to do lots of small basis changes. So you could have a translation that moves the origin to the center, and then another that applies the offset. You know, for example.
- Once you have your matrix, you'll need to pass it in to the shader. You'll need another uniform variable, another memory address handle, etc.
- Finally, modify the shader so it uses the passed in matrix. Note that you can simply multiply your translation matrix by the (scale-corrected) location to get a new
vec4to output viagl_Position.
This matrix that represents the transformation from "model frame" to "world frame" is commonly known as a Model Matrix. In fact, you can encode all the transformation components--both offset and scaling--in a single matrix! Try using the mat4.scale() methods to create scaling transformations, and then compose them with your existing transformation matrix. If you're good, you can skip passing in any uniform variables other than the model matrix!
- You are welcome to make this change as an extension to the assignment. However, if so please do it inside a separate shader (maybe
glyph_model.vert), so that I can see both formats!
When everything works, you should have the same functionality as at the end of the previous part. But your shader will be simpler and your code will be more robust (and possibly faster, though not enough that you'd notice).
Adding Interaction
Once last piece: it would be nice if the user could type in a word of sentence and see it rendered on the screen using your glyphs. Add this functionality.
-
Add some simple HTML to your
glyphs.htmlfile so that the user has an<input>field and a<button>to press. Remember to give both elements IDs so you can access them in the JavaScript! -
Add a trigger
(e.g., $.click())
so that when the button is clicked, your script grabs the text from the
<input>field and renders that text. Having the click set a global variable and then call render() should make this easy!
Extensions
There are plenty of extensions you could add to this program, in order to continue to experiment with OpenGL. Just make sure you have the base system in first!
- You are welcome to model more glyphs: numerals, punctionation, lower-case letters, etc. Send them along and I'll share them with the class.
- As mentioned above, you could also support other display models, such as triangle strips.
- As mentioned above, you might add further extensions to your model, such as color values for the vertices.
- You could add animation, making the rendered text "scroll" across the screen. What is the one value you'd have to modify each frame to do this?
- Finally, you might consider adding to your script so that the letters seem to protrude into 3D! Effectively, you can make each "edge" of the glyph into a kind of box, using a third coodinate to represent the depth. See here as an example (and inspiration for this assignment/extension!)
Submitting
BEFORE YOU SUBMIT: make sure your code is fully functional! Grading will be based primarily on functionality. I cannot promise that I can easily find any errors in your code that keep it from running, so make sure it works.
Upload your entire project (including the lib/ and asset/ folders) to the Hwk2 submission folder on vhedwig (see
the instructions
if you need help).
Also include a filled-in copy of the
README.txt
file in your project directory!
The homework is due at midnight on Fri Sep 26.
Grading
This assignment will be graded out of 18 points:
- [4pt] Models both assigned glyphs, with appropriate formatting and good use of triangles
- [3pt] Loads the JSON glyphs and creates appropriate VBOs
- [2pt] Uses OpenGL to draws one glyph
- [2pt] Shader includes extra variables from the program to scale and translate the rendered glyph
- [2pt] Glyphs are positioned correctly, and the program displays multiple glyphs
- [2pt] Uses a matrix to represent glyph translations
- [1pt] The user can specify a string to render from the web interface
- [1pt] Coding style (good readability, cohesion, comments, etc)
- [1pt] README is complete