CS 161 Lab F - Turtle Loops
Due Fri Mar 6 at the start of class
Overview
In this lab, we'll be revisiting the Turtle class from Lab B and making more sophisticated drawings, all requiring loops!
This lab should be completed in pairs. You will need to find a different partner than you had for the last lab. Be sure to review the pair programming guidelines before you begin; remember to switch off who is driving and who is navigating!
Objectives
- To practice with loops and conditionals
- To practice working with the Color class
- To practice creating and using a tester class
Necessary Files
You will need to download and extract the TurtleLoop BlueJ project from the
TurtleLoop.zip file.
This project includes Turtle class that you worked with before. You will need to create a pair of new classes as well.
- Remember to extract the BlueJ project from the zip file, and then delete the zip file!
You may want to refamiliarize yourself with the Turtle class described in
Lab B.
You can instantiate a Turtle on the workbench and call it's methods to play with it.
You can also view the JavaDoc for the turtle by double-clicking on the class in BlueJ, or by looking at the bottom of the page.
Part 0: Drawer and Tester
For this lab, you'll be making two new Java classes: a TurtleDrawer that tells the Turtle how to draw, and a TurtleTester that you can use to call methods on the drawer. The first step (which you should not skip over) is to make these new classes
-
Start by creating a new
TurtleDrawerclass with the following requirements:- It has one attribute: a
Turtleobject that will do the drawing -
It has one constructor that takes in a single parameter: a
Colorobject specifying the default color for the turtle's pen.-
You will need to
so that you can use the Color class here. Put the import at the very top of the file (above the class comment).
import java.awt.Color; - The constructor should instantiate the Turtle attribute, assign the given color to the pen (check the JavaDoc for what method to use!), and lower the pen for drawing.
-
You should also use the
setSpeed()method to set the turtle's speed to0.9. This will help your drawings appear at a reasonable rate, so you don't spend too much time waiting! If that still isn't fast enough for you, you can try the max speed of 1.0.
-
You will need to
- It has one attribute: a
-
You could test that your constructor works by instantiating a new TurtleDrawer in BlueJ, but let's use the opportunity to get our tester setup instead. Create another new class
TurtleTesterthat contains a single static method:public static void test() -
Inside this
test()method, add code that instantiates a newTurtleDrawerobject (not a Turtle, but aTurtleDrawer!). Hint: remember to use thenewkeyword to call the constructor that you just wrote!-
You will need to pass your constructor a
Colorobject. I recommend you use one of the constant colors defined in the Color class.Color.BLACKis a good default, but you can pick whatever color you want. Don't spend a lot of time making a custom color here! -
Once again, you'll need to
importthe Color class.
-
You will need to pass your constructor a
-
Now test that your program works by right-clicking on the
TurtleTesterclass and selecting thetest()method. Your Turtle progam should start!- Your "workflow" should involve writing a method in your
TurtleDrawingclass, and then adding code to yourtest()method that calls that method (using dot notation). - You can comment out old method calls when you start working on a new method, but don't delete the code (in case you want to test it again later!)
- Your "workflow" should involve writing a method in your
Part 1: Triangles
To practice with the testing workflow, let's add a quick and dirty method to the TurtleDrawing class.
-
Add a method called
drawTriangle. It takes in asideLength(inintprecision) as a parameter, and doesn't return anything. - Make sure to add a method comment (preferably in JavaDoc format) for this method!
-
This method should instruct the Turtle to to draw an equilateral triangle (i.e., one where all the sides are the same length):

There are a couple of things to consider before you plunge into writing the code:
- Notice that when the Turtle is first instantiated, it initially faces east.
- Observe how the angles are all 60 degrees within an equilateral triangle. Once a side is drawn, you then want to turn your turtle left to prepare drawing the next side. But how many degrees do you need to turn?
- Even better: Is there a relationship between the degrees-turn you always need to make and the number of sides in this shape (three)? Answering this now will makes your life easier later. (Hint: The turtle always faces the same direction before and after the polygon is drawn. How many degrees must it have turned during its traversal?)
-
Because a triangle is easy to draw, it may be tempting to write this method directly, like the code that's given below:
This isn't very fun, but it does reveal the code's repetitive structure. The code segments for each of the edges are exactly the same. So instead of writing the same thing 3 times, put them in a loop that iterates exactly 3 times (hey, that's the number of sides for a this particular shape...).
public void drawTriangle(int sideLength)
{
  intd turnDegrees = 120; //how much to turn left by at each corner

  //first edge
  turtle.forward(sideLength);
  turtle.left(turnDegrees);

  //second edge
  turtle.forward(sideLength);
  turtle.left(turnDegrees);

  //third edge
  turtle.forward(sideLength);
  turtle.left(turnDegrees);
}
-
Your task is to write this method using a loop to replace the redundant, repetitve code segments. You can either use a
whileloop or aforloop (though since this is definite iteration, aforloop would be appropriate...). The following code gives examples of how to iterate n times (for a positive n):int i = 0; while (i < n) { //statements to repeat i++; }
for (int i = 0; i < n; i++)
{
  //statements to repeat
}
-
Make sure and test your method by calling it from the
TurtleTester. You can also check in with us when you're done to make sure everything looks right. - If you haven't yet, this is a good time to switch drivers!
Part 2: Polygons and Refactoring
Triangles are cool and all, but your TurtleDrawer class should be made general. What we mean by general is that writing a method just to draw a single shape doesn't make a whole lot of sense. If we wrote new methods to draw 4-sided square, a 5-sided pentagon, a 6-sided hexagon, etc., then when would we ever stop writing methods?!
Being the good computer scientists that you are, you recall the concept of abstraction. This time our old pal abstraction is used in the context of method design. A much better alternative would be to write a single method that takes in, along with the sideLength, the number of sides of the shape and draws it with however many sides we say!
-
Add a new method
drawPolygonto yourTurtleDrawerclass. This method should take in thesideLength, the number ofsides(think:intordouble?) AND a a penColorfor the polygon you wish to draw.- If
sidesis less than three, then this method should do nothing.
- If
- Make sure to add a method comment (preferably in JavaDoc format) for this method!
-
Before you dive into the code, think about what needs to be done to generalize the
drawTrianglemethod you previously wrote to draw any polygon with an arbitrary number of sides. -
If you didn't answer the question in Part 1 about how much to turn after each side is drawn, you need to do so now. To help you through this process, draw several polygons on a piece of paper. Start with triangle (3-sides) again, then try a square (4-sides), pentagon (5-sides), and so on, until it becomes obvious what the relationship between the number of sides vs. how much to turn by. (Hint: consider that the turtle needs to go 360 degrees (a full circle), but we need to break all of that up into n turns...).
Once you figure out the formula to find the turn-degrees given the number of sides, You should calculate this value and store it as a local variable (don't repeat calculations if you don't have to!)
-
Now you're ready to write your method. Remember to write-a-little, test, write-a-little, test. Call the method from your tester to avoid needing to repeatedly type in things like the number of sides or the Color. When you're done, make sure it works on multiple inputs. For instance, here's what the following method calls should draw:
drawPolygon(150, 4, Color.BLACK);drawPolygon(150, 5, Color.BLACK);drawPolygon(150, 6, Color.BLACK);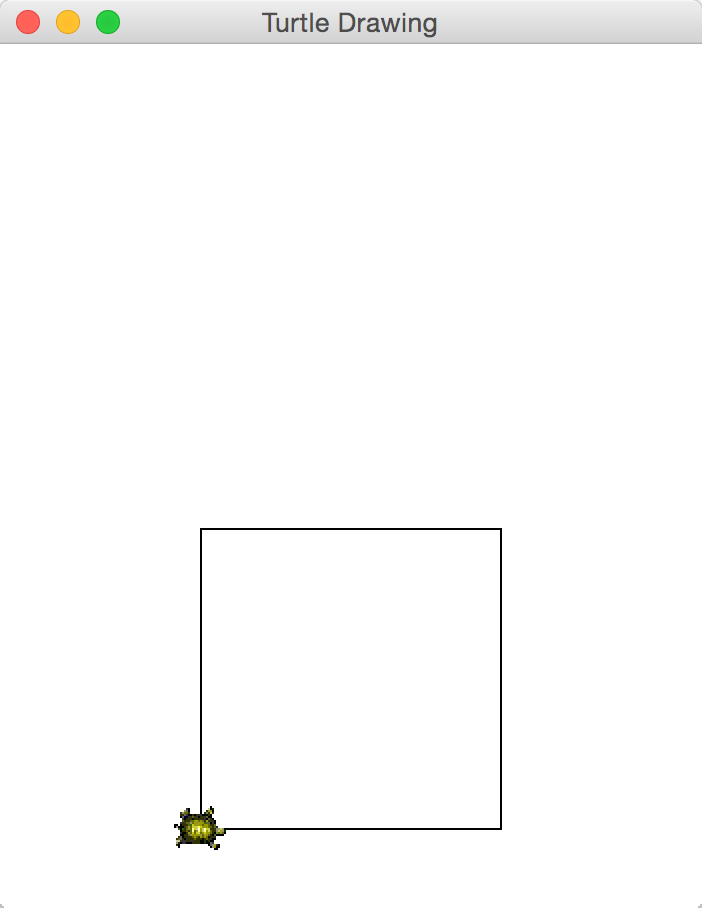
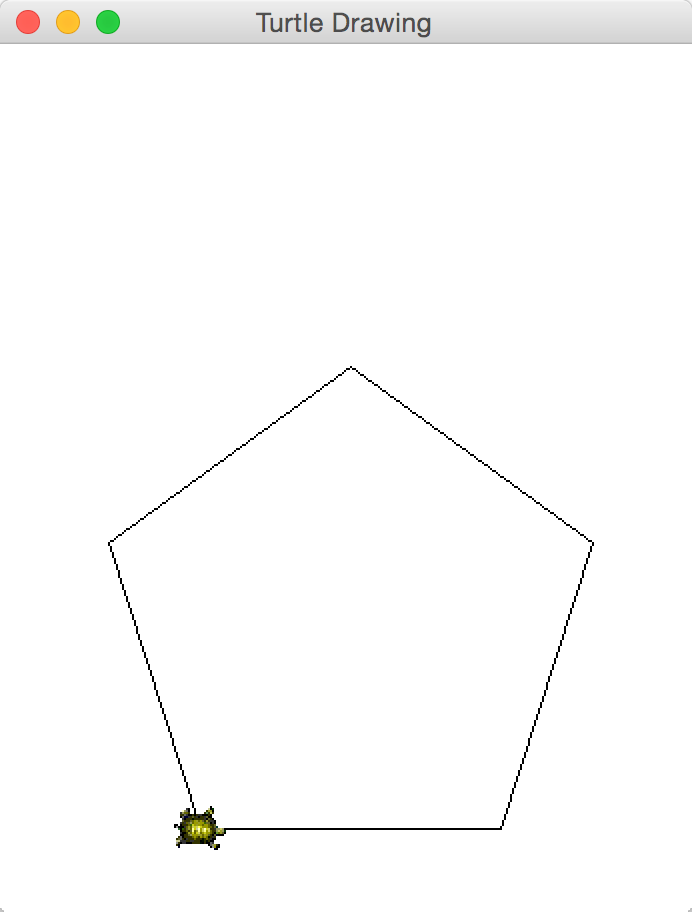
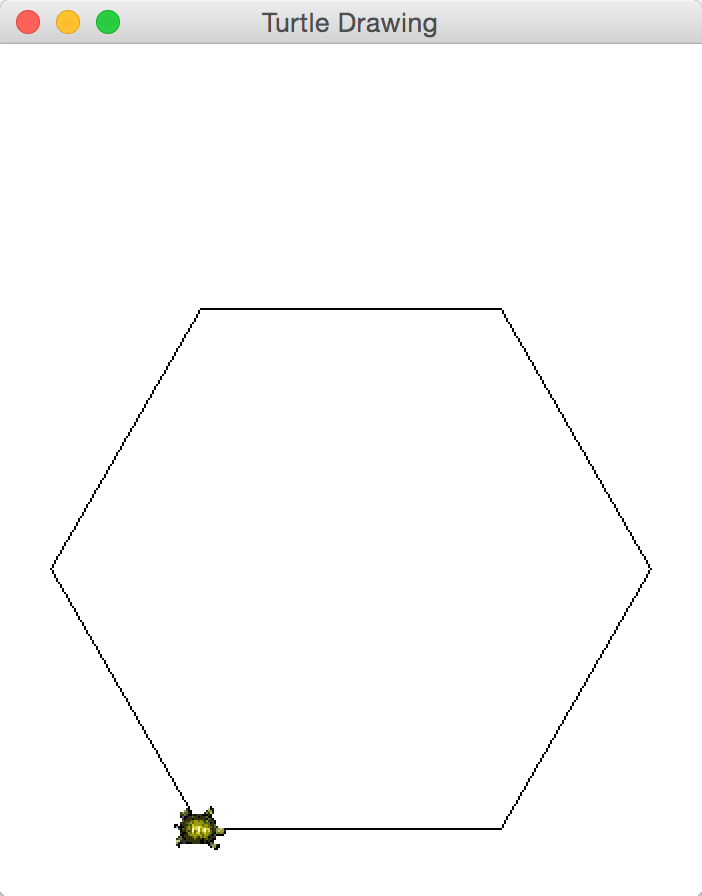
It is not an illusion that the shapes get larger with these calls, because we're not changing the sideLength, but we're increasing the number of sides. (Figuring out how much to change the sideLength so the polygon stays the same radius is a fun math problem we don't have time for).
-
Refactoring (important! read this!): The correct implementation of
drawPolygon()rendersdrawTriangle()a bit too specialized, doesn't it? Indeed, you should now replace the entire body of thedrawTriangle()method with a single line of code calling thedrawPolygon()method (with appropriate parameters). Make sure you understand why this works--and if not, ask!What you just did is called refactoring: taking the existing code-base, and improving its design.
You might wonder why we even kept
drawTriangle()around, instead of removing it altogether. Consider this real-world scenario: Suppose thousands of users are currently using the old version of theTurtleDrawerclass. Today, we decide to refactor the code and release a new and improved version to the public. If we removeddrawTriangle()completely, and insisted that everyone switch to usingdrawPolygon(), then everyone's code which made calls todrawTriangle()would now broken and require fixing. Not a very effective upgrade, is it?So by keeping
drawTriangle()around, we ensure that our new upgrade is backward-compatible. We might warn the user thedrawTriangle()method is now deprecated, and might be removed in future versions of our code. This makes for a much smoother upgrade. - If you haven't recently, now is a good time to switch drivers!
Part 3: Zigzags
Next, you'll make a method that has the turtle draw zigzags.
-
Zigzags: It turns out that these cool lines don't just make for great sweatpants and haircut patterns. Zigzags are also great ways for us to practice! loops. Make a new method, called
drawZigzag(), that takes as input twointarguments. The first argument specifies thelengthof the zigzag line to be drawn. The second argument is thewidth, and is both the width and the zigzagging interval (see below for illustration). You method will also need to take in twoColors as parameters: a zigColor and a zagColor. (Yes, this may seem like a lot of parameters, but 4 isn't actually that many).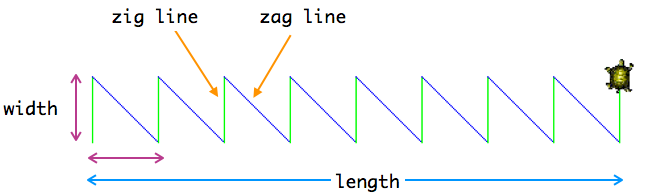
- Make sure to add a method comment (preferably in JavaDoc format) for this method!
-
Things to consider when implementing this method:
- For convenience, let's call the lines that move vertically along the
widtha "zig line", and the longer lines that sweep back across a "zag line". - In the picture above, the turtle was initially facing east. Therefore, when I called the method, I expected that the zigzag will be drawn horizontally, and to the east. But notice how the first zig-line is actually vertical! You should not assume that the turtle will always be facing east, but you'll still need to change the turtle's angle before you do any drawing at all. (The "zig-zagging" should take the turtle in the same direction it was facing when the method was first called).
-
Next, you need to determine the length of the zag-lines, as well as the angle of your turns. (Hint: These sawtooth shapes sure remind me of
right triangles...
-
Watch out for rounding errors when calculating ratios in
intprecision. Remember you can cast from a double to an int using:int x = (int)3.0;
-
Watch out for rounding errors when calculating ratios in
- Think about the loop condition, which is related to how much you should draw per iteration. What appears to be the "minimally repeated pattern"? Perhaps a single zig-line plus zag-line combination (looks like a tooth)?
- Don't forget to make sure your ziglines and zaglines alternate colors.
- For convenience, let's call the lines that move vertically along the
- Again, test this method using your tester (this will make it easy to give different colors!). Make sure to test out your drawing when the turtle faces different directions (you can do this by temporarily having the constructor change the starting direction of the turtle. Just remember to remove this code later!)
- If you haven't recently, now is a good time to switch drivers!
Part 4: Your Own Pattern
It's amazing how many cool patterns we can now draw with just the drawPolygon() and drawZigzag() methods implemented. Your last task is to create your very own pattern by combining (you guessed it) loops and those previous methods you wrote.
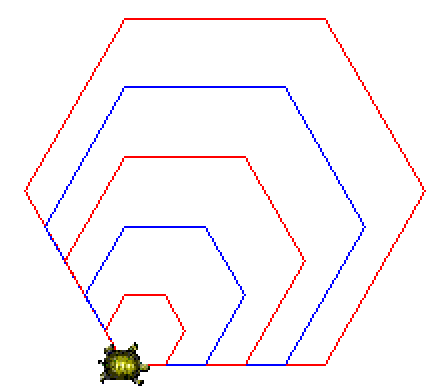
You are not required to draw the above pattern, but can use it as inspiration. If you're wondering, the algorithm for this one is surprisingly simple: first draw a polygon with sideLength-long edges. After the first one is complete, shrink the sideLength by 20%. Repeat this process five times. Each time through the loop, check if you're in an odd iteration, or an even iteration. Depending on this check, set the pen's color to either Color.BLUE or Color.RED.
-
In the
TurtleDrawerclass, add another method calleddrawPattern(). This method should take no parameters and return nothing. The method should draw a new pattern of your own design by repeatedly calling the previous methods you've written. Your pattern should meet the following criteria:- You must use at least one loop.
- You must use at least two colors.
- Make sure to add a method comment (preferably in JavaDoc format) for this method!
-
You should get creative with this, but to give you some ideas on expectations, here are some patterns of sufficient difficulty that you can make:
- Nested polygons like the ones found about, but with each polygon "centered" in the other.
- A wall (several rows or columns) of zigzags, changing colors every row or column
- A "grid" of polygons--can you make a honeycomb? (Hint: you will probably need a nested loop for this one, as well as have the turtle turn around to move back across a row).
- The fancier your design, the better!
Extensions
This is not required and will not give extra credit, but its good for your health and is excellent practice
-
Dashed lines: All of the drawings so far have used solid lines. Make a new method called
drawDashedLinedthat draws a dashed line, like the one shown below.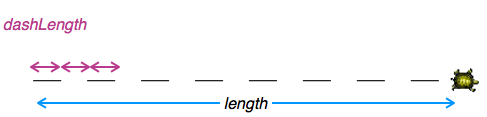
This method should take in two
intparameters (thedashLengthand thelength), as well as aColor. - To build intution, try coding this up sequentially (without loops) to figure out the repetitive structure.
-
Things to note:
- You'll need to lift and lower the pen repeatedly to implement this algorithm.
- Think about the loop condition. When do you stop the pen-up/pen-down/move cycle?
- If the
dashLengthis zero or negative number, you should draw a solid line.
Submission
-
Make sure both of your names are in a JavaDoc comment on both of your class (
TurtleDrawerandTurtleTester). If your names aren't on your assignment, we can't give you credit! -
Right-click on the project folder you downloaded, then:
- If using Linux, select Compress...
- If using Windows, select Send to and then Zip file
- If using Mac, select Compress ... items
This will let you take the selected folder (or files) and generate a new compressed
.zipfile. -
Navigate to the course on Moodle
(Lecture Section A),
(Lecture Section B).
Upload your
.zipfile to theLab F Submissionpage. Remember to click "Save Changes"! You may submit as often as you'd like before the deadline; we will grade the most recent copy. - While you're on Moodle, remember to fill out the Lab F Partner Evaluation. Both partners need to submit evaluations.
Grading
This assignment will be graded out of 26 points.
- TurtleDrawer (18pt)
- [1pt] Your TurtleDrawer class has appropriate instance variable(s)
- [2pt] Your TurtleDrawer has an appropriate constructor (that meets the requirements)
- [1pt] Your TurtleDrawer includes a drawTriangle() method with an appropriate signature
- [1pt] Your drawTriangle() method uses the drawPolygon() method
- [1pt] Your TurtleDrawer includes a drawPolygon() method with an appropriate signature
- [2pt] Your drawPolygon() method can draw a regular polygon of the given size
- [1pt] drawPolygon() doesn't try to draw shapes with less than 3 sides
- [1pt] Your TurtleDrawer includes a drawZigzag() method with an appropriate signature
- [2pt] Your drawZigzag() method draws a zigzag
- [1pt] Your drawZigzag() method works for any starting direction
- [1pt] Your drawn zig and zag lines are different colors (as specified by the parameter)
- [1pt] Your TurtleDrawer includes a drawPattern() method with an appropriate signature
- [2pt] Your pattern includes at least one loop
- [1pt] Your pattern includes at least two colors
- TurtleTester (5pt)
- [1pt] You have created a TurtleTester class with the requisite method
- [1pt] Your TurtleTester can test the drawTriangle() method
- [1pt] Your TurtleTester can test the drawPolygon() method (for different polygons)
- [1pt] Your TurtleTester can test the drawZigzag() method
- [1pt] Your TurtleTester can test the drawPattern() method
- Style & Documentation (3pt)
- [1pt] Your code is properly formatted (indentation, etc) and methods/variables are properly named--including loop control variables
- [1pt] Each of your methods includes a method comment explaining what it does and what its parameters are
- [1pt] Submitted a lab partner evaluation
Documentation
Below is the JavaDoc for the Turtle class, for your reference.
Class Turtle
public class Turtle
A class representing a Papert-style Turtle that can be moved about a canvas. This class acts as an initializer and wrapper for the JTF Turtle, so that it can be controlled through the BlueJ interface Note that this class uses a singleton canvas (run as an applet)
- Version:
- Aug 2013
- Author:
- Joel
| Constructor Summary | |
|---|---|
Turtle()
Constructor for objects of class Turtle |
|
| Method Summary | |
|---|---|
void |
forward()
Moves the turtle forward by one "step" (the size of the turtle; 30 pixels). |
void |
forward(int distance)
Moves the turtle forward the specified distance (in pixels) |
double |
getDirection()
Gets the turtle's current facing (in degrees counterclockwise from the x axis) |
Color |
getPenColor()
Returns the color of the turtle's pen. |
String |
getPenColorName()
Returns the name of the color of the turtle's pen. |
double |
getSpeed()
Gets the turtle's current speed. |
boolean |
isPenDown()
Gets whether the turtle's pen is down or not. |
void |
left(int angle)
Turns the turtle to the left the specified number of degrees |
void |
penDown()
Puts the turtle's pen down. |
void |
penUp()
Lifts the turtle's pen up. |
void |
printText(String message)
Prints the given message on the screen. |
void |
right(int angle)
Turns the turtle to the right the specified number of degrees |
void |
setPenColor(Color color)
Sets the color of the turtle's pen. |
void |
setPenColorByName(String color)
Sets the color of the turtle's pen, using the name of the color. |
void |
setSpeed(double speed)
Sets the turtle's speed. |
| Methods inherited from class java.lang.Object |
|---|
clone, equals, finalize, getClass, hashCode, notify, notifyAll, toString, wait, wait, wait |
| Constructor Detail |
|---|
Turtle
public Turtle()
- Constructor for objects of class Turtle
| Method Detail |
|---|
forward
public void forward()
- Moves the turtle forward by one "step" (the size of the turtle; 30 pixels).
forward
public void forward(int distance)
- Moves the turtle forward the specified distance (in pixels)
getDirection
public double getDirection()
- Gets the turtle's current facing (in degrees counterclockwise from the x axis)
getPenColor
public Color getPenColor()
- Returns the color of the turtle's pen.
Note that this will look like jibberish in BlueJ.
getPenColorName
public String getPenColorName()
- Returns the name of the color of the turtle's pen.
getSpeed
public double getSpeed()
- Gets the turtle's current speed. 0.5 is default, 1 is fastest, 0 is slowest.
isPenDown
public boolean isPenDown()
- Gets whether the turtle's pen is down or not.
left
public void left(int angle)
- Turns the turtle to the left the specified number of degrees
penDown
public void penDown()
- Puts the turtle's pen down.
penUp
public void penUp()
- Lifts the turtle's pen up.
printText
public void printText(String message)
- Prints the given message on the screen. Note that this will not move the turtle.
right
public void right(int angle)
- Turns the turtle to the right the specified number of degrees
setPenColor
public void setPenColor(Color color)
- Sets the color of the turtle's pen.
Note that if called through BlueJ, you will need to specify the full path to the color
(i.e., java.awt.Color.RED or java.awt.Color.BLUE).
setPenColorByName
public void setPenColorByName(String color)
- Sets the color of the turtle's pen, using the name of the color. Can either be:
"red", "green", "blue", "cyan", "magenta", "yellow", "pink", "gray", "black", "white"
setSpeed
public void setSpeed(double speed)
- Sets the turtle's speed. 0.5 is default, 1 is fastest, 0 is slowest.