CS 161 Lab C - Composing a Robot
Due Fri Feb 06 at the start of class
Overview
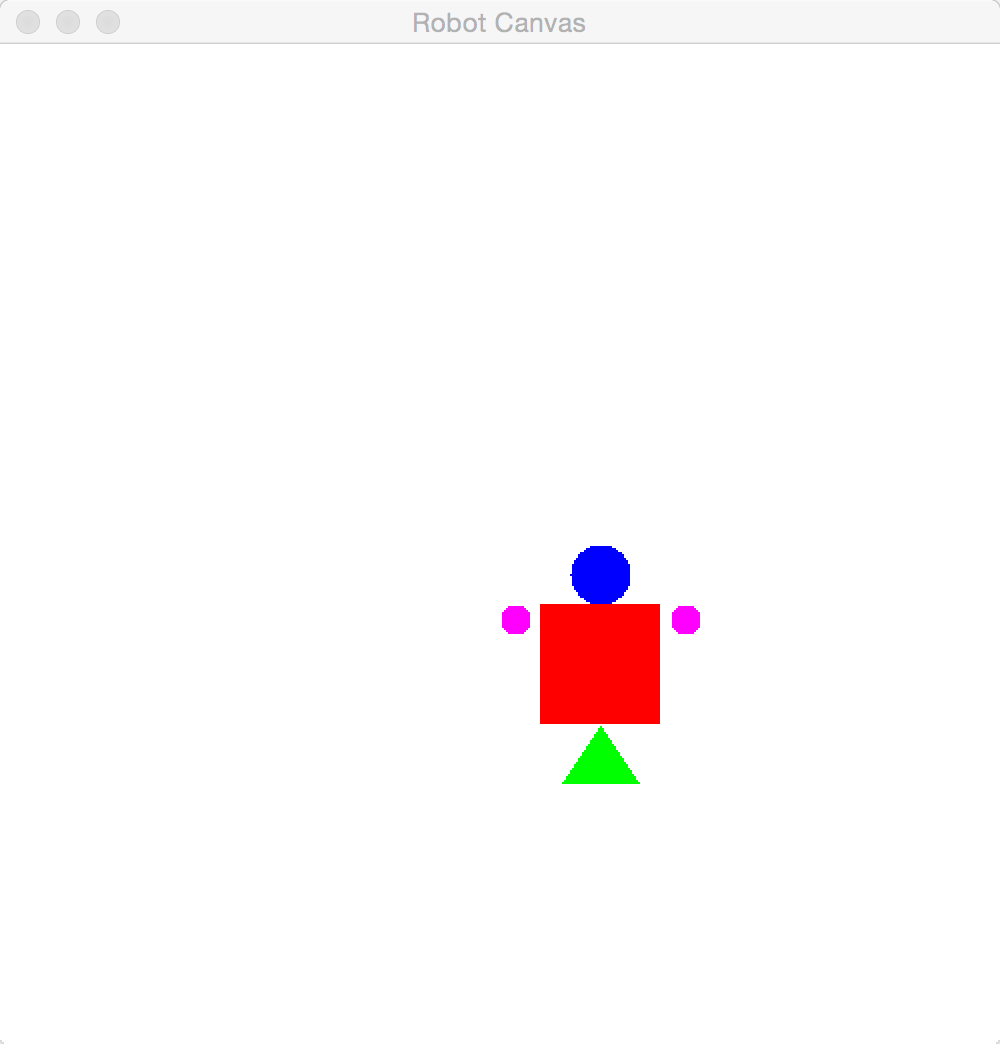
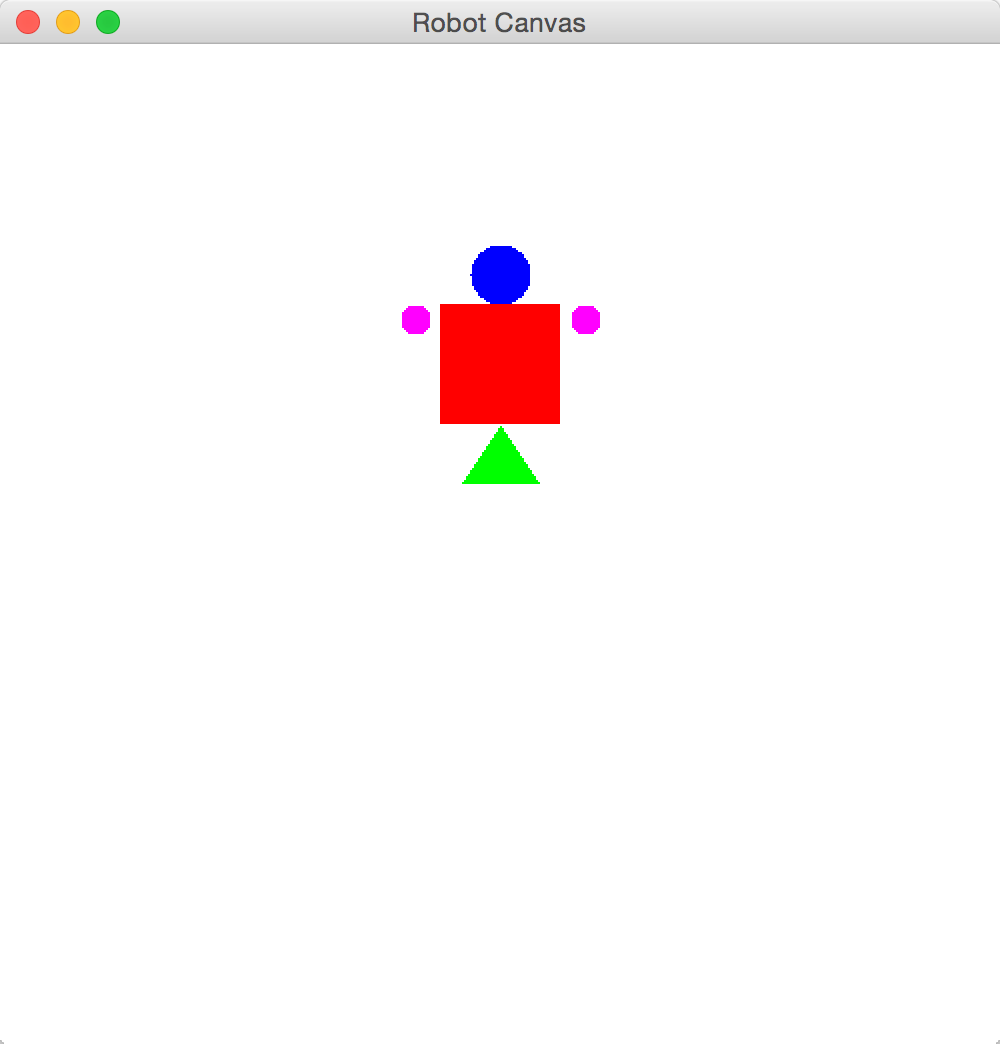
In this lab, you will practice working with classes, objects, attributes, and methods. You will practice composing objects into a particular class--such as combining a bunch of shapes into a single object. Thus you will be developing a new Java class that represents a graphical robot made up of shapes:
This lab will be completed in pairs. You should review the pair programming guidelines before you get started.
Objectives
- Practice creating and working with instance variables (attributes)
- Practice creating and calling methods with parameters
- Practice working with variables and basic mathematical operations
Necessary Files
You will need to download and extract the Robot BlueJ project from the Robot.zip file. This project includes the same set of "shape" classes that you worked with in Lab A and that we've been discussing in class. You will also need to create a new class as well.
- Remember to extract the BlueJ project from the zip file, and then delete the zip file!
Assignment Details
Part 1: Creating the Robot
-
The first thing you will need to do is create a new class to represent your robot. Click on the New Class button in BlueJ and name your class
Robot. - Remember to delete most of the sample code that BlueJ provides--everything except the class comment (which you should fill in) and the class declaration.
-
The next step in creating a class is to think about its attributes--what are the instance variables it should have to describe its properties or state? What does the Robot need to remember about itself?
-
In this case, your Robot should remember its body parts: its
head, body, left arm, right arm, and itslegs. So you'll want instance variables to represent all of those (5 parts total). We declare instance variables with the formatprivate DataType variableName; - Think about what data type each of these variables will have--how would you declare them if they were "local" variables? The data type can be a primitive (e.g.,
int, double), or it can be a class (wink wink nudge-nudge). -
Remember that we only declare variables at the top of the class--you'll assign values to those variables in a moment.
- You might name these instance variables starting with an
_(an underscore), to keep clear what is an instance variable and what is a local variable.
- You might name these instance variables starting with an
-
Also remember to always make instance variables
private.
-
In this case, your Robot should remember its body parts: its
-
You assign instance variables in an object's constructor, so you'll need one of those. Remember that constructors have the format:
public ClassName()
{
  //... code goes here
}
Where
ClassNameis the name of the class you're working on. -
Now you can assign values to your instance variables inside the constructor! Remember that we can create and assign new objects using the format such as:
objectName = new ClassName()(replacing
ClassNameandobjectNameas appropriate).- And because we've already declared the instance variables, we need to avoid doing that again!
- Now when you instantiate a Robot, you should see a bunch of shapes show up on the screen! Of course, they aren't in the correct spots to actually look like a robot...
-
The other task that constructors are used for is to initialize aspects of the object--to "set up" the object. For example, setting up where the shapes should be so that your picture looks like a robot is appropriate work for a constructor.
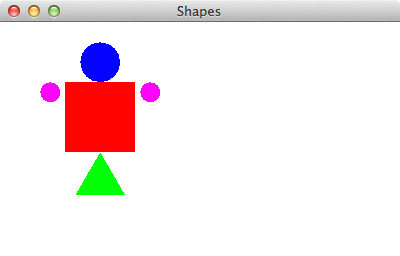
Add further Java statements to your constructor to modify the color, size, and position of the instance variables so that your object looks like the robot shown above. Remember, you can call methods on the instance variables using dot notation--just like we did in the last lab!
-
Your robot should match the following description:
-
The body is square (same width and height--I used a height of 70 pixels)
- (I also positioned the body about 70 pixels down and to the right, so that the robot fit on the screen).
- The head is horizontally centered above the body (I used the default radius)
- The bottom of the head and the top of the body are at the same level
- The arms are aligned with the top of the body.
- The arms are spaced half a radius away from the body (I gave the arms a radius of 10, so they were 5 pixels away from the body).
- The feet is horizontally centered with the body (I gave the feet a sideLength of 50)
- The top of the feet and the bottom of the body are at the same level
-
The body is square (same width and height--I used a height of 70 pixels)
-
DON'T IGNORE THIS: I recommend planning out your robot outside of code, on paper. Something like this:
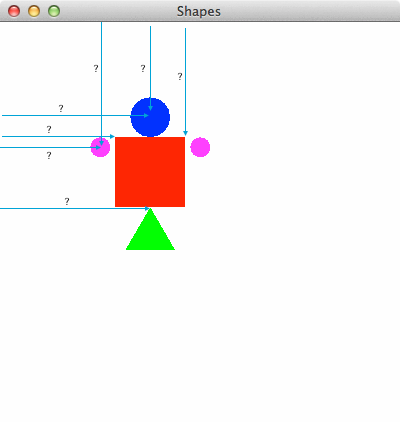
Think about where you would position all of the body parts (say, relative to the
body). Consider the width/head of the body and the radii of the circles.- I also recommend using the
setXPosition()andsetYPosition()methods rather than the equivalent move methods, as it will make it easier to be precise about where objects go! -
Helpful hints:
- The canvas is 400px by 400px in size.
- The
xPositionandyPositionof a Rectangle refer to the upper left corner of the Rectangle. This is called the reference point - The reference point of a Circle (e.g.,
xPositionandyPosition)refer to the center of the Circle. - Remember that the radius of a Circle is half of its distance across!
-
The reference point of a Triangle refer to the upper left corner of the "rectangle that would contain the Triangle:

- I also recommend using the
-
As we've done previously: try writing a little (e.g., moving a single body part), then compiling and testing your code to make sure it works. Once you're done, you should have a nice graphical Robot!
- Also try to think about what was your own mental process for determining where shapes go! Hint: avoiding too much trial and error will make your life easier!
-
Your robot should match the following description:
- If you haven't yet, this is a good time to switch drivers!
Part 2: Changing Color
Now that you have a robot, it would be good to give it some functionality--some methods. For a simple start, let's try playing with the robot's color.
-
Implement the following method in your
Robotclass:/** * Make the Robot exist only in black and white */ public void makeBlackAndWhite()
This method should change your Robot so that shows up like in an old movie: in black, white, or
"gray". For example: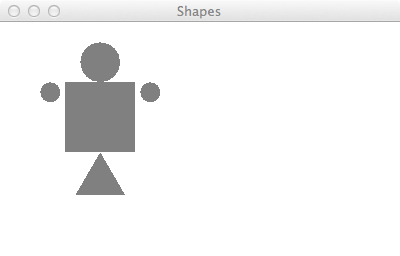
- Start by creating the method signature and method comment detailed above.
-
Think about how you would color the Robot if you had access to all of the component shapes--what would be your algorithm?
- Try setting the color of each shape individually, by re-using the methods that already exist for the shapes!
- Make sure you test your method by calling it through BlueJ (right click on a red Robot object and select the method) to check that they work.
-
Of course it would be nice to also be able to bring the Robot back to living color again. Add another method
/**
 * Colors the robot
 */
public void makeColorful()
That returns the Robot to its original colors.
- This method will be very similar in implementation to the previous one!
- Again, be sure and test to see that this works.
- Remember to switch drivers between method implementations!
Part 3: Adding Movement
-
Since one of the things we frequently do with shapes is to move them around, lets give the
Robotthe ability to be moved.Implement the following two methods in your Robot class:
/**
 * Moves the Robot horizontally by the specified distance
 */
public void moveHorizontal(int distance)

/**
 * Moves the Robot vertically by the specified distance
 */
public void moveVertical(int distance)
Note that both of these methods include parameters for how much to move by!
-
You should use a similar procedure to the last part: create the method signatures and method comments detailed above, and then fill in the method body
- Again, think about how you would move the Robot if you had access to all of the component shapes--what would be your algorithm?
- Remember to test your methods thoroughly!
- This demonstrates the power of abstraction--now we can talk about moving a Robot without needing to worry about further details! See how much easier that would make a Robot Dance Party Simulator™?
- Remember to regularly switch drivers!
Part 4: Teleporting
-
Moving the Robot by specific distances is all well and good, but it would be nice to be able to teleport the Robot to a specific location.
You should add another method to your robot:
/**
 * Moves the Robot to the specified location
 */
public void moveTo(int x, int y)
- At this point, you might be thinking "well I'll just move all of the components to new specific locations." But if you try that, you may realize that you'd also need to figure out where they all go in relation to one another (e.g., so that the head is above the body). Wouldn't it be nicer if you could re-use those methods you just wrote that move the Robot a specified amount? If we could take advantage of abstraction?
-
In order to do this, you'll first need to have some way of specifying the Robot's current position--to give the Robot a reference point (the same way Circles and Rectangles have reference points). After all, if I told the Robot to move to (x=100, y=200), would that be the position of its head or its body?
-
To determine the Robot's reference point, draw an imaginary box around it. Your Robot's reference point should be the top left corner of that box:

- The reference point can be represented by the current
xandycoordinates of that top-left corner. That means the Robot now needs to remember these two things. How do we remember things? instance variables! - To keep track of its position, add additional instance variables to represent the Robot's
xPositionandyPosition. (It's very common to need to add more instance variables to a program while you're working on it)! -
You'll need to assign values to these variables in the constructor. You may need to do some mental (or coded) calculations to identify the coordinates of that top-left corner!
- Hint: think about using the head's yPosition and radius to determine the y-coordinate, and the leftArm's xPosition and radius to determine the x-coordinate.
-
Remember to make the instance variables
privateand to assign values to them in the constructor (two steps in two different places)!
-
To determine the Robot's reference point, draw an imaginary box around it. Your Robot's reference point should be the top left corner of that box:
-
Since you've added variables that track position, you'll want to make sure those variables are kept up-to-date when you tell the Robot to move. Modify your previous methods so that the position variables are updated based on the distance moved.
-
Hint: remember you can use mathematical operators to add a value to a variable and then reassign the result. For example:
int x = 2;
x = x + 3; //x is now 5
-
Hint: remember you can use mathematical operators to add a value to a variable and then reassign the result. For example:
-
Finally, you can fill in the algorithm of the
moveTo()method.- Due to the utter awesomeness of abstraction, this is actually easier than it might seem. Think about what the current position of the robot is, what the target position of the robot is, and what the difference it needs to move is! You might make new local variables (e.g.,
xDistanceToMove) to represent these values. -
Remember, you can have one method call another method of the same object using dot notation, where
thisis the object you're commanding. So:this.myMethod(parameters) -
Hint: if your
moveTo()method is more than a few lines long, you're probably on the wrong track.
- Due to the utter awesomeness of abstraction, this is actually easier than it might seem. Think about what the current position of the robot is, what the target position of the robot is, and what the difference it needs to move is! You might make new local variables (e.g.,
-
Make sure to test that this method works! Below are a few approximate examples you can use to check your work (note that your Robot might start out in a different location):
robbie.moveTo(0,0);robbie.moveTo(200,200);robbie.moveTo(150,50);
- Also make sure that if you move the robot horizontally and vertically, you can still teleport it to the proper location!
Submission
-
Make sure both of your names are on the class you've created (
Robot). If your names aren't on your assignment, we can't give you credit! -
Right-click on the project folder you downloaded, then:
- If using Linux, select Compress...
- If using Windows, select Send to and then Zip file
- If using Mac, select Compress ... items
This will let you take the selected folder (or files) and generate a new compressed
.zipfile. -
Navigate to the course on Moodle
(Lecture Section A),
(Lecture Section B).
Upload your
.zipfile to theLab C Submissionpage. Remember to click "Save Changes"! You may submit as often as you'd like before the deadline; we will grade the most recent copy. - While you're on Moodle, remember to fill out the Lab C Partner Evaluation. Both partners need to submit evaluations.
Extensions
There are of course lots of other features you could give your robot. If you finish the lab early, one additional challenging option is below. Note that completing this method can be worth 10% extra credit.
Extra Credit: Changing the Height
-
As a final piece of functionality, make it so your Robot is able to change its size by implementing the following method:
/**
 * Sets the Robot's height to the given value
 */
public void setHeight(int height)
-
"But Joel!" I hear you cry. "If the Robot is 300 pixels tall, I don't know big to make the head!". This is very true. So we're going to use the following algorithmic trick:
    Figure out the Robot's current height
Figure out a multiplier for how much bigger the robot will get
Change all the component shapes to be that much bigger
Move the component shapes into place based on their now-correct size
-
For Step 1, you'll need to have some way of figuring out the size of the component shapes--remember, once this method exists it's possible that the size of the shapes is different than you defined in the constructor! Luckily, the Shape objects have getter methods that let you ask them for information about themselves. For example:
myCircle.getRadius(); //returns the current radius of myCircleRemember, these methods return values--just as if you had typed in a number or received it from a method parameter. Thus you can use these methods to calculate a value for a
currentHeightvariable.- Remember that a Circle's radius is only half of its height!
- You can get the height of a Triangle using the formula \(\frac{\sqrt{3}}{2} * \mathtt{sideLength}\)
-
Note that your height will need to be in
doubleprecision (since Triangle height will not be a whole number!).
- For Step 2, try using division.
-
For Step 3, you can get the current size, multiply that by the multiplier, and then set the result to be the new size. For example:
int currentRadius = circle.getRadius();
int newRadius = (int)(currentRadius*multiplier);
circle.setRadius(newRadius);
-
Note that because radius needs to be a whole number
(an
int), you will need to cast the double precision result of the multiplication into anintin order to get it to fit with the variable type!
-
Note that because radius needs to be a whole number
(an
- This is a good time to switch drivers!
-
At this point, all of your shapes are the correct size--but they aren't in the correct location! Once again, use the
setXPosition()andsetYPosition()methods to put them in the ride place.- In order to determine what the x- and y- positions should be, you'll need to think back to how you originally figured out the position of your Robot. Can you generalize those steps so that they only care about the size of the shapes, rather than specific numbers?
- Feel free to make as many local variables as you need to help keep track of intermediate values in your calculations. And if you get stuck, let us know!
Grading
This assignment will be graded out of 20 points.
- [1pt] You have created a new Robot class
- [1pt] Your Robot has appropriate instance variables
- [1pt] Your Robot keeps track of its position (based on its body center)
-
[1pt] Instance variables are
private - [1pt] Your Robot includes a constructor that assigns values to the instance variables
- [2pt] Your constructor properly initializes the shape components of the Robot
- [1pt] You have implemented the
makeBlackAndWhite()method - [1pt] Your
makeBlackAndWhite()method turns the Robot gray - [1pt] You include a
makeColorful()method that colorizes the Robot - [1pt] You have implemented the
moveHorizontalandmoveVerticalmethods - [1pt] Your movement methods appropriately utilize their parameters
- [1pt] Your movement methods update the Robot's position instance variables
- [1pt] You have implemented the
moveTo()method. - [2pt] Your
moveTo()method properly calculates the distance to move - [1pt] Your
moveTo()method calls your previous methods to move the Robot - [1pt] You have included a completed class comment with your names
- [1pt] All methods include a method comment
- [1pt] Submitted a lab partner evaluation