CS 161 Lab A - Moving Shapes
Due Fri Jan 23 at the start of class
Overview
In this lab you will set up the BlueJ interactive Java environment (IDE) for future work this semester, and familiarize yourself with the program. You will practice using BlueJ to instantiate and call methods on shape objects. You will manipulate these shapes to create a few simple pictures.
Note that this first lab should be completed individually (not in pairs). If you get stuck or have problems, please ask for help!
Objectives
- To become familiar with the lab environment and the BlueJ IDE
- To become familiar manipulating objects
- To practice writing down an algorithm
- To practice submitting your work
Necessary Files
You will also need to download a copy of the DrawableShapes BlueJ project.
Lab Details
Below are detailed instructions for completing this lab. For this early assignment, we'll walk you through most of the steps. There are a lot of details; be sure and read the instructions carefully, and let us know if anything is unclear!
Part 1: Getting Started with BlueJ
-
Setting up your network drive (Alexandria): Before you get started, you'll want to make sure your network drive on Alexandria has been mounted. If you can't find it, or haven't ever used your network space,
go here for guidance.
- Warning: Do not proceed to the next step before this is complete!
- Run the BlueJ IDE by clicking the shortcut on the desktop (or by successive clicking to follow "Start->All Programs->BlueJ->BlueJ"). If you choose to use your laptop, you might first need to install the Java Development Kit (JDK 7 or later) and BlueJ. Follow this link to download and install the JDK, and this link to download and install BlueJ. Let us know if you need help installing the JDK and BlueJ on your laptop. Once you've got BlueJ set up and running, continue to the next step.
- Download a copy of the DrawableShapes project to experiment with: click and save the DrawableShapes.zip file to your Alexandria drive. You should create a dedicated folder on your network drive for storing your programming and class work.
- The actual DrawableShapes project is inside this compressed folder, and you need to extract it before BlueJ can open the project. No matter what the downloaded file looks like on your desktop, you should be able to double-click it to get at its contents. On a Windows machine, you'll see the DrawableShapes project folder inside the compressed file; simply drag the DrawableShapes folder out onto your desktop. Alternatively, you can right-click on the compressed file and select "Extract All", which should create a non-compressed folder in the same directory. On a Mac, double-clicking the file should extract the project folder in the same directory as the compressed file. Again, if you have any problems with this process let us know!
-
You can open this project by either double-clicking on the "package.bluej" file inside the project folder, or by selecting "Project" > "Open Project..." in BlueJ and navigating to the "DrawableShapes" project in the file-selection dialog. (Protip! On a Mac, do not just drag the project file or folder into the BlueJ icon on your dock!). If all goes well, you should end up with a project window like the one below:
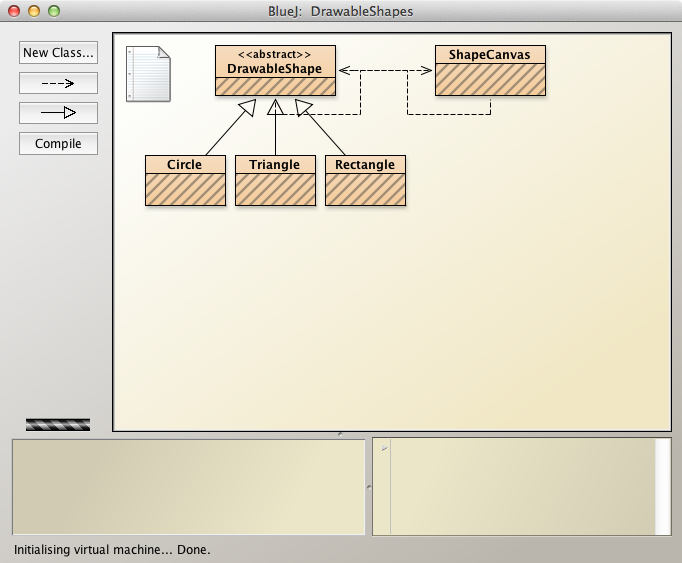
- The orange boxes that are displayed are known as classes. Think of these as cookie-cutters or blueprints that we use to create objects of that class's type. The dotted arrows mean that certain classes "use" other classes.
- The gray stripes appear on the orange class boxes because the classes haven't been compiled yet. We can't interact with the classes until they are compiled, so click on the "Compile" button on the left side of the screen to compile all the classes before proceeding. If something goes wrong, it's typically because either Java isn't properly installed on your machine, or BlueJ hasn't been configured properly and is having trouble finding the Java compiler. Holler if the compilation fails, and we'll help sort things out. If you're trying this on your own, there are installation instructions on the downloads page that should help.
Part 2: From Shapes to Pictures
-
Now that you have the project open and compiled, you can start creating and manipulating objects.
For this project, the objects will be creating are Shapes (
Circle,Triangle, orSquare). You can create or instantiate objects by right-clicking on the appropriate class (the orange box) and selecting thenew <classname>()method. For example, if you right-click on the Circle class, you should be able to select thenew Circle()method.You will be prompted to provide a name for your object in order to keep track of it. To continue with the default name shown in the textbox (e.g.
circle1), click the "Ok" button. At this point, a window with a small blue circle in it should pop up, and in the workbench (the lower left corner of the BlueJ window) you should now see a red box marked with the object's name and class. The red box represents and gives you access to the object you just created.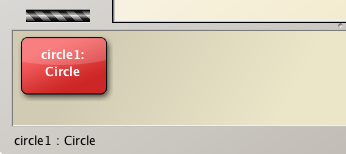
-
You can now begin calling methods (functions or actions) on the circle and changing its attributes (details or properties). Right-click on the red object box to see a list of methods you can call on it. Certain methods will give you information about the shape (such as its size or color), while others will let you change it (such as its size and color).
- If you accidently close the window with the drawing, you can select the
void makeVisible()method from the ShapeCanvas class to make it appear again. -
DO NOT select the red "Remove" option at the bottom of an object's method list: this will remove the object from the object bench, but not from the drawing! And since it is removed from the bench, you'll never be able to call a method on it again. You should first call the
void removeSelfFromCanvas()method on the object in order to remove it from the Canvas---then you can remove it from the bench. -
If you select the red "Inspect" option from the BlueJ menu, you will get a window that shows you all of the attributes of the object:
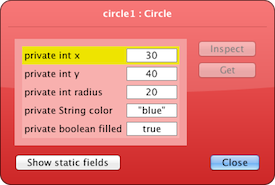 This shows the circle's x and y positions (measured from the center), its radius, its color, and whether it is filled in. This is very helpful for getting details about what changes you have made to a shape!
- If you accidently close the window with the drawing, you can select the
-
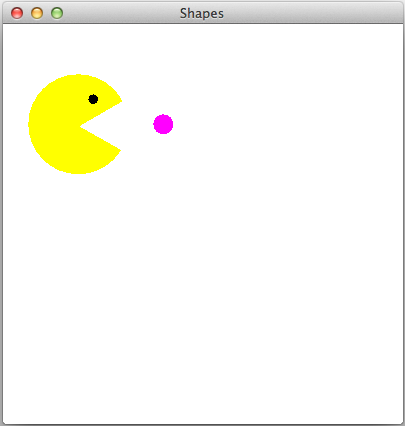
Your first task is to create and manipulate shapes in order to create a drawing of Pac-Man. Perform the following steps in order by selecting the proper methods from the BlueJ menus. Note that some steps will require you to provide additional details to the method (e.g., how far to move or what color to make the shape). These details are called parameters.
Algorithm
Create a new Circle named body
Change the body's color to "yellow"
Change the body's radius to 75
Change the body's radius to 40
Set the body's x-position to 75
Set the body's y-position to 100
Change the body's radius to 50
Create a new Circle named eye
Change the eye's color to "black"
Change the eye's radius to 5
Move the eye horizontally by 100
Move the eye horizontally by -20
Move the eye horizontally to the left by 20
Move the eye vertically by 20
Move the eye down by 20
Create a new Triangle named mouth
Set the mouth's rotation to be 30 degrees
Set the mouth's side length to be 75
Move the mouth horizontally 45
Move the mouth vertically by 10
Move the eye up by 5
Set the mouth's color to be "white"
Make a new Circle called pellet
Set the pellet's color to be "magenta"
Set the pellet's radius to be 20
Make the pellet's radius be 10
Move the pellet horizontally 150
Move the pellet vertically down by 60
Move the pellet to the left by 20
If you followed the instructions correctly, you should end up with the following image:
-
You've probably noticed that some of the steps you just carried out are redundant. For nstance, changing the body's size in Step 3 is superceded by another change in Step 4 (and then again by Step 7!). Similarly, Steps 11 to 13 could all be combined. The algorithm could thus have been reduced to 25 steps, would would have made it more efficient:
Algorithm
Create a new Circle named body
Change the body's color to "yellow"
Change the body's radius to 50
Set the body's x-position to 75
Set the body's y-position to 100
Create a new Circle named eye
Change the eye's color to "black"
Change the eye's radius to 5
Move the eye horizontally by 60
Move the eye vertically by 20
Move the eye down by 20
Create a new Triangle named mouth
Set the mouth's rotation to be 30 degrees
Set the mouth's side length to be 75
Move the mouth horizontally 45
Move the mouth vertically by 10
Move the eye up by 5
Set the mouth's color to be "white"
Make a new Circle called pellet
Set the pellet's color to be "magenta"
Set the pellet's radius to be 20
Make the pellet's radius be 10
Move the pellet horizontally 150
Move the pellet vertically down by 60
Move the pellet to the left by 20
Can you see even more "optimizations" that you might make?
Part 3: Your Turn!
By drawing Pac-Man, you actually carried out an algorithm: a sequence of instructions that, when executed, gives the desired result. In designing and provided this algorithm to you, we were careful and precise because anyone using this algorithm should get the same Pac-Man drawing. Now it's your turn to provide an algorithm to produce a drawing of your choice!
-
To remove Pac-Man, you can remove each of the shapes from the canvas using the
removeSelfFromCanvas()method (remember to do that before you remove them from the workbench!).- Or as a short-cut, you can end the drawing program by clicking on the "Compile" button again, allowing you to start fresh.
- Take a few minutes to design a SIMPLE drawing on a piece of paper. Popular ideas in the past include: a face, a spaceship, a landscape, or a more detailed Pac-Man drawing. Your drawing should contain at least 3 shapes--but try not to use too many!
-
As you create your drawing on the screen by moving shapes into place, you will also need to write down the steps you took to produce the drawing!
-
You should write these down in the
README.txtfile found in the BlueJ project. You can open this inside BlueJ by double-clicking on the white paper icon in the upper-left corner of the class window.
- Save early, save often!
- Because another student will need to reproduce your drawing, it is imperative that the recording is accurate: record all the steps, even if you make the same method call with different values when producing your drawing.
- Don't let anyone see what you are drawing! (it's more fun that way) :)
- Make sure and delete your drawing when you are done!
-
You should write these down in the
-
Finally, when we call time (e.g., when there are about 30 minutes left in lab), you will need to find another student and exchange algorithms (just jump to each other's computer). Try and reproduce each other's drawings!
- You should follow the student's instructions EXACTLY. Even if you think you found an "error" or a typo, don't try and fix it! Pretend you are as inflexible as a computer.
-
Once you are finished, add a brief note (a couple of sentences) to the bottom of the README describing what the picture is of and any problems you had following the algorithm. (It's okay for there to be problems, we just want to see what you thought of the process)!
-
Be sure and add your name to the bottom of the note!
Part 4: Survey!
One last thing: at the end of each lab, you'll need to fill out a "peer evaluation" on Moodle to give some feedback on your lab partner. But since you don't have a partner for most of this lab, you'll instead be filling out a different survey.
-
Log in to the Moodle page for this course--a link can be found on the main course page, or you can simple access it from
moodle.pugetsound.edu.
- This page is where I will put the lab partner evaluations, as well as upload source code and such from lectures.
- Under the "Surveys" heading you should see a survey called "Mini-Bio." Click on that and fill in the short survey.
- That's it for this part. Note that you'll need to make sure to fill in your lab partner evaluations BEFORE the lab deadline--take 2 minutes to do it right after you turn in the lab.
Submittion
After you have completed the lab, use the following to submit your work on Moodle:
-
First, make sure your name is written at the top of the README. If your name isn't on your assignment, I can't give you credit!
- Also make sure your partner's name is attached to their description at the bottom!
-
Right-click on the project folder you downloaded, then:
- If using Linux, select Compress...
- If using Windows, select Send to and then Zip file
- If using Mac, select Compress ... items
This will let you take the selected folder (or files) and generate a new compressed
.zipfile. - Right-click on your
.zipfile and select"Rename". Rename the file toLastName1_LastName2_Lab1.zip, where theLastNamesare the respective last names of the authors. -
Navigate to the course on Moodle
(Lecture Section A),
(Lecture Section B).
You should see a
Lab A Submissionpage. Click on this link, and you should be able to drag your.zipfile right into the submission box. Click"Save Changes.". You may submit as often as you'd like before the deadline; we will grade the most recent copy. - Normally at this stage, I'd remind you to fill out the partner evaluation. Instead, make sure that you've completed the Mini-Bio!
Notes
This lab is a warmup for this class. Don't be concerned if you don't understand any or all of the Java code in the DrawableShapes project. The goal is to become comfortable with using BlueJ, and using the BlueJ interface to instantiate objects and call methods to modify objects' attributes. As always, I welcome questions, so don't hesitate to ask!
Grading
This assignment will be graded out of 5 points (it is almost impossible not to get full credit on this lab!):
- [2pt] You submitted a README.txt with a detailed and precise algorithm for producing a drawing
- [1pt] Your algorithm produces something recognizable as a picture
- [1pt] You have executed someone else's algorithm and left a comment on the process
- [1pt] You have filled out the mini-bio