CS 161 Homework 8 - Graphical Hangman
Due Tues Apr 21 at 11:59pm
Overview
In designing your Hangman game for the last program, you were encouraged to break the code up into helper methods so that it would be easy to modify and adjust your program later. Indeed, "we might want to change it" has been a common excuse for a lot of style and implementation decisions! The vast majority of programming wok involves modifying and adapting existing programs--this assignment will give you a chance to practice with that process and see how easy it can be with well-organized code.
For this assignment, you will be modifying your previous Hangman game to give it a simple graphical user interface (or "GUI"), like the one below:
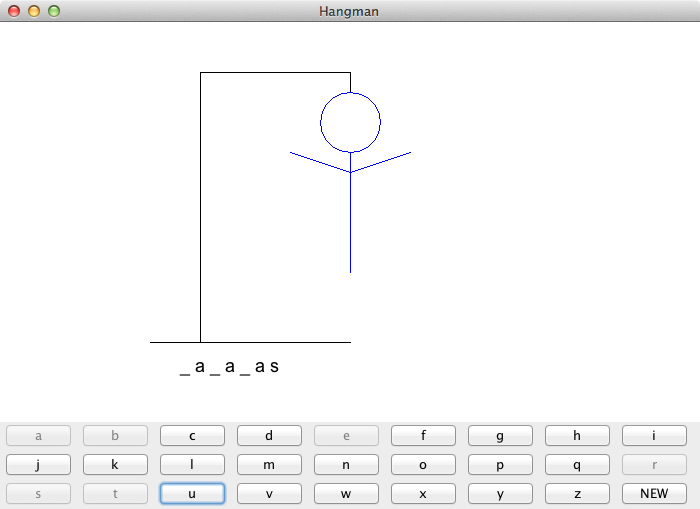
Users can click on the buttons to guess letters, and will see the hangedman drawing appear as they make mistakes! The "NEW" button can start a new game. Implementing this program will involve refactoring (reorganizing) your Hangman game, as well as adding classes to support the drawing and the buttons.
Finally, you'll also package your entire game into a single file, so that you can easily show it off to your friends and family without them needing BlueJ!
This assignment should be completed individually. You are welcome to ask for help (either from me or from your classmates), but remember the Gilligan's Island rule!
Objectives
- To practice refactoring and modifying code
- To practice implementing Graphical User Interfaces (GUIs) using classes from the Swing libraries
- To practice writing graphical event-driven programs
- To practice developing programs with low coupling (separating logic and representation)
- To practice packaging code into a
.jarfile.
Necessary Files
You will need a copy of your completed Hwk 7 (the HangmanGame). You should make a copy the entire project directory (remember to rename the folder!), and then start working from there.
- You need to copy the entire directory so that you get all the classes (
HangmanGame,WordFile) as well as the word-lists, etc.
The one new thing you will need is to download a new README.txt for this project (right-click on the link and select "Save Link As" to download the file). Remember to fill it out and turn in along with your assignment.
Assignment Details
The instructions in this assignment are more detailed and straight-forward than the last one (I'll walk you through many of the steps). However, dealing with refactoring your HangmanGame program will depend on how you wrote it!
Part 1: The Graphical Hanged-man
The first thing you'll want to do is set up the GUI and drawing part of your program, so that you can have something (the hanged-man) displayed.
-
To do this, you will need to create two new classes:
HangmanGUIto represent the overall GUI (the frame and the buttons) and aHangmanCanvasto perform the graphical drawing logic. -
Because both of these classes will involve GUI work, you'll need to import the graphics and Swing packages for both of them to use:
import java.awt.*; //for graphics
import javax.swing.*; //for swing
import java.awt.event.*; //for events
-
Your
HangmanCanvasclass will be set up similar to other graphical classes you've worked with (like theQuiltfrom Homework 5). Because theHangmanCanvasis going to be a graphical component we can draw on, we need to declare that it inherits the functionality and properties of a graphical component (such as aJPanel). Thus it's class declaration should look like:public class HangmanCanvas extends JPanelThe
extends JPanelpart says that this is a subclass ofJPaneland so gains all of the methods and properties of the existing graphical component--theHangmanCanvasis aJPanel, and so we can use it as such (e.g., we can make it show up on the screen). -
Since your class declaration has established that the
HangmanCanvasis aJPanel, you can callJPanelmethods onthis. In particular, in your constructor, you should call JPanel's.setPreferredSize()method so that yourHangmanCanvascan report how big it wants to be. Note that this method takes aDimensionobject as a parameter.- I used a canvas size of 700x400pixels.
-
Your since your
HangmanCanvasis aJPanel, you can override the JPanel'spaintComponent()method and specify what you want the canvas to look like (that is--specify how you want it to be drawn, such as with a hanged-man picture). So yourHangmanCanvasshould include a method:public void paintComponent(Graphics brush)In which you specify the drawing that will appear, using the provided
brushto draw your picture! You should be familiar with theGraphicsbrush by this point.-
You will likely need to use some trial-and-error experimentation to determine the coordinates of the lines to draw. You might want to skip down to
Step 9
And get the
HangmanGUIworking so you can see your drawing and test it.
-
You will likely need to use some trial-and-error experimentation to determine the coordinates of the lines to draw. You might want to skip down to
Step 9
And get the
-
Your drawn image should meet the following requirements:
- It should always include the "gallows"
- It should draw as many body parts of the hanged-man as the user has missed letters.
- It should draw the current word-so-far (including spaces between the underscores).
You can also include further details (e.g., number of lives left, words of encouragement/scorn) as optional extras.
-
Notice that the last two requirements have some variables involved--for example, you'll need some variable that will tell you how many letters have been missed. Because
paintComponentcan't take any more parameters, they can't be local variables--you'll need to make them instance variables.- The logic for the body parts can be a little tricky: think about under what conditions you want to draw a particular body part!
- Be careful to avoid code duplication! You should only have a line of code that draws each body part once.
- You'll probably need some way to change these instance variables. What kind of method do we use to set the value of instance variables?
-
You can test your drawing by instantiating the
HangmanGUI(below) once it works. Make sure to test your logic drawing by specifying different values for the instance variables (in the constructor or by calling a setter from theHangmanGUI). -
When you create the
HangmanGUIclass, it should not be aJPanel. It does not need toextendsanything. -
Your
HangmanGUIclass will need aHangmanGameand aHangmanCanvasas attributes. Remember to instantiate instance variable in the constructor- Your
HangmanGUI()constructor will not need any parameters, though if you want to pass it a wordList file (orString[]) you can do that.
- Your
-
Your
HangmanGUIclass's constructor should also instantiate aJFrameto hold the GUI. Check out the linked API for details about instantiating anew JFrameobject (e.g., calling it's constructor).-
Whenever you instantiate a
JFrame, you should immediately call the following method on it:This will make the program end when you close the window that is created.frame.setDefaultCloseOperation(JFrame.EXIT_ON_CLOSE); -
You should add the
HangmanCanvasobject you instantiated (your instance variable) to theJFrame(by calling the.add()method on the frame and passing the canvas in as a parameter). This will effectively put the canvas (which is aJPanel) inside the frame. -
Finally, you will also need to call the
.pack()method on the frame (which takes no parameters), as well as the.setVisible()method on the frame (passing a parameter oftrue). These methods will tell the frame to "resize to fit the contents" and to actually appear (respectively).- You should call these methods at the END of your constructor, after you've done all the work setting up/adding things to the JFrame (and you will be adding more steps throughout the assignment).
-
Whenever you instantiate a
-
At this point, you should be able to instantiate a new
HangmanGUIobject (right-click on the class in BlueJ) and see your drawing on it!
Part 2: Refactoring the HangmanGame
Now that you've got your frame and drawing working, you'll need to start integrating your existing game logic. To do this, you'll need to refactor (reorganize) your code from the last homework.
-
You will need to add the following methods to your
HangmanGame's public interface (that is, publicly available methods):Method Summary intgetMissCount()
Returns the number of letters that have been incorrectly guessed.StringgetPuzzle()
Returns the current "puzzle word" as guessed so far. For example:"_ _ a _ _"booleanguessLetter(char guessedLetter)
Guesses the given letter, and returns true if the guess was correct (and false otherwise).booleanisLost()
Returns whether or not the game has been lost.booleanisWon()
Returns whether or not the game has been won.voidresetGame()
Resets the game, picking a new word and reseting the letters and lives missed. -
As you add each new method, you should also modify your
playGame()method to utilize these new functions. For example, yourplayGame()method probably has somewhere that you evaluate if the game is won--you should replace that boolean expression with a call to your newisWon()method.- You will need to continue to avoid duplicating code as you add all this new functionality!
-
While there are a lot of methods here, most of them are very straight forward--they're basically just getters for some attribute (or combination of attributes), so will probably be one line of code
- For example, the
resetGame()method probably exists already, though you may need to rename it (and you should make it public!)
- For example, the
-
The only complex method you need to add is
guessLetter(). This method should take in acharrepresenting the letter that was guessed, then does all the work that determines whether the guess was correct or not (including losing lives if it was incorrect), and thenreturns whether or not the guess was correct!- Implementing this method will involve extracting the functionality from your
playGame()method. If you've organized your logic into helper variables correctly, this shouldn't be too complicated--simply take the logic from theplayGame()method that occurs after you prompt the user for a letter, put it into theguessLetter()method, and then call that method instead. - Note that handling whether a letter has already been guessed does not need to go in
guessLetter--and in fact probably shouldn't (since it goes with it's own output) -
Your
guessLettermethod must not print out anything--it should only handle logic! All of your printed output should be handled in the playGame() method. -
Again, you will need to adjust your
playGame()method so that there isn't duplicated code. This is important!
- Implementing this method will involve extracting the functionality from your
-
You should first test your refactoring by re-testing your
playGame()method. YourHangmanGameshould work exactly the same as before (from the user's perspective)--you've just reorganized the code to make it more extensible.
Part 3: The Button Keyboard
Your HangmanCanvas will handle the output of the game (giving information to the user), but you'll need to add the ability to get input to the game (getting information--guesses--from the user).
To do this, you'll add a graphical keyboard that the user can press to guess individual letters.
This input is handled by the GUI (the Canvas is only for drawing output).
-
The keyboard will be made up of graphical buttons, represented with the
JButtonclass. You can look through this documentation for methods that might be useful. -
Your keyboard is going to need to have 26 buttons though--one for each letter (plus one for a new game). Of course you don't want to make 27 variables... so your program should use an array of
JButtons.-
Declare this array as an instance variable, and then instantiate it in the constructor. You can then use a loop to fill each room in the array with a
new JButton. -
The constructor that you should use for each
JButtontakes in a String that is the "label" for the button (e.g., the text shown on it). So the first time through your filling loop you should make a button labeled"a", the second time a button labeled"b", etc. -
Luckily, you can do this easily using a similar trick to how you assigned letters to PianoStrings in Hwk 6. Define a variable (e.g.,
alphabet) that contains all of the letters in the alphabet. Then each time through the loop, you can get theith letter from that String in order to determine what letter to put on each button. -
Note that the last button in your array should be labeled
"NEW"
-
Declare this array as an instance variable, and then instantiate it in the constructor. You can then use a loop to fill each room in the array with a
-
In order to arrange all of these buttons in the window, you'll need a "container" to hold them and lay them out. The most common type of container we use is a
JPanelwhich is basically an empty container for GUI elements. You then.add()elements to thisJPanel, just like you added yourHangmanCanvasto theJFrame.- You can instantiate a new
JPanelfor this purpose (it can be a local variable). -
You'll then need to specify how items in that
JPanelwill be laid out, so that you can put more than one button inside it. To do this, you use aLayoutManager,which says how components in the container should be organized. Specifically, since you'd like to arrange the buttons in a grid, so you should use aGridLayout(which is a kind ofLayoutManager). -
Instantiate a new
GridManagerand tell theJPanelto use it with the.setLayout()method. For example:panel.setLayout(new GridLayout(3,3)); //sets layout to be 3x3 grid -
Each GUI component you then
.add()to theJPanelwill be placed into a "cell" of the grid--starting at the top left and moving across one row before going down to the next (you can't specify which cell to put an item in--they are added in order). You should.add()eachJButtonin your array to thisJPanel.
- You can instantiate a new
-
Once you have the buttons in the
JPanel, you should.add()theJPanelto yourJFrame- It's a bit like organizing pencils inside a box, and then putting that box inside another box.
- Note that this will cause your
HangmanCanvasobject to (temporarily) be replaced with the panel of buttons, but it will let you test your work!
-
Of course, you'd like to be able to put multiple components into the
JFrame... so you should set its layout as well!-
I recommend you use a
BorderLayout.If you look at the linked documentation, you'll see that this layout gives you 5 "areas" in which to place components (NORTH,EAST,SOUTH,WEST, andCENTER)--you specify which area you want to add items to as a second parameter to the.add()method, and then Java will organize items appropriately. For example:JPanel panel = new JPanel(); panel.setLayout(new BorderLayout()); panel.add(new JButton("Top"), BorderLayout.NORTH); //puts button on the top panel.add(new JButton("Middle"), BorderLayout.CENTER); //puts button in the middle panel.add(new JButton("Bottom"), BorderLayout.SOUTH); //puts button on the bottom
-
Give your
JFrameaBorderLayout, and then add theHangmanCanvasin one spot (e.g.,NORTH) and the button keyboardJPanelin another (e.g.,SOUTH).
-
I recommend you use a
-
At this point, when you instantiate your
HangmanGUIclass you should see both yourHangmanCanvasand your button keyboard. Yay GUIs!
Part 4: Handling Actions
The last step is to make it so the buttons you've created do something. To do this, you'll need to specify what happens in response to a button being pressed.
When a JButton is pressed, it (automatically) shouts that says "hey, an action occurred! I was pressed!" We write a method that responds to this event by doing something, and then let the JButton know to call our method when it is pressed.
-
In order to have our method respond to the event, we need to tell the
JButtonthat we are "listening" to it--that is, we're ready to respond if it shouts that something happened. In order to give ourselves that functionality, we declare that we are anActionListener(e.g., someone that can listen for theActionEventsthatJButtonscreate by shouting), and so we have the method that theJButtonshould call on us when something occurs; a method calledactionPerformed.-
Thus the first step in responding to a a button's action is to change the class declaration of our
HangmanGUIto specify that we are anActionListener: we do this by implementing theActionListenerinterface:public class HangmanGUI implements ActionListenerThis is Step 1 of responding to a GUI event!
-
By claiming that we are an
ActionListener,we are promising to include a single method. Look at the documentation for the interface to figure out the signature for this method (it's the only one in the summary). You should add in the method signature now so that your code compiles (don't worry about filling in the method quite yet).-
But helpful hint:
Add a simple print statement to the
actionPerformed()method, so that you can test that pressing your buttons calls the method as expected.
-
But helpful hint:
Add a simple print statement to the
-
Thus the first step in responding to a a button's action is to change the class declaration of our
-
Step 2 of responding to a GUI event is to tell the source of the event (the
JButton) that who is listening to it. We do this by calling the.addActionListener()method on theJButton.-
This method takes in an
ActionListeneras a parameter... but since ourHangmanGUIis anActionListener(because we declared it as such)... we can pass inthisas a parameter. Thus the object is adding itself as a thing listening to the button!
-
This method takes in an
-
Step 3 of responding to a GUI event is to fill in the listener's method (e.g.,
ActionPerformed) and specify what we want to do when the event occurs! In effect, this method will be replacing a lot of the logic of yourplayGame()method. What you'd like your program to do is:-
Figure out which button was pressed (since there are a lot that we might be responding to)! Luckily, the
ActionEventpassed in as a parameter to this method has a method called.getSource()that returns the object which caused the event.-
You should search through your array of JButtons to find which one
==theevent.getSource()
-
You should search through your array of JButtons to find which one
-
Once you've found which button was pressed, you should get the letter from the label of the button. You can ask a
JButtonwhat its label says by calling the.getText()getter on it. Note that you'll have to convert the String into achar(e.g., by using.charAt()). -
You should also disable the button once it's been pressed--this will keep the user from guessing the same letter twice. You can do this by calling the
.setEnabled()method on the button.- Notice that this will effectively replace the functionality in the game that keeps track of what letters were already guessed (the user can just check for grayed-out buttons, and can't select the same letter twice anyway). This is an example of how the UI can influence the functionality of a program!
-
Next you'll want to actually guess the letter--call the
guessLetter()method on yourHangmanGameobject (that you should have stored as an instance variable!)-
You can't print anything in order to give information to the user (because the GUI program doesn't come with a terminal, though BlueJ's terminal will work for testing). If you want to let a user know if the guess was correct or incorrect, you'll instead want to create a "pop-up" message. You can do this easily using the static methods from the
JOptionPaneclass. For example, you can make a simple popup message with theshowMessageDialog()method. This method can take a number of parameters to define its behavior: a simple example is:Try out the above code and study the documentation to figure out what parameters you will need to give this method.JOptionPane.showMessageDialog(null, "Hello world!", "An example", JOptionPane.PLAIN_MESSAGE);
-
You can't print anything in order to give information to the user (because the GUI program doesn't come with a terminal, though BlueJ's terminal will work for testing). If you want to let a user know if the guess was correct or incorrect, you'll instead want to create a "pop-up" message. You can do this easily using the static methods from the
-
After you've processed the guessed letter, you'll probably want to check if the user has won or lost. Are there methods you can call that will do this? You may want to give the user an alert as well.
- These
JOptionPanealerts effectively will be replacing theSystem.out.println()s from yourplayGame()method.
- These
-
Finally, you'll need to update the
HangmanCanvasto show any changes to the game. Call on setters to change the canvas' instance variables, and then callto tell the canvas to "refresh" itself.myHangmanCanvas.repaint();-
You can tell the canvas what word to show (and how many body parts to draw) by fetching that information from the
HangmanGameobject. Do you see now why you added thosepublicgetters? - Note that the
.repaint()method is basically how we can call thepaintComponent()method.
-
You can tell the canvas what word to show (and how many body parts to draw) by fetching that information from the
-
Figure out which button was pressed (since there are a lot that we might be responding to)! Luckily, the
- Make sure that you only let the user guess a letter (that is, you only respond to letter button pressed) if the game isn't already won or lost.
-
If the user pressed the
"NEW"button, you should reset the game by calling the appropriate method on it. Make sure that you tell the canvas to use the updated values as well.- You should also remember to re-enable all the buttons!
- Be sure and test your program thoroughly! You should be able to play multiple complete games of Hangman (both winning and losing), using only the GUI and pop-ups (no printouts!)
Part 5: Packaging the Project
Finally, once your game is totally working, you should package it into a single executable file that a user can double-click on to run. There are a few (simple) steps to do this:
-
When you run a Java Program outside of BlueJ, Java needs to know what method it should call to start the program. It's like specifying a "default" method that you click on to start your program. But because Java can't make any decisions about what to do, this method is always called
mainand always has the same signature:
-
You can put this method into a separate "Tester" class (e.g.,
HangmanGUITester), or put it at the bottom of yourHangmanGUIclass. The former is cleaner, but the later is acceptable as well.
-
You can put this method into a separate "Tester" class (e.g.,
-
The
mainmethod should contain 1 thing: the code you use to start your program. Think about what you do to start your program through BlueJ. What code represents that set of right-clicking?- When you select the
mainmethod through BlueJ (and pass it an empty array{}as a parameter), everything should run!
- When you select the
-
Now that you have a
mainmethod that lets your program run outside of BlueJ, you can go ahead and package it into an executable file:- In the BlueJ menu, select
Project > Create Jar File... - Under "Main class", select the class that contains your
mainmethod. You can choose to include the source files in the package if you wish - Hit "Continue"
-
You will be prompted for where to save the file. Be sure and give it a name and include
.jarat the end of the filename!. If you don't include the.jar, your computer won't know how to open the file.- You can save the file anywhere, but make sure to put a copy back inside the project file so you can submit it!
-
Be patient and wait for BlueJ to confirm that the
.jarfile has been created. This shows up as a message at the bottom of the class window (it's subtle):
- In the BlueJ menu, select
-
And that's it! You should be able to double-click on the created
.jarfile and see your program in action (assuming you have Java installed on your machine). If there are any problems, let me know.
Development Schedule
There may seem like a lot of parts to this assignment, but it's really not too much code (and really only a few different moving pieces). Nevertheless, get started early in case you encounter problems working with all of these new classes and methods!
A good set of deadlines for getting each step working:
- Part 1: Tue 04/14
- Part 2: Thu 04/16
- Part 3: Sun 04/19
- Parts 4&5: Tue 04/21
Submitting Your Assignment
- Double-check that your program is complete and works correctly. If your program doesn't compile, I can't give you credit for it!
-
Make sure that your code is commented. Give lots of inline comments, and include a JavaDoc method comment for each method in your program (especially the new
publicmethods). -
You will also need to fill out the README.txt file. You can open this file in BlueJ by double-clicking on the white paper icon in the upper left corner of the class window. You should place the answer to each question below the question box, replacing the "<Replace this with your response!>". Remember to save your changes (select "Class > Save" from the menu).
-
Remember to put the
.jarfile in your project folder as well! -
You should compress the entire Hwk8 folder into a single zip file (like you did for Lab A), and then submit it to the Hwk8 Submission page on Moodle.
- Be sure an upload the ENTIRE project folder--that is what includes all your work!
- This assignment is due at midnight on Tue, Apr 21.
Grading
This assignment will be graded out of 30 points.
- Refactoring (6pt)
- [3pt] You have included the required methods in your
HangmanGame's public interface - [2pt] You utilize your new methods inside your
playGame()method (avoiding code duplication) - [1pt] Your
HangmanGamecan continue to be played via the Scanner - GUI (20pt)
- [2pt] You have included a
HangmanCanvasclass that is a JPanel - [2pt] Your
HangmanCanvasdraws an appropriate number of body parts - [1pt] Your
HangmanCanvasdraws the current word-so-far - [1pt] You have included a
HangmanGUIclass that displays aJFrame - [1pt] Your GUI shows both the canvas and the keyboard
- [1pt] You represent the keyboard using an array of
JButtons - [1pt] Your keyboard is laid out in a grid
- [1pt] Your
HangmanGUIimplements theActionListenerinterface - [2pt] Pressing a keyboard letter causes a letter to be guessed
- [2pt] Guessed letters are processed and the display is updated
- ]1pt] Keyboard buttons are disabled when pressed (so the user can't guess a letter twice)
- [1pt] The game reports if it is won or lost (e.g., via a
JOptionPane) - [1pt] Users can only guess a letter if the game isn't won or lost
- [1pt] Pressing the "NEW" button starts a new game
- [1pt] You included a properly written
mainmethod. - [1pt] You have exported your game to an executable
.jarfile. - Style & Documentation (4pt)
- [1pt] Your program shows good coupling (division of responsibilities) between classes
- [1pt] You avoid code and data duplication whenever possible
- [1pt] You have included a full JavaDoc comment (with
@paramand@returntags) for each of your methods - [1pt] You have completed the included README.txt file