CS 161 Homework 6 - Piano Synthesizer
Due Tue Mar 31 at 11:59pm
Overview
In this assignment, you will be able to apply your programming skills to the domain of digital audio. Specifically, you will be writing a program to simulate the plucking of a piano string (similar to plucking a guitar string), creating an application that lets the user create synthesized music by hitting keys on the (computer) keyboard as well as see a visualization of that music. An example video can be seen below:
This assignment should be completed individually. You are welcome to ask for help (either from me or from your classmates), but remember the Gilligan's Island rule!
Objectives
- To practice working with
arrays - To practice with loops and conditionals--particularly using them with arrays
- To learn some basics of digital audio
- To once again practice with graphics and drawing
Necessary Files
You will need a copy of the Hwk6.zip file. The BlueJ project in this file contains a number of classes for you to use.
-
PianoStringTesterThis is a simple tester that you can use to check that yourPianoStringsimulation algorithm (see below) is working correctly. Run itstest()method (e.g., by right-clicking in BlueJ) to see the expected and actual output of your code. You will not need to modify this class. -
PianoPlayerThis class contains a single methodsynthesize()that will run your keyboard synthesizer (right-click and select the method through BlueJ). The methods has already been started for you, so that you can test your early code. You will be adding more to this method for the assignment.- Important note: Due to a bug in either Java for Windows or BlueJ for Windows, on some Windows machines the input frame doesn't automatically focus, and so doesn't register that you've typed on the keyboard. Minimizing and then restoring the frame seems to fix the problem.
-
IOFrameThis is a provided Graphical User Interface (like aJFrame) that will let you easily respond to the user hitting buttons on the keyboard. You can see an example of how this class is used in the providedPianoPlayercode,IOFramehas a couple of methods you will likely be using:-
public boolean hasMoreKeysTyped()
This method returns whether the user has recently pressed a key (and allows the program to handle multiple keys being pressed at once). The provided code uses this method. -
public char getNextKeyTyped()
This method returns acharof which key the user typed. So if the user just hit the 'a' key, this method will return'a'. The provided code uses this method.-
A
charis like a String, but is a single character/letter. We writechars with single quotes (e.g.,'a', and can compare them with==just like numbers.
-
A
-
public Graphics createGraphics()
This method returns aGraphicsbrush that that represents the drawing in the frame. You can call this method to get access to that object, and then draw on it from any other method! -
public void repaint()
This is the standard method used to "refresh" a drawn component. Calling this method gets Java to call thepaintComponent()method, thereby causing your drawing to be redone. If you've changed what is drawn on the frame (e.g., by drawing something with the brush provided bycreateGraphics()), calling this method will get that update drawing to show up.
You are of course welcome to look over the code for this class. It uses one or two new concepts, but much of it should be familiar. Note that you will not need to edit this class for the assignment--if you find yourself wanting to change it, try to think of another solution (or ask me!)
-
The zip file also contains the README.txt that you will need to fill out and turn in along with your assignment. Note that the README contains a few extra questions about digital audio you will need to answer correctly!
-
Remember to extract the files from the zip folder before proceeding!
Helpful Advice: Iterative Development
As always, you should work to complete this assignment iteratively---you should build a small piece, test that it works, and then move on to the next bit. Below is a suggested order of steps, as well as somewhat aggressive set of deadlines for getting each step working (if you haven't figure something out by the listed date, definitely ask for help!!):
- Part 0: Read the introduction to digital audio: Fri 03/13
- Part 1: Implement the
PianoStringclass: Wed 03/25 - Part 2: Add an array of PianoStrings to the
PianoPlayer class: Fri 03/27 - Part 3: Draw the waveform visualization: Tues 03/31
Note: Spring break falls in the middle of this assignment. You are not required to work on the assignment over break (it's perfectly feasible to get it done after break).
Digital Audio (A Rough Overview)
Digital audio is a complex topic; for this assignment we will be considering it from a very simple and specific point of view. I have placed a short (5-page) simple excerpt from an introductory text online; I recommend you read through that for an introduction.
The basic idea behind digital audio is the concept that
sound waves
can be represented mathematically as complex trigometic functions that indicate the amount of "energy" at any particular time. Different properties of this trig function correspond to differnet properties of the sound. For example, the frequency of the function (how close each "hill" is to the previous) is related to the pitch of the audio (how 'high' the note sounds), while the amplitude of the function (how "high" each hill is) relates to the volume of the sound.

Because sound is continuous but computers work with integers (discrete values), we end up sampling the audio lots and lots of times in order to get a pretty good guess of what the curve looks like. In other words, rather than using a trig function like y = sin(x), we plug in a lot of specific values of x to get a long list of y values, and then use that list of y values to represent the curve. These y values will be between -1 and 1 (e.g., -1 is a low valley and 1 is a high peak. 0 is the middle).
- CD quality audio samples the curve 44,100 times per second (measured in what is called hertz (Hz)--1Hz means 1 time per second, 10Hz means 10 times per second, etc). So this means that we would represent 1 second of audio on a CD with a list of 44,100 numbers--each number representing the sound you can hear for a particular 1/44,100 of a second!
Thus in order to play audio through Java, we represent a "sound" as a number (a sample) between -1 and 1. You can almost think of each sample as representing a sound that is 1/44,100th of a second long. We can tell Java to either play a single sample (and just tell it to do that over and over), or to play an entire array of samples (representing a full song, for example).
-
Note that in order to play sound we are using a class called
StdAudiodeveloped at Princeton. This class is secretly included in the BlueJ project you downloaded, and doesn't even require you to import any packages! You can see the documentation for this class here. Note that this class contains static methods (and no constructor!), so you don't need to instantiate it. The particular method you'll be calling iswhich plays a single provided sample. More detail about this class is included in the provided audio reading.StdAudio.play(sample); //sample is a double between -1 and 1
Plucking a Piano String
So we have a method to play a 1/44,100th of a second audio clip (a single sample). But how do we use a computer to model a piano?
First, if you weren't aware, pianos are stringed instruments! It's like an 88-string guitar.
The basic intuition is this: When you pluck a piano string (e.g., by hitting a piano key), the string vibrates and creates sound. The middle of the string bounces up and down wildly. Over time, the tension on the string causes the string to move more regularly and more gently until it finally comes to rest. Strings for higher notes have greater tension, causing them to vibrate faster (producing higher sounds), but also to come to a rest more quickly. Lower notes are looser, and so vibrate slower and longer.
We'll be modeling this kind of vibration by keeping track of the audio samples over time---that is, the sampled "height" (between -1 and 1) of trig curve shown in the figure above. We'll use an array (specifically, a
double[])
to hold a list of the upcoming samples and act as a "buffer" (a temporary storage of data). We'll then use a method called the Karplus-String algorithm to repeatedly update the array of samples in a way that simulates the piano string vibrating until it comes to rest. This algorithm played a seminal role in the emergence of physically modeled sound synthesis (where a physical description of a musical instrument is used to synthesize sound electronically).
The Karplus-Strong algorithm works as follows:
-
The sample buffer:
First, the "buffer" for each piano string will have a different length depending on the frequency of the note: higher notes will have short arrays, longer notes will have long arrays. In particular, the length of the array N will be the sampling rate (44,100Hz for CD quality) divided by the frequency of the note (for example, a Concert A has a frequency of 440Hz). Higher notes have higher frequency, making the array shorter (because you're dividing by a larger number).
-
Plucking the string:
When we pluck the string, we "excite" it--give it some energy. The excitation of the string can contain energy at any frequency. We simulate the excitation with white noise by setting each of the N samples in the buffer to a random real number between -1/2 and +1/2. So immediately after you've plucked the string, the audio it will produce for the next set of samples might look like:

The "x-axis" of this chart is time, and the y-axis is the audio sample.
-
Vibrating the string:
When the string is plucked, it causes a displacement (a vibration) which spreads wave-like over time. The Karplus-Strong Algorithm models this wave-like displacement in the following way: after sampling the buffer, we "update" it by repeatedly deleting the first sample from the buffer and adding to the end of the buffer the average of the first two samples, scaled by an "energy decay factor" of 0.994).

Thus we use the current (random) vibration to determine what the vibration will be sometime in the future, using an averaging and "decay" factor to let that vibration become less random and eventually stop.
- This process (removing from the front and adding to the back) produces what is called a "ring buffer" (or a "circular array"). We will talk about this data structure in more detail in CS 261.
Why it works
-
The ring buffer feedback mechanism
This "ring buffer" models a medium (like a string tied down at both ends) in which energy travels back and forth. The length of the buffer array determines the "fundamental frequency" of the resulting sound (e.g., how high a note it is). Sonically, the feedback mechanism created by having the front of the array influence the back of the array reinforces only the fundamental frequency and its harmonics (frequencies at integer multiples of the fundamental). The energy decay factor (.994 in this case) models the slight dissipation in energy as the wave makes a roundtrip through the string, so that the String eventually stops.
The final kicker is the length of our buffer. Low notes have lower frequencies, and hence longer arrays (44,100 / N is bigger if N is smaller). That means you will have to go through more random samples before getting to the first round of averaged samples, and so on. The result is it will take more steps for the values in the buffer to become regular and to die out, modeling the longer reverberation time of a low string
- The averaging operation The averaging operation serves as a gentle low-pass filter (which removes higher frequencies while allowing lower frequencies to pass, hence the name). Because it is in the path of the feedback, this has the effect of gradually attenuating the higher harmonics while keeping the lower ones, which corresponds closely with how a plucked piano string sounds.
- If you say so... This really does work---I promise!
- Bonus confusing fun fact! From a mathematical physics viewpoint, the Karplus-Strong algorithm approximately solves the 1D wave equation which describes the transverse motion of the string as a function of time.
The README has a few questins about these concepts; it's a good idea to answer those now to make sure you follow what's going on (and if not, be sure to ask for clarification!)
Assignment Details
Implementing this algorithm is a lot less complicated than it may sound--it's a simple algorithm that produces an awesome effect for complex reasons.
For this assignment, you will be creating one new class: a PianoString class to model a single string of a Piano (or any other stringed instrument). You will also be modifying the provided PianoPlayer class, which lets you interact with keyboard input to strum the strings.
Part 1: Modeling PianoStrings
The first class you'll need to make is the PianoString class, which will represent a single Piano String and contain the "buffer" of upcoming samples (following the Karplus-Strong algorithm). It should have the following set of methods:
| Constructor Summary | |
|---|---|
PianoString(double frequency)
Creates a PianoString with the given frequency (e.g., concert A). |
|
PianoString(double[] init)
Creates a PianoString with the given sample buffer. |
|
| Method Summary | |
|---|---|
void |
pluck()
Plucks the string by filling the buffer with white noise (random values) |
double |
sample()
Returns the "next" sample (the one at the front of the buffer) |
void |
update()
Applies the Karplus-Strong Algorithm to update the buffer |
Be sure to match these signatures exactly! Further details are below:
-
Instance variables
Your
PianoStringwill need an array to store the (upcoming) samples. Since samples are between -1 and 1, this should be an array ofdoubles.- You should also create some constants to represent common values--for example, all Strings will have a
SAMPLING_RATEof 44,100, and Karplus-Strong uses an energyDECAY_FACTORof 0.994.
- You should also create some constants to represent common values--for example, all Strings will have a
-
Constructors
Your
PianoStringclass will need two (2) constructors:- The first constructor takes in a desired frequency (e.g., 440.0Hz) and uses that to create the buffer (the array). The length of the buffer should be the sampling rate divided by the frequency, rounding up (hint: look up the
Math.ceilfunction). Note that you should also initialize each value of the array to be 0. - The second constructor takes in a provided array buffer and assigns it to the instance variable. This constructor will be used primarily for testing and grading.
- The first constructor takes in a desired frequency (e.g., 440.0Hz) and uses that to create the buffer (the array). The length of the buffer should be the sampling rate divided by the frequency, rounding up (hint: look up the
-
pluck()This method should go through your buffer and replace each element with a random value between -0.5 and 0.5.
-
Remember that you can use the
Randomclass to produce a random number--look for a method that will give you a randomdouble. Alternatively, you can use theMath.random()function to get a random number between 0 and 1.
-
Remember that you can use the
-
sample()This method is easy: it should return the value of the item currently at the front of your buffer.
-
update()This method applies the Karplus-Strong update. It should calculate the value of the new sample (as described above--average the first two samples and multiply by the decay factor), remove the first value, and then add the new value to the end of the array.
- Note that because the array is fixed-length, you "delete" a sample by moving every other sample up one step (so that the value who was 2nd is now 1st, the value who was 3rd is now second, etc). Use a loop to do this!
- Be careful about the order of these steps, so that you don't lose any information! Storing values in local variables can help.
Once you have filled in all your methods, be sure and TEST your code using the provided PianoStringTester class! Your expected output should match the actual output (ignoring rounding issues).
You can also test your program using the provided PianoPlayer starter code class. You should be able to hear two different pitches corresponding to A and C each time you press the appropriate key.
- If the program doesn't print out that you pressed a key, then your keyboard input isn't being registered. Try making sure the frame has "focus" (minimizing and restoring it may help).
- Also confirm that your volume is turned on so you can hear the sounds!
Part 2: Making Music
Once your PianoString class is working, you can add the ability to synthesize an entire instrument (rather than just 2 Strings). To do this, you will need to make significant modifications to the provided PianoPlayer class.
-
Start by taking a moment to read through how the provided
PianoPlayerclass works. In short, it uses an intentional infinite loop to repeatedlypluck()piano strings whenever the appropriate key is pressed. Since we're interested in hearing the sound of several piano strings at once, and the combined result of several sound waves is the superposition of the individual sound waves, we simply play the sum of all the string samples! We then make sure to advance the buffers of each string so we can get the next round of samples. -
You will be modifying this program so that instead of only having two strings, it will support a total of 37 notes on a chromatic scale from 110Hz to 880Hz. Your musical keyboard should map to the computer keyboard based on the following diagram:
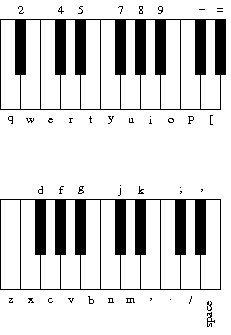
Specifically, this keyboard layout is based on the String
String keyboard = "q2we4r5ty7u8i9op-[=zxdcfvgbnjmk,.;/' ";where the ith character in the above String plays the ith note. So
'w'plays the 2nd note.-
The frequencies associated with each key should follow the chomatic scale, so that the character
'q'is 110Hz,'i'is 220Hz,'v'is 440Hz, and' 'is 880Hz. Mathematically, the ith character should have a frequency of440 × 2(i - 24) / 12
Each key shouldpluck()an appropriatePianoStringobject. - Helpful hint: watch out for integer division!
-
The frequencies associated with each key should follow the chomatic scale, so that the character
-
Don't even think about defining 37 individual
PianoStringvariables! Instead, you should create an array of 37PianoStringobjects (putting the appropriate object in the appropriate spot in the array). Using the loop and the above mathematical equation should make this easy.- Define the array in the same place that the individual
PianoStrings are given in the sample code. In fact, most of this section will involve replacing those individual objects with an array of objects (just like in the Bouncing Ball lab; and like in that lab you should delete the individual objects once you're done with them).
- Define the array in the same place that the individual
-
Next you'll need to make it so that the appropriate PianoString is plucked when the user hits an appropriate key. Again, don't you dare create a 37-way
ifstatement! Instead, use theindexOf(char key)method of theStringclass to easily "look up" the index of which key is pressed. That index should directly correspond to an index in your array of PianoStrings.- This is the same process that was used in the Clock problem on the first exam!
- Make sure your program doesn't crash (or cause an Exception/Error) if the key pressed is not one of your 37 notes. Don't try to pluck a String that doesn't correspond to a letter!
- You'll need to make sure to play the sum of the samples of all your piano strings (whether or not the String has been strummed). Use a loop and a "running total".
- After you've played your total sound, you'll need to update all of the PianoStrings. Again, use a loop!
-
Once you've completed your
PianoPlayerclass, try playing this familiar melody:nn//SS/ ..,,mmn //..,,m //..,,m nn//SS/ ..,,mmn (S = spacebar, not the 's' key!)
You can play the beginning of Led Zeppelin's Stairway to Heaven with the following keys. Multiple notes in a column represent a dyad or a chord (hit all the keys at once).
w q q 8 u 7 y o p p i p z v b z p b n z p n d [ i d z p i p z p i u i i -
Be sure and include plenty of inline comments inside your
synthesize()method to explain what your code does!
Part 3: Seeing the Music
Finally, you should add functionality to your PianoPlayer class so that it displays a visual representation of the audio. This visualization should be a wave form that looks like the one below, but changes over time (as in the video at the top of the page).
Your visualization will show a recent history of played samples. So each "point" on the wave form will have a height based on a sample placed at some time in the past (in this wave-form, the x-axis is "time", where the oldest sample is on the left and the newest sample is on the right).
However, you CANNOT try and draw the wave form each time through the main infinite loop (so each time you play a new sample)--this drawing will cause your program to run too slowly and break your audio playback. Instead, you'll be drawing the recent history---the latest n samples--only when you've aquired a new set of n samples. Since we're sampling at close to 44,100 times per second, even only drawing the waveform every 1000 samples will still produce an animated wave-form at 45 frames per second (which looks smooth and nice).
-
To do this, you'll need to create another buffer (an array) to keep track of your history of recent samples. Declare and instantiate this array at the top of the method (where you initialized your other variables).
- This array should hold A LOT of samples (500 worked well for me). You might make and use a constant
HISTORY_LENGTHso that you can easily change the length of your buffer.
- This array should hold A LOT of samples (500 worked well for me). You might make and use a constant
- Every time you play a sample, you'll need to also store that sample in your history buffer. The best way to do this is to always add the sample to the "end" of the array. That means you'll need another variable to keep track of what index is the current "end" of the history. Update this index (increase it by 1) every time you save a sample.
-
When your history buffer is "full" (so the "end" of the history is at the array's
.length), you should draw the current waveform on the canvas-
You can get access to the IOFrame's
Graphicsbrush by calling thecreateGraphics()method on the frame:Graphics brush = frame.createGraphics();You should initialize this variable at the beginning of the method, and then you can use it to draw during your while loop.
- Pro tip: try drawing a (temporary) black rectangle on the frame, just to make sure everything is working.
-
Before you draw a new waveform, you'll need to "erase" the previous drawing. The easiest way to do this is to draw a filled
Color.WHITErectangle over the entire frame, effectively coating it in whiteout. Then you can set your paintbrush's color back toColor.BLACKto draw your waveform. -
You can use circles to draw each sample--by drawing enough circles, you'll be able to make something that looks like a solid waveform. You can have the circle's x-coordinate be based on the time (e.g., where the sample is in the history buffer) and have the y-coordinate be based on the value of the sample. As an example so you don't need to fight through the math:
//draw based on the sample's index and the sample's value
//              x               y                          w  h
brush.fillOval(50+sampleIndex, (int)(75+(50*sampleValue)), 2, 2);
You could also try drawing a line between alternate samples--you'll need to use variables to keep track of the "previous" drawn point location.
-
After you've drawn your new waveform, you will need to refresh the drawing (basically tell the frame that it should update itself--similar to hitting the "refresh" or "reload" button on a web browser). You can do this by calling the
.repaint()method on the IOFrame object, so:frame.repaint();
-
You can get access to the IOFrame's
- Finally, after you've drawn the waveform, you'll need to reset where the "end" of your history buffer is so that you start saving samples at the very beginning of the buffer. This effectively "erases" your previous history (which is okay, since you just draw that history for the user to see)
- Once these pieces are in place, you should be able to see the waveform bouncing around as you play music via the keyboard.
- You are also welcome to experiment with other drawing techniques to produce something that looks nice (e.g., different colored waves, etc). If you need help or ideas, please ask!
Extensions
Here are some next steps. It is possible to earn up to 10% extra credit on this assignment.
-
More instruments: You can modify the Karplus-Strong algorithm to model different kinds of instruments, simply by changing the excitation of the string (from white-noise to something more structured) or changing the averaging formula (from the average of the first two samples to a more complicated rule). Alexander Strong suggests a few simple variants you can try:
-
Harp strings:
Flipping the sign of the new value (multiplying by -1) before enqueing it in the
update()method will change the sound from piano-like to harp-like. You may want to play with the decay factors and note frequencies to improve the realism. -
Drums:
Randomly flipping (with 50% probability) the sign of the new value before enqueing it in
update()will produce a drum sound. You will need lower frequencies for the drums than for the piano and harp, and will want to use a decay factor of 1.0 (no decay). The note frequencies for the drums should also be spaced further apart. - Mix and match: Assign some keyboard keys to drums, others to piano, and still others to harp (or any other instruments you invent) so you can play an ensemble---like a one-man band!
You will need to create a new "string" classes (e.g.,
HarpString,DrumString) and a new synthesizer class (e.g., InstrumentPlayer) for this extension. YourPianoPlayerclass should continue to perform the core assignment so I can grade it! -
Harp strings:
Flipping the sign of the new value (multiplying by -1) before enqueing it in the
- You can also add extra flashiness to your visualization! Maybe waves of color, 2D effects, etc. Try looking at the visualizations that go along with mp3 players for ideas.
Submitting Your Assignment
There are a couple of details to keep in mind before you submit your assignment.
- Double-check that your program is complete and works correctly. If your program doesn't compile, I can't give you credit for it!
-
Make sure that your code is commented. Give lots of inline comments, and include a JavaDoc method comment for each method (e.g., in your
PianoStringclass). -
You will also need to fill out the README.txt file. You can open this file in BlueJ by double-clicking on the white paper icon in the upper left corner of the class window. You should place the answer to each question below the question box, replacing the "<Replace this with your response!>". Remember to save your changes (select "Class > Save" from the menu).
- The README as a few more questions that normal, be sure and fill it out completely!
-
You should compress the entire Hwk6 folder into a single zip file (like you did for Lab A), and then submit it to the Hwk6 Submission page on Moodle.
- Be sure an upload the ENTIRE project folder--that is what includes all your work!
- This assignment is due at midnight on Tue, Mar 31.
Grading
This assignment will be graded out of 32 points.
- PianoString (10pt)
- [1pt] Your PianoString class has the required method signatures
- [1pt] Your PianoString uses an array as a sample-storage buffer
- [2pt] Your PianoString class has both constructors
- [1pt] Your PianoString class correctly specifies the length of the buffer
- [1pt] Your pluck() method fills the array with random values
- [1pt] Your sample() method returns the current sample
- [1pt] Your update() method "removes" the first sample from the buffer
- [2pt] Your update() method calculates the new sample based on the Karplus-Strong algorithm
- PianoPlayer (8pt)
- [2pt] Your PianoPlayer class initializes and uses an array of PianoStrings
- [1pt] You calculate the correct frequencies for the PianoStrings
- [2pt] Your PianoPlayer class responds to the 37 specified keys
- [1pt] Your PianoPlayer class doesn't error on other keys
- [1pt] Your PianoPlayer plays the summed sample of all the PianoStrings
- [1pt] You update all of the PianoStrings after sampling them
- Visualization (6pt)
- [2pt] You use an array to keep track of the recent history of played samples
- [1pt] You add each played sample to the end of the history buffer
- [2pt] You draw a waveform based on the contents of the history buffer
- [1pt] Your waveform is only drawn when the history buffer is full
- Digital Audio Questions (3pt)
- [3pt] You have answered the audio questions in the README.txt
- Style & Documentation (5pt)
- [1pt] Your code properly names and uses variables
- [1pt] You utilize constants (rather than hard-coded "magic numbers") when appropriate
- [1pt] You have included a full JavaDoc comment (with
@paramand@returntags) for each method, including constructors - [1pt] You include inline comments to explain the why of your code (especially the
synthesize()method) - [1pt] You have completed the included README.txt file