CS 161 Homework 5 - Sampler Quilt
Due Wed Mar 11 at 11:59pm
Overview
In this assignment, you will write a program that draws a picture of a particular type of quilt called a sampler quilt, which is composed of several different block types that illustrate a variety of quilting styles. You will use the java.awt graphics library to generate a drawing such as the one below:
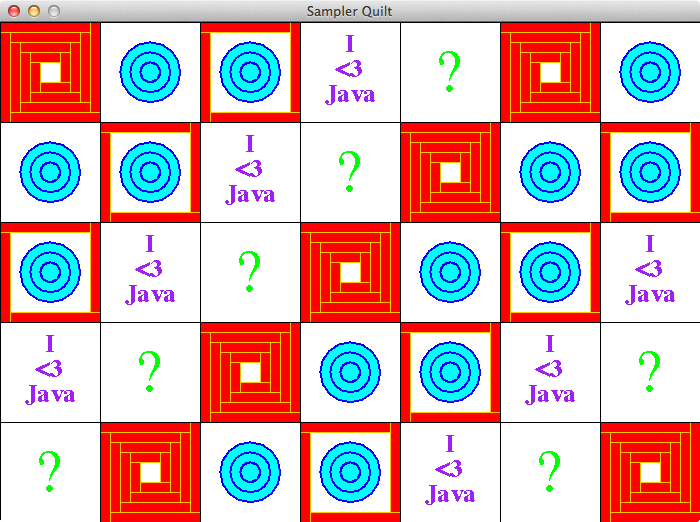
The quilt consists of five patterns, illustrated by the first 5 patches in the top row:
- A "log cabin" block consisting of a nested pattern of rectangles
- A bullseye design of concentric circles
- A hybrid pattern combining elements of the log cabin and the bullseye
- A patch with a written message
- A design of your choosing (indicated by a question mark in this diagram)--you are free to replace this pattern with whatever design you like!
You can use whatever colors you want for these designs; hopefully your quilt will look less garish than mine! More details about how to create each of these designs are given below.
This assignment should be completed individually. You are welcome to ask for help (either from me or from your classmates), but remember the Gilligan's Island rule!
Class Quilts: section A, section B.
Objectives
- To practice writing loops
- To practice organizing your program into re-usable methods
- To work with the Java Graphics package, including drawing and colors
- To practice reading, using, and writing Java documentation
Necessary Files
You should download and extract the BlueJ project from the
Hw5.zip file.
This project includes the beginnings of your Quilt class to provide an example and get you started. It also includes a README.txt file that you will need to complete.
Background: Graphics
-
Your quilt class will be drawn on a graphical window (similar to the one that Karol runs in, or that the Turtle appears in, or the Canvas that you drew shapes on...). The provided
Quiltclass includes the code needed to create this window--you can produce a "blank" window simply by instantiating a newQuiltobject.-
FYI: In order to draw on a Quilt, we had to specify that it was a kind of Java class that can appear in a graphical program. We did this by modifying the class declaration to include
extends JPanel. We'll talk more about what this means later in the semester. - One side effect of this though is that if you right-click on the Quilt class (or a Quilt object) you're going to see options for a lot of methods that we get for free. You should ignore all these methods. The only interaction you'll have through BlueJ is to instantiate a new Quilt object, which will run your code and make the drawing appear.
-
FYI: In order to draw on a Quilt, we had to specify that it was a kind of Java class that can appear in a graphical program. We did this by modifying the class declaration to include
-
When Java creates a new window, it needs to know the algorithm for what to draw to make that window appear. This algorithm is specified by the method:
public void paintComponent(Graphics brush)This method has been provided for you--your task will be to finish it. Note that we never call this method ourselves--instead, we let Java call it for us when the window needs to be shown. You're going to fill in the details, and let someone else (Java) start the algorithm.
-
When Java calls this method, it will pass it a
Graphicsobject as a parameter (which the given signature then labels asbrush). AGraphicsobject represents an object you can draw on!- The best metaphor is to think of a
Graphicsobject as a paintbrush that is attached (like with a lanyard) to a canvas. You call methods on the Graphics brush to "command" it to paint on the canvas, which is what then shows up on the screen.
- The best metaphor is to think of a
-
A
Graphicsobject has a large number of built-in methods that you can use to draw; you should check out the Java documentation for more details, as well as Chapter 2.9, 2.10, and 3.8 in the textbook). Methods you might be interested in include: - There are many more methods, and you are welcome to explore them all and use them as desired (and if you have any questions about a particular method, just ask!)
-
Note that you will need to specify the Color by using a
Colorobject. You can use the constants defined in Color class (referring to them asColor.REDfor example), or you can use a constructor to make anewColor object with your choice of red, green, and blue components. You can look up these RGB values for different colors online. -
There are examples of using the brish in the
paintComponent()method, and I have included an example method that draws a "grid" outlining the patches; this should give an example of how to (a) set the Color and (b) draw a line (inside a loop no less!)-
This method is called inside the
paintComponent()method--I put the functionality into a separate helper method to keep things organized! Note that we call the method onthisand pass the method the Graphics paintbrush as a parameter, so that method knows what brush it should use to draw.
-
This method is called inside the
Assignment Details
To draw your quilt, you will be making a single Java class called Quilt. I have provided the beginnings of this class for you, so you don't need to start from scratch. In this class you will define methods to draw each patch, calling these methods from a single paintComponent() method in order to paint a picture of the quilt. More details about each of the patches can be found below, as well as
example documentation that can be found at the bottom of the page.
(Looking at this documentation is a great way to figure out what your method signatures should be!)
Positioning Patches
- If you look at the quilt as a whole, you'll notice that each patch shows up more than once. That means that each patch will need to be able to be drawn anywhere in the quilt!
-
Thus each method will need to take additional parameters that specify the relative position of the patch to the upper-left corner of the screen. Methods should thus take an
rx(relative x) andry(relative y) as parameters. See the below documentation for an example. The rx and ry should refer to the location of the upper-left corner of the patch.-
All of your drawing commands (the methods you call on the
Graphicspaintbrush) will then need to take coordinates relative to these parameters. You can treat the (rx,ry) as the "origin" (kind of like (0,0)) for the patch. - So instead of drawing a dot at (50,50), you'd draw a dot at (rx+50, ry+50), where (rx,ry) is the origin for the patch.
-
This will allow you to easily re-draw the patch at a different location, simply by calling the draw method with a different
rxandry. - Remember how with the Robot in Lab C you have it a relative position? This is the same idea!
-
All of your drawing commands (the methods you call on the
-
In order to then draw the patches within the grid, you want to make sure that you specify the relative origin (the
rxandry) to match with the upper-left corner of the grid. Since each patch is the same size (thePATCH_SIZEconstant), you can use that as an "offset" for how much to move each patch over by. -
Thus there will be a patch at (0,0), one at (PATCH_SIZE,0) one at (2*PATCH_SIZE,0), etc.
- Note if you are on a high-resolution screen and your quilt is too tiny, you can change the PATCH_SIZE to 200.
- Lastly, notice that each patch-drawing method will need to take a Graphics object as a parameter; this will let you tell the method which paintbrush it should use to draw!
-
To get a feel for how all this works, I recommend you start by creating and fill in the
drawBullseyePatch()method, with appropriate parameters. If you tell this patch to draw a single red circle using:you should be able to get it to draw the circle anywhere on the screen just by calling your method (from thebrush.setColor(Color.RED); brush.fillOval(...params...);paintComponent()method) with different parameters.- Make sure you can draw your patch in each of the 4 squares in the upper-left corner: that is a good test that everything is working!
Bullseye Patch
While not in the order above, I recommend you start with the Bullseye Patch (it's a bit easier). This patch is made up of a series of concentric circles centered on the block. You will need to use a loop to draw multiple circles.
- Start by drawing a single circle within the patch. Note that unlike the circle's we've worked with before, the Graphics method for drawing circles (
drawOval()) measures an x and y position not from the center of the circle where you would expect, but from the upper left corner of the enclosing rectangle (similar to the Triangle from previous labs). So drawing an oval involves specifying a rectangle in which the circle will appear. -
You will need to write a loop that will draw multiple circles. Each time through the loop, you should reduce the size of the circle (shrinking diameter by 10 or 20 is a good number). You'll need to change both the (x,y) coordinates of the circle, as well as its width and height.
-
Hint: Try making variables for
currentX,currentY, andcurrentDiameter. Declare these variables outside the loop. Then inside the loop's body, reduce the variables (e.g., subtract 10) and pass those variables to the paintbrush'sdrawOval()method.
-
Hint: Try making variables for
-
Your loop should continue until the diameter of the circle is less than 5 pixels. Because you don't know how many circles you'll need, you should use a
whileloop to perform indefinite iteration. -
Your bullseye patch should use at least two (non-white) colors: e.g., one for the background and one for the circles.
- Alternatively, you can make a circle "filled in" by using the fillOval() command. If you want to put an outline on it, try using fillOval(), then changing the color, then using drawOval() with the same parameters. (Can you see why this works?)
Log Cabin Patch
This patch is a representation of an authentic quilt pattern that is widely used in traditional quilting. It is composed of a series of frames, each of which is nested inside the next larger one. Each frame is in turn composed of four rectangular boxes laid out to form a square. The outer frame, for example, looks like this:
 The next frame fills the space inside the outer frame, as follows:
 This same pattern continues for a specified number of frames, giving rise to the completed picture:

- To aid in this repetition, the first thing you should do is make a helper method that will draw a single frame of a specified width and length. You might call this method
drawLogCabinFrame(). -
As a helper method, this method should be
privateso that others don't call it (it's a secret helping method!) -
This method will need to take in a number of parameters: it will need to know which
Graphicspaintbrush to use, where the relative origin of the frame is, as well as the length and width of each rectangle in this particular frame! Yes, you will have a lot of parameters (but you'll use them all).- Note that the width (the short distance) of each rectangle is the same no matter how far you nest, but the length decreases as you move in. In fact, the length is shortened by twice the width at each step (can you see why?)
- You can draw the 4 rectangles for each grid individually; you are not required to use a loop here.
-
You can test this helper method by calling it from within the
paintComponent()method. Try calling it with different origins and sizes! -
One you have the helper method working, you can fill in the actual
drawLogCabinPatch()method. This method should call the helper method repeatedly (with successively smaller lengths) in order to draw the entire patch. -
But calling the draw method repeatedly is redundant; instead, you should use a loop to call the method at least 4 times.
- Since you know how many times you'll be calling the method ("definite iteration"), you should use a
forloop, though awhileloop is acceptable. - Note that each time through the loop you will need to "update" the values (e.g., the width and height) passed to the helper method. Be careful about keeping track of these variables!
- Since you know how many times you'll be calling the method ("definite iteration"), you should use a
Hybrid Patch
This patch combines elements from the log cabin (the outer frame) and from the Bullseye. The point of including this patch is to emphasize the benefits of writing re-useable code.
- Since you should have a helper method for drawing a single "frame" of the log cabin, and you there is a method for drawing a bullseye, drawing this patch should be simply a matter of calling those two methods.
Text Patch
In this patch, you should write a short text message (it does not need to profess your enjoyment of a particular programming language).
- Look at the above list of methods and the documentation for the
Graphicsclass. What method is going to help here? - You can put text on separate lines by using separate calls to the drawString() method. Just make sure to move the x,y position of the text!
-
You can make the text larger by changing the font via the
setFont()method. See the Font class for more details. It is not required that you change the font.
Personal Patch
The last patch is one of your own choosing---a chance for you to flex your creative muscles! You have to include some kind of design, but what that design is remains totally up to you (please keep it appropriate though). You might draw a picture using circles, rectangles, and lines, create another geometic pattern, play with colors, or do whatever you like.
-
Be sure to give this method a signature of
public void drawYourNamePatch(Graphics brush, int rx, int ry) //replace your name - I intend to take the patches everyone designs and copy them all into a single program so that we can generate an entire class quilt!
The Patch Grid
Once you have all (or most) of the patch drawing methods defined, you'll need to make it so they all are drawn over the entire quilt.
-
This drawing should occur directly inside your
paintComponent()method. -
In order to draw patches in each spot in the quilt grid, you'll need to use a loop. In fact, you'll need to use two! Use one loop to go through the rows, and then inside that loop, use another to go through the columns. This is called a nested loop.
- Since you know how many ROWS and COLS there are, you can use a pair of
forloops for this.
- Since you know how many ROWS and COLS there are, you can use a pair of
-
When you call a method to draw a patch, you'll need to specify where that patch is. As mentioned above, the origin of the patch in the upper-left corner is at (0,0) or (0*PATCH_SIZE,0*PATCH_SIZE). The one next to that is at (1*PATCH_SIZE,0), the one next to that is at (2*PATCH_SIZE,0)... etc. (do you see a pattern?). Use the loop control variables (e.g., the
iandj). to calculate the location for each patch as you loop through the grid. - If you look at the quilt as a whole, one of the first things to notice is that the different block types are arranged in the quilt so that they form a regular pattern. Each successive row in the quilt has the same blocks in the same cyclic order (e.g., log cabin, bullseye, hybrid, text, custom; log cabin, bullseye, ...).
-
You can easily produce a cycle by using the modulo operator
%. This is a numeric operator (like + - * /): it takes the first operand, divides by the second operand, and returns the remainder. Thus:1 % 5 == 1 // 5 goes into 1 zero times, with 1 left over. 4 % 5 == 4 // 5 goes into 4 zero times, with 4 left over. 5 % 5 == 0 // 5 goes into 5 one time, with 0 left over. 7 % 5 == 2 // 5 goes into 7 one time, with 2 left over. //...etc
Consider the following pattern:
0%3 => 0
1%3 => 1
2%3 => 2
3%3 => 0
4%3 => 1
5%3 => 2
...
That is, if you keep modding by the number of options, you can simply add one to a count in order to form a cycle!
-
Once you have the current "count" of which patch you are drawing from the cycle (e.g., patch #0, patch #1, patch #2, etc), you can use a simple
if/else ifblock to choose which draw method to call. E.g., if you're on patch #0, draw the log cabin; if you're on patch #1, draw the bullseye. - Since each row starts with a different patch in the cycle, to avoid getting straight rows you'll need to offset the start spot in the cycle. Try having the 0th row start at patch #0, the 1th row start at patch #1, etc. Hint: try adding the row number to the cycle count!
- In short, inside your
paintComponent()method you'll want to use a pair of loops to cycle through all the patches, and then for each spot in the grid you can use the modulo operator to choose which pattern to draw, and then call the appropriate method with the correct (rx,ry) parameters to actually draw the pattern! - This should allow you to produce something similar to what you see at the top of the assignment!
Documentation
- While writing your program, be sure to include plenty of comments to explain what you are doing! Use inline comments to explain the "why" of your code, not the "what." Also include a full Javadoc comment (complete with @param and @return tags) for each method in your program.
Timeline
You may be thinking there is a lot to do for this assignment---and you'd be right. This is not an assignment you can just do the last day--get started early! Try writing a pattern each day, and then by the due date you'll be all finished!
- Start by working through the relative positioning for the patterns (the rx and ry, described under "Positioning Patches").
- After that, I recommend starting with the text patch and the log cabin helper; these don't require any loops, and are good practice working with the Graphics paintbrush. You can do these by Tues Mar 03.
- Doing the bullseye is a good next step, and you should be able to do it by Wed Mar 04.
- The log cabin can be completed after that, and should be doable by Fri Mar 06.
- Finish up the patches (including adding your custom patches) by Mon Mar 09.
- You can then add in the final set of nested loops to draw all the patches by the due date on Wed Mar 11.
Submitting
There are a couple of details to keep in mind before you submit your assignment.
-
Double-check that your methods are completed and work correctly.
- If your program doesn't compile, I can't give you credit for it!
- Make sure that your code is commented. Give lots of inline comments, and include a JavaDoc method comment for each method!
- Also confirm that your custom patch method is named appropriately :)
-
You will also need to fill out the README.txt file. You can open this file in BlueJ by double-clicking on the white paper icon in the upper left corner of the class window. You should place the answer to each question below the question box, replacing the "<Replace this with your response!>". Remember to save your changes (select "Class > Save" from the menu).
-
You should compress the entire Hwk5 folder into a single zip file (like you did for Lab A), and then submit it to the Hwk5 Submission page on Moodle.
- Be sure an upload the ENTIRE project folder--that is what includes all your work!
- This assignment is due at midnight on Wed, Mar 11.
Grading
This assignment will be graded out of 31 points.
- The Quilt (25pt)
- [3pt] Your patch drawing methods have correct signatures (with appropriate parameters)
- [2pt] Your patches can all be drawn in any location based on the parameters
- [1pt] Your quilt includes a Bullseye patch
- [1pt] Your Bullseye patch includes multiple circles
- [2pt] Your Bullseye patch is drawn using a
whileloop - [1pt] Your Bullseye patch uses two non-white colors
- [1pt] Your quilt includes the Log Cabin patch
- [1pt] You use a helper method to draw a frame of the logic cabin
- [1pt] Your helper method has an appropriate signature with useful parameters
- [2pt] Your Log Cabin is drawn using a loop
- [1pt] Your quilt includes the Hybrid patch
- [1pt] Your hybrid patch is drawn using previous methods
- [1pt] Your quilt includes the Text patch
- [1pt] Your Text patch writes out a message
- [1pt] Your quilt includes a personal patch of your own design
- [1pt] Your personal patch's draw method is named correctly
- [1pt] Your personal patch draws a picture that is different from the other patches
- [2pt] Your quilt utilizes all the patches in a repeating pattern
- [1pt] Each row and column in your quilt starts with a different patch than its neighbor
- Style & Documentation (6pt)
- [1pt] You utilize provided constants when appropriate
- [1pt] Your code properly names and uses variables
- [2pt] You have included a full JavaDoc comment (with
@paramand@returntags) for each method - [1pt] You include inline comments to explain the why of your code
- [1pt] You have completed the included README.txt file
Documentation
Below is sample JavaDoc for the completed Quilt class.
Class Quilt
public class Quilt extends javax.swing.JPanel
A program that draws a sampler quilt
- Author:
- YOUR NAME HERE
| Field Summary | |
|---|---|
int |
COLS
The number of columns in the quilt |
int |
PATCH_SIZE
The size of a patch (in pixels) |
int |
ROWS
The number of rows in the quilt |
| Constructor Summary | |
|---|---|
Quilt()
Creates a new 5x7 quilt. |
|
Quilt(int rows,
      int cols)
Creates a new quilt with the given number of rows and columns |
|
| Method Summary | |
|---|---|
void |
drawBullseyePatch(Graphics brush,
                  int rx,
                  int ry)
Draws a bullseye pattern at the given coordinates |
void |
drawGrid(Graphics brush)
Draws an grid using the given graphics brush |
void |
drawHybridPatch(Graphics brush,
                int rx,
                int ry)
Draws a hybrid pattern at the given coordinates |
void |
drawLogCabinPatch(Graphics brush,
                  int rx,
                  int ry)
Draws a log cabin pattern at the given coordinates |
void |
drawTextPatch(Graphics brush,
         int rx,
         int ry)
Draws a text pattern at the given coordinates |
void |
drawYOURNAMEPatch(Graphics brush,
                  int rx,
                  int ry)
Draws a personal pattern at the given coordinates |
void |
paintComponent(Graphics brush)
This method actually draws the quilt. |
| Field Detail |
|---|
COLS
public final int COLS
- The number of columns in the quilt
PATCH_SIZE
public final int PATCH_SIZE
- The size of a patch (in pixels)
- See Also:
- Constant Field Values
ROWS
public final int ROWS
- The number of rows in the quilt
| Constructor Detail |
|---|
Quilt
public Quilt()
- Creates a new 5x7 quilt.
Quilt
public Quilt(int rows,
             int cols)
- Creates a new quilt with the given number of rows and columns
- Parameters:
-
rows- The number of rowscols- The number of cols
| Method Detail |
|---|
drawBullseyePatch
public void drawBullseyePatch(Graphics brush,
                              int rx,
                              int ry)
- Draws a bullseye pattern at the given coordinates
- Parameters:
-
brush- The graphics object to draw withrx- The relative x-originry- The relative y-origin
drawGrid
public void drawGrid(Graphics brush)
- Draws an grid using the given graphics brush
- Parameters:
-
brush- the Graphics paintbrush to draw with.
drawHybridPatch
public void drawHybridPatch(Graphics brush,
                            int rx,
                            int ry)
- Draws a hybrid pattern at the given coordinates
- Parameters:
-
brush- The graphics object to draw withrx- The relative x-originry- The relative y-origin
drawLogCabinPatch
public void drawLogCabinPatch(Graphics brush,
                              int rx,
                              int ry)
- Draws a log cabin pattern at the given coordinates
- Parameters:
-
brush- The graphics object to draw withrx- The relative x-originry- The relative y-origin
drawTextPatch
public void drawTextPatch(Graphics brush,
                     int rx,
                     int ry)
- Draws a text pattern at the given coordinates
- Parameters:
-
brush- The graphics object to draw withrx- The relative x-originry- The relative y-origin
drawYOURNAMEPatch
public void drawYOURNAMEPatch(Graphics brush,
                              int rx,
                              int ry)
- Draws a personal pattern at the given coordinates
- Parameters:
-
brush- The graphics object to draw withrx- The relative x-originry- The relative y-origin
paintComponent
public void paintComponent(Graphics brush)
- This method actually draws the quilt. It is called automatically (by Java)
when the window appears. You never call this yourself.
- Overrides:
-
paintComponentin classjavax.swing.JComponent
- Parameters:
-
brush- The Graphics paintbrush to draw with.