CS 161 Lab E - PhotoShopper
Due Thurs Feb 28 at 11:59pm
Overview
In this lab, you will be complete a program that lets you manipulate a graphical image, similar to the ever-popular Photoshop application. Your program will open an image file, display the image, and allow the user to apply a number of effects to that image. The basic functions you will be implementing are:
- Erasing (clearing) the image
- Creating a mirror image of the file (i.e. flipping over the central vertical axis)
- Turning the image upside-down (i.e., flipping over the central horizontal axis)
- Turning the image into gray scale (i.e., making it black and white)
- Turning the image into its "negative"
- Blurring the image (optional)
- Being able to "undo" the previous effect
Although it sounds complicated, you can do it if you read the lab directions carefully, think, and plan before you code.
When running, your program will look something like this (all examples are made using the eye.jpg file included in the project file):

This lab will be completed in pairs. Be sure to review the pair programming guidelines. You also must work with a different partner than you have before!
Objectives
- To continue practicing with loops
- To experiment with image manipulation and processing
- Practice reading Java documentation
- To learn about the BufferedImage class and to continue exploring how to manipulate Colors.
Necessary Files
You will need to download and extract the BlueJ project from the LabE.zip file. This project will supply you with the following classes:
-
ImagePanelThis handles the work of actually displaying your image and takes care of the details of sizing it for the window, etc. You do not need to modify this file, nor will you use it directly. -
PictureViewerThis opens a window, shows the image and provides buttons for the user to click to manipulate the image. You do not need to modify this file, nor will your code use it directly. -
PictureViewerTesterThis tester class can be used to run the program. You can also test the program by simply creating a new PictueViewer object using the BlueJ interface (which is exactly what the tester does!)
Fun Fact: These classes demonstrate how to do graphical systems without using the Applet class. You are welcome to look them over and see if you can figure out how they work, but this is not required for this lab.
The lab file also has a couple of images you can use to test your program, though the system will be able to work with any file with a .jpg extension (called a "jay-peg" file).
Details
For this lab, you will be writing a new class called PhotoShopper (make sure to get the capitalization correct!) This class will do the actual image manipulation, such as making a mirror image, flipping the image, etc. When your class is finished, you will be able to construct (right-click in the BlueJ window) a PictureViewer. When the PictureViewer starts, it will look like this:
When you first start the program, you will get a window like this:
![]() Each of the buttons in the PictureViewer window will call a method in your
Each of the buttons in the PictureViewer window will call a method in your PhotoShopper class to manipulate an image. Note that the "Load Image" button is already implemented for you: it opens up a dialog box (called a JFileChooser) that will let you select an image to manipulate. The user can navigate to find the image and select it. Once the image is selected, the PhotoViewer loads it from the file and creates an new BufferedImage object to represent it. Then the PhotoViewer calls the constructor for your PhotoShopper and passes this BufferedImage as an argument.
When the user clicks other buttons, the PhotoViewer calls methods in your PhotoShopper. Each of those methods manipulates the BufferedImage object and returns a new, changed BufferedImage object as the return value. Finally, when the user clicks the "Save Image" button, the PhotoViewer retrieves the image from your PhotoShopper and saves it to the harddrive, so you can share it with your friends!
All of the button interaction is provided for you--you just need to fill in the appropriate methods in the PhotoShopper class. These methods are listed in the documentation at the bottom of the page, and described in more detail below.
Creating the PhotoShopper class
-
Your PhotoShopper will need to include two import statements to get access to the BufferedImage class and the Color class:
import java.awt.image.BufferedImage;
import java.awt.Color;
-
The PictureViewer won't compile until you have defiend all the PhotoShopper methods. But you don't want to write everything before you test. It is much easier to write and test one method at a time. So start by making a "skeleton" of the class: fill in the method signatures for all of the methods you will need (there are 8 including the constructor). These are called "stubs" by programmers. For example, here is a stub for the eraseImage method:
public BufferedImage eraseImage()
{
    return null; //we return null so that we're returning SOMETHING!
}
Once you have written the stubs, you can compile the PhotoViewer, load an image, and then begin programming by adding and testing one method at a time.
- Don't forget the Javadoc comment for each method!
BufferedImages
Your PhotoShopper class will need to have an attribute that is of the type BufferedImage to represent the current image. Be sure to look over the documentation for this class. Some details are below:
A BufferedImage is an object that represents a graphic image. Each image consists of a number of colored points, called 'pixels'. A BufferedImage is a collection of pixels that make up the image. Each pixel has an x and y coordinate and a color. BufferedImages have lots of available methods, but, for this lab, we are mostly interested in finding out what the color of each pixel is, and changing the colors of the pixels.
For each pixel, its color is represented by an integer. The integer (and therefore the color) has three components: a red component, a green component and a blue component. Each component can have a value from 0 to 255. For each pixel, you can specify its color by giving the red, green and blue components values. You can ask each pixel what its red, green and blue components are. If all components are 0, the color ends up being black. If all components are 255, the color is white. Other combinations give other colors. To see what different combinations mean, take a look at this site: http://www.rapidtables.com/web/color/RGB_Color.htm. This method of specifying colors (there are other methods too) is called 'RGB' for "red green blue".
To process a pixel, you need to get the RGB components, change them, and then set them back in the image. The process is not obvious. There are many ways to do it, but a simple way is to first get the RGB int, then make a Color object out of it. From the Color object, you can get the red, green and blue components as separate ints. After manipulating the red, green and blue components, make a new Color object from them and then use the Color object to give you the appropriate int for the pixel, and put it back in the image. Here is the basic idea:
int theRGB     = theImage.getRGB(x,y);     // get the RGB for the current pixel
Color oldColor = new Color(theRGB);        // make a color so we can extract RGB components

// get the components
int redComponent   = oldColor.getRed();
int greenComponent = oldColor.getGreen();
int blueComponent  = oldColor.getBlue();
// process the color components here
         ...

Color newColor = new Color(redComponent, greenComponent, blueComponent);// make the new Color
int newRGB = newColor.getRGB(); // get the RGB for it as an int
newImage.setRGB(x, y, newRGB); // make the pixel that color
Modifying the Image
Each of the methods you will write manipulates the BufferedImage object by changing the pixels that make up the image. It then returns a new manipulated BufferedImage. Write one method at a time and test it. Once you have the first one done, the others will be much easier because most follow the same basic outline. The basic outline for each of these methods is this:
get the dimensions of the image
make a new BufferedImage of the same size
use nested for-loops to process each pixel
return the new BufferedImage
You can use nested for loops to process each pixel by making a for loop that iterates through each x-value. Within that loop, use another for loop to iterate through each y-value. Like this:
for (int x = 0; x < theImageWidth; x = x + 1)
{
    for (int y = 0; y < theImageHeight; y = y + 1)
    {
      // process the pixel
    }
}
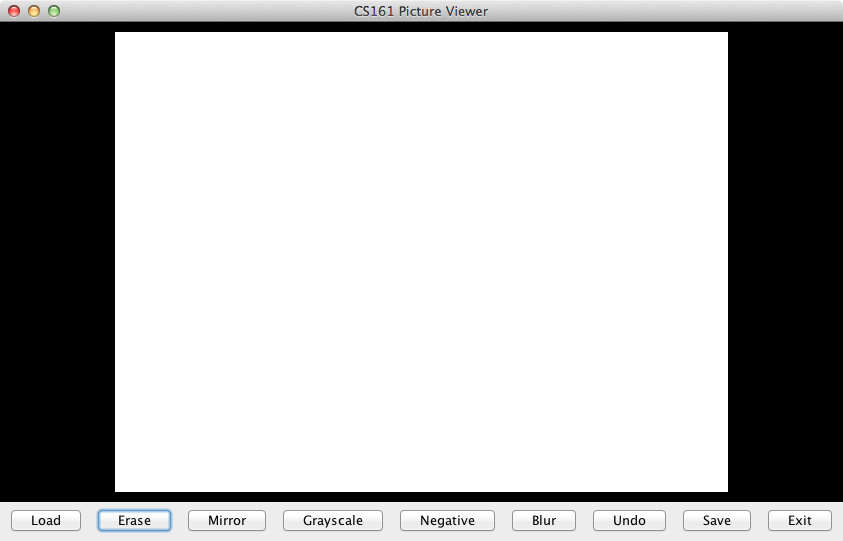
eraseImage()
This method should set all of the RGB components to 255 (making the pixel white). This is a great method to write first, since all of the other methods will follow this pattern. After writing this method, hitting the appropriate button should produce an image like:
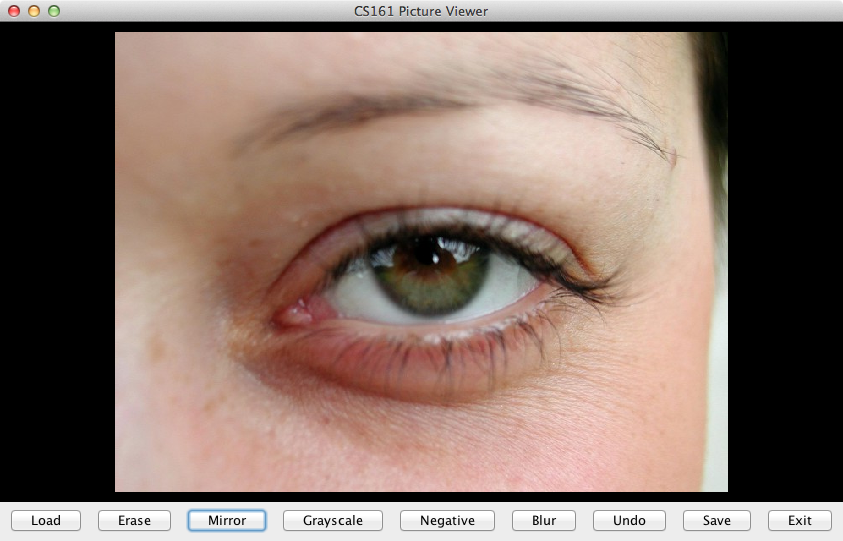
mirrorImage()
This method should take each pixel from the original image and put it in the corresponding place in the new image by giving it a new x-coordinate. Think about where each pixel needs to go! After writing this method, hitting the appropriate button should produce an image like:
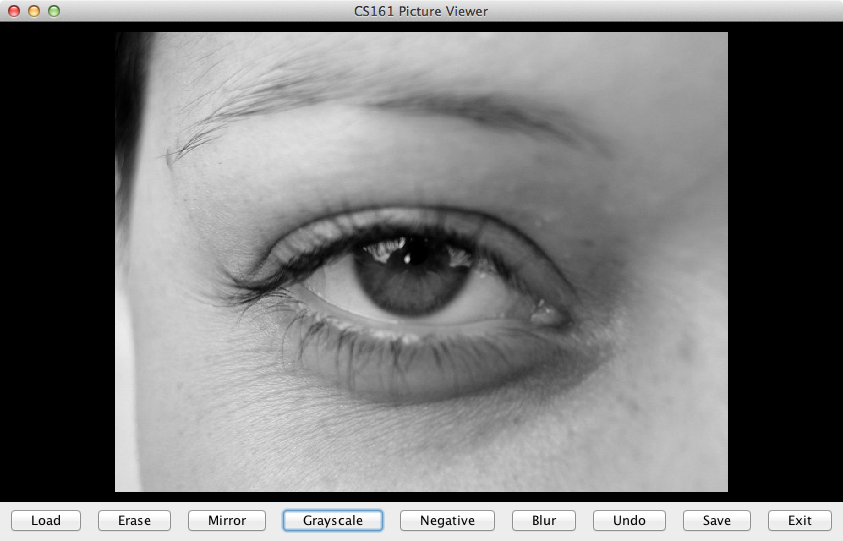
grayScaleImage()
This method should take each pixel from the original image and figure out the average of the red, green, and blue components. Use that average for all of the red, green, and blue components of the corresponding pixel in the new image. After writing this method, hitting the appropriate button should produce an image like:
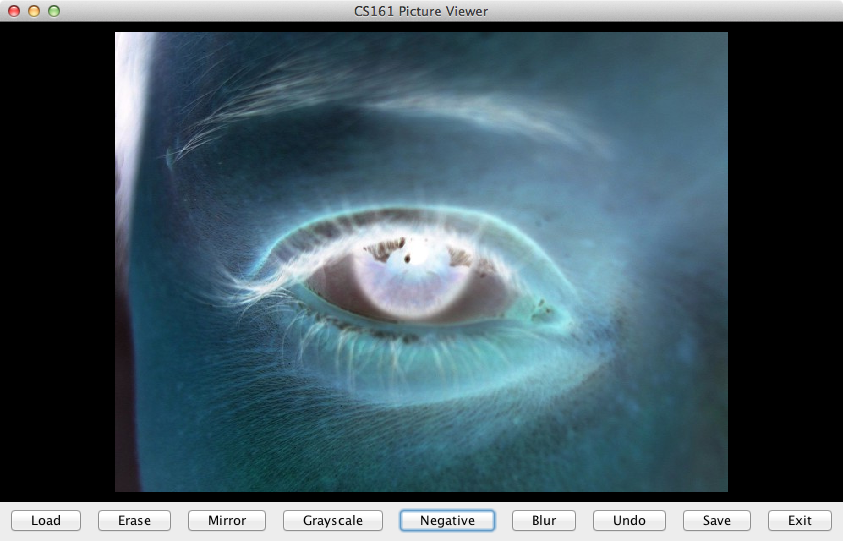
negativeImage()
This method should take the red component and subtract it from 255 to get the new red component value. Do the same for the green and blue components. After writing this method, hitting the appropriate button should produce an image like:
Optional:
blurImage()
- This method is the hardest to write. What you need to do is for each pixel, set each color component (red, green, and blue) to the average of the appropriate color component of ALL PIXELS nearby it. This ends up making each pixel look more like its neighbors, and has the effect of blurring the image.
-
Each pixel has 8 neighbors next to it (north, northeast, east, southeast, south, southwest, west, and northwest). However, just averaging the immediate neighbors won't produce a huge effect. You'll get a much more noticable blur if you instead average all the pixels within a certain distance of your "center" pixel (4 is a good distance for us, but you can use a smaller distance if your program seems to be running slowly). You can do this by using another pair of for loops:
for(int i=row-distance; i<row+distance; i++)
{
    for(int j=row-distance; j<row+distance; j++)
    {
      //add the value of each color component to running total
    }
}
//divide the running totals by the number of pixels you looked at to get the averages
Yes, this means you will have 4 nested loops. But don't panic--as long as you're careful, you can keep track of everything!
- There is one more trick though: pixels near the borders don't have that many neighbors to each side: for example, the pixel at (0,0) can't get his neighbor that is 4 pixels to the left, since that pixel would be at (-4, 0). So you will need to make sure your loops do not go outside the bounds of the image. Your
icannot be less than 0 or greater than (or equal to) the image height, and yourjcannot be less than 0 or greater than (or equal to) the image width. You should use theMath.min()andMath.max()functions to make sure that your starting value (e.g., row-distance) and your stopping value (e.g., row+distance) are inside the legal bounds! -
After writing this method, hitting the appropriate button should produce an image like:

undo()
You can implement a simple "Undo" method by saving a copy of the image before changing it (you will need to make the "old image" an attribute so you can remember it!). When the PhotoViewer calls the undo() method, simply make the current image the old image (if there is one) and return it.
getImage()
This is very simple, you just need to return the image (no need to process each pixel!) This method is used by the "Save image" button, and will let your program save the modified image to a file.
Submitting
- Once you are sure that your program works, make sure that both your and your partner's names are in a class comment at the top of the file. Then submit your program to the submissions folder.
- Upload the your
PhotoShopper.javaclass to the LabE folder on the submission folder on hedwig. Make sure you upload your work to the correct folder! The lab is due at midnight on the day of the lab. - Finally (as always) be sure to fill out the lab partner evaluation survey on Moodle after you turn in your work!
Important Points
- Test your code Use the PictureViewer class to test your code. Create an object of this class in BlueJ and use the buttons to select and manipulate an image.
- Use good programming style Comment your code heavily. Use comments to describe classes, methods, variables and individual statements as required. Use good variable names and proper indentation of code---this will not only help us read your code, but it will help you be able to keep track of what is going on! A significant portion of the grade has been allocated for using a good programming style.
Grading
This assignment will be graded on approximately the following criteria:
- Constructor, attributes, and getImage() [10%]
- Erase (clear) the image [10%]
- Create a mirror image of the file (i.e. flip over the central vertical axis) [15%]
- Turn the image into gray scale version (i.e. black-and-white) [15%]
- Turn the image into its negative [15%]
- Undo function [10%]
- Use of good programming style and documentation [20%]
- You completed your lab partner evaluation [5%]
- Blur the image [+10% extra credit]