CS 240 Homework 4 - Rails
Due Sun Oct 12 at 11:59pm
Overview
In this assignment you will practice programming in Rails by adding a feature to an existing (simple) Rails app. You will also practice deploying the result publically on the Heroku cloud hosting service.
This homework involves modifying the textbook's example RottenPotatoes site in various ways. Git is your friend: practice working on a development branch, and commit frequently in case you accidently break something that previously worked! Storing lots of git commits makes it easy to back up to a previous version, or to compare what changed in each file since your last "good" commit.
- Remember: commit early, commit often!
Objectives
- Practice working on a rails application, modifying models, views, and controllers.
- Learn to deploy a rails application to Heroku
Necessary Files
You will want to get the starter code and instructions from the GitHub homework repository. Be sure and pull the latest version of the homework upstream repo, per the instructions in
Hwk1.
The starter code you're looking for is in the hwk4 folder.
You will need to run some commands to get the code setup:
-
First, switch into the
hwk4app directory of yourhomework/foldercd hwk4
-
Now you need to install the various Ruby libraries ("gems") with the bundle command
bundle install --without production
-
You'll need to run some commands to setup the database locally and add some data to work with
bundle exec rake db:migrate
bundle exec rake db:seed
-
Finally, you can start a web server for your rails project!
rails s
Once WEBrick has booted, navigate to http://localhost:3000/movies in your browser and you should see the system up and running!
Assignment Details
Part 1: Sorting The Movies
Your first enhancement to the RottenPotatoes app will be to make the movies sortable.
On the list of all movies page, the column headings for 'Movie Title' and 'Release Date' for a movie should be clickable links. Clicking one of them should cause the list to be reloaded but sorted in ascending order on that column. For example, clicking the 'release date' column heading should redisplay the list of movies with the earliest-released movies first; clicking the 'title' field should list the movies alphabetically by title. (For movies whose names begin with non-letters, the sort order should match the behavior of
String#<=>)
-
The general idea is to use the
link_tomethod to create a link in your view. In the URL, you should use the route that routes to theindex.htmlview, or the action "index".-
Remember, you can use
rake routes
to see the routing table!
In the URL, pass a hash that has a symbol as a key and a value of a string (e.g.
:sort_by=>"title")The will let you fetch that information back in the controller: you can sayparams[:sort_by]and get out "title"Important for grading purposes! Your links (that is, the
<a>tag) should haveidattributes associated with them. The 'title' link should have an id'title_header', and the 'release date' link should have an id'release_date_header'. -
Remember, you can use
-
Now you can edit the controller, using the information passed in the
:sort_byparameter to determine what to do.-
Keep in mind that databases are pretty good at returning collections of rows in sorted order according to one or more attributes. Before you rush to sort the collection returned from the database, look at the documentation for the ActiveRecord
findmethod and see if you can get the database to do the work for you! - Don’t put code in your views! The view shouldn’t have to sort the collection itself---its job is just to show stuff. The controller should spoon-feed the view exactly what is to be displayed.
-
Keep in mind that databases are pretty good at returning collections of rows in sorted order according to one or more attributes. Before you rush to sort the collection returned from the database, look at the documentation for the ActiveRecord
-
When the listing page is redisplayed with sorting-on-a-column enabled, the column header that was selected for sorting should appear with a yellow background, as shown below. You should do this by setting controller variables that are used to conditionally set the CSS class of the appropriate table heading to
hilite, and pasting this simple CSS into RottenPotatoes’app/assets/stylesheets/application.cssfile:-
table#movies th.hilite {
  background-color: yellow;
}
The result should look something like this:
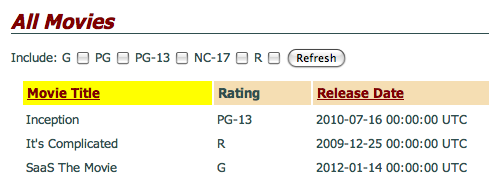 (Note that you'll add in the check boxes in the next part of the assignment!
-
Part 2: Filter the List of Movies
Your next enhancement will be to add some checkboxes that allow the user to filter the list to show only movies with certain MPAA ratings (see above screenshot). When the Refresh button is pressed, the list of movies is redisplayed showing only those movies whose ratings were checked.
This will require a couple of pieces of code. I've provided code that generates the checkboxes as a form, whcih you can include in the index.html.haml template:
= form_tag movies_path, :method => :get do
  Include:
  - @all_ratings.each do |rating|
    = rating
    = check_box_tag "ratings[#{rating}]"
  = submit_tag 'Refresh'
I highly recommend you take a few minutes to parse this code. What is it doing? How does it work? (These kinds of forms will be common and useful in your projects, so it's good to understand how they work!)
You will have to do some more work to use the above code: as you can see, it expects the variable
@all_ratings
to be an enumerable collection of all possible values of a movie rating, such as ['G','PG','PG-13','R']. The controller method needs to set up this variable. And since the possible values of movie ratings are really the responsibility of the Movie model, it’s best if the controller sets this variable by consulting the Model. Hence, you should create a class method of Movie that returns an appropriate value for this collection.
You will also need code that figures out (i) how to figure out which boxes the user checked and (ii) how to restrict the database query based on that result.
Regarding (i), try viewing the source of the movie listings with the checkbox form, and you’ll see that the checkboxes have field names like ratings[G], ratings[PG], etc. This trick will cause Rails to aggregate the values into a single hash called ratings, whose keys will be the names of the checked boxes only, and whose values will be the value attribute of the checkbox (which is “1” by default, since we didn’t specify another value when calling the check_box_tag helper). That is, if the user checks the ‘G’ and ‘R’ boxes, params will include as one if its values
:ratings=>{"G"=>"1", "R"=>"1"}.
Check out the Hash documentation for an easy way to grab just the keys of a hash, since we don’t care about the values in this case.
Regarding (ii), you’ll probably end up replacing Movie.all in the controller method with Movie.where or Movie.find, which have various options to help you restrict the database query.
Hints and caveats:
-
Important for grading purposes!
Your form tag should have an id
ratings_form, your form submit button should have an id ofratings_submit, and each checkbox should have an id ofraitings_#{rating}, where the interpolated rating should be the rating itself, such as “PG-13”, “G”. i.e. the id for the checkbox for PG-13 should beratings_PG-13. -
If the user checks (say) ‘G’ and ‘PG’ and then redisplays the list, the checkboxes that were used to filter the output should appear checked when the list is redisplayed. This will require you to modify the checkbox form slightly from the version we provided above.
- Don’t put code in your views! Set up some kind of instance variable in the controller that remembers which ratings were actually used to do the filtering, and make that variable available to the view so that the appropriate boxes can be pre-checked when the index view is reloaded.
- Important! Easy to miss! The first time the user visits the page, all checkboxes should be checked by default (so the user will see all movies). For now, ignore the edge-case when the user unchecks all checkboxes (they want to see no movies?!)—--you will get to this in the next part.
- Make sure that you don’t break the sorted-column functionality you added previously! That is, sorting by column headers should still work, and if the user then clicks the “Movie Title” column header to sort by movie title, the displayed results should both be sorted---but do not need to be limited by the checked ratings (you'll get to that in Part 3).
Part 3: Remembering the Sorting and Filtering Settings
The user can now click on the “Movie Title” or “Release Date” headings and see movies sorted by those columns, and can additionally use the checkboxes to restrict the listing to movies with certain ratings only. And we have preserved RESTfulness, because the URI itself always contains the parameters that will control sorting and filtering.
The last step is to remember these settings. That is, if the user has selected any combination of column sorting and restrict-by-rating constraints, and then the user clicks to see the details of one of the movies (for example), when she clicks the Back to Movie List on the detail page, the movie listing should “remember” the user’s sorting and filtering settings from before.
(Clicking away from the list to see the details of a movie is only one example; the settings should be remembered regardless what actions the user takes, so that any time she visits the index page, the settings are correctly reinstated.)
The best way to do the “remembering” will be to use the session[] hash. The session is like the flash[], except that once you set something in the session[] it is remembered "forever" until you clear the session with *cough* session.clear or selectively delete things from it with *cough* session.delete(:some_key). That way, in the index method, you can selectively apply the settings from the session[] even if the incoming URI doesn’t have the appropriate params[] set.
Hints and caveats:
- If the user explicitly includes new sorting/filtering settings in
params[], the session should not override them. On the contrary, the new settings might even be remembered in thesession!. - If a user unchecks all checkboxes, use the settings stored in the
session[]hash (because it doesn’t make sense for a user to uncheck all the boxes. Note that this claim is a design decision with its own significance you might consider...) - To be RESTful, we want to preserve the property that a URI that results in a sorted/filtered view always contains the corresponding sorting/filtering parameters. Therefore, if you find that the incoming URI is lacking the right
params[]and you’re forced to fill them in from thesession[], the RESTful thing to do is toredirect_tothe new URI containing the appropriate parameters. There is an important corner case to keep in mind here, though: if the previous action had placed a message in theflash[]to display after a redirect to the movies page, your additional redirect will delete that message and it will never appear, since theflash[]only survives across a single redirect. To fix this, useflash.keepright before your additional redirect.
Part 4: Deploy to Heroku
Really you can deploy to Heroku and test there at any time. However, Heroku may not provide as obvious errors (and is more difficult to deal with than local development), so I recommend you get things working "in development" and then deploy "to production" (so to speak).
-
In order to deploy to Heroku you will need to sign up for a free Heroku account at
https://id.heroku.com/signup
and follow the instructions to create your account. Assuming you have
Heroku Toolbelt
installed (it should be pre-installed on the VM) you now need to
set up ssh keys
to securely talk to Heroku. The three basic commands you need are the following, but see the
Heroku page
ssh-keygen -t rsa
heroku login
heroku keys:add
- Note that this is an area that a lot of people get stuck, particularly if they have existing ssh keys. If you are on a fresh VM you should be fine.
-
Once you have your heroku keys set up correctly you can create a heroku instance from the rottenpotatoes directory
heroku create
Note the URL listed, as you will need it later!
-
Double-check that heroku was added as a remote:
$ git remote -v
  heroku  git@heroku.com:<url>.git (fetch)
  heroku  git@heroku.com:<url>.git (push)
  ...
(if not, you can add it manually usinggit remote add, like you did in Hwk1). -
Now you can use git to deploy your code to the Heroku server in the cloud.
Because of our folder structure, we need to specify that we want to deploy the project in the hwk4 folder, not the entire repository. To do this, use:
git subtree push --prefix hwk4 heroku master
(If you're using the VM, subtree isn't installed. You can find tested instructions for enabling subtree here).
Note, if you see a warning such as:
The authenticity of host 'heroku.com (50.19.85.132)' can't be established.
RSA key fingerprint is 8b:48:5e:67:0e:c9:16:47:32:f2:87:0c:1f:c8:60:ad.
Are you sure you want to continue connecting (yes/no)?
Please type 'yes' or 'no':
This is normal - go ahead and type yes then hit 'enter' to add heroku to the list of known hosts. -
Next we need to tell the cloud instance to prepare the database, and add data to the database (just like you did locally)
heroku run rake db:migrate
heroku run rake db:seed
-
Now you should be able to navigate to the heroku url that
heroku createprinted to the console and see your app running in the cloud!heroku open
If there are problems, you can find more details on Heroku in the appendices of the textbook.
Submitting
Make sure that your code passes all tests, and then push your code out to your personal homework repo (which you set you in Homework 1). You should include a README.md with a link to your Heroku installation.
Extensions
While they are not extra credit, there are a couple of follow-up assignments to this that give you more practice with Behavior-Driven Design (BDD), Cucumber, and Test-Driven Development. We will go over some of the first assignment in class as an example, but I leave the second to you if you want more practice. You can find starter code and instructions on the textbook's GitHub repos:
Grading
TBD...