CS 161 Lab H - Game of Life
Due Fri Nov 01 at 9:00am
Overview
In this lab, you will investigate Conway's "Game of Life", which isn't actually a game, but is fun nonetheless. The Game of Life is played on a square grid of cells, each of which may be "alive" or "dead". Given one state of the grid, you update the grid to a new state (a new "generation") based on the number of neighbors of each cell:
- Any live cell with fewer than two live neighbours dies (due to underpopulation or loneliness).
- Any live cell with more than three live neighbours dies (due to overcrowding).
- (By inference, any live cell with exactly two or three live neighbours stays alive).
- Any dead cell with exactly three live neighbours becomes a live cell (slightly awkward reproduction).
More details about this game can be found on page 373 of the textbook.
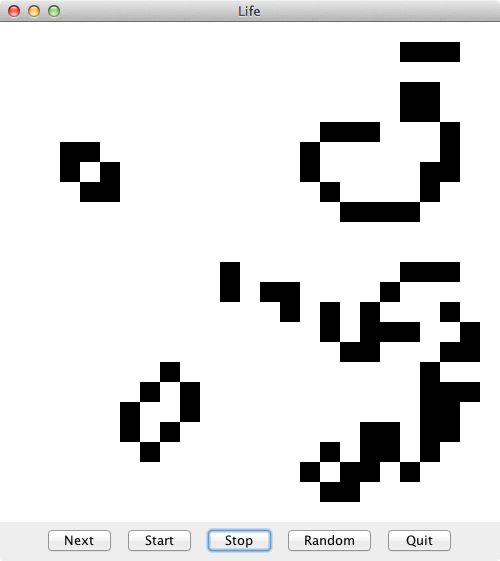
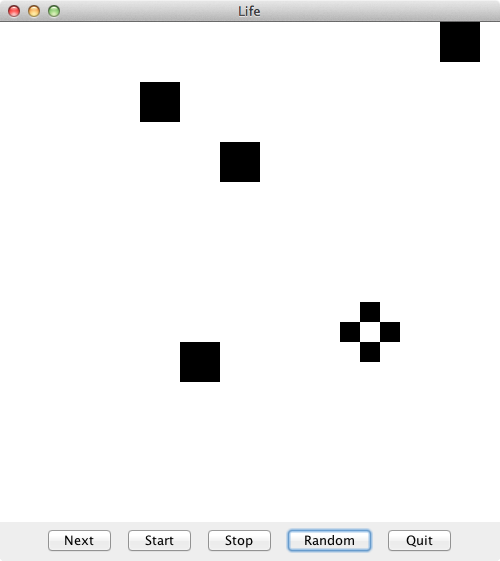
Here are a couple of pictures of the game in progress:
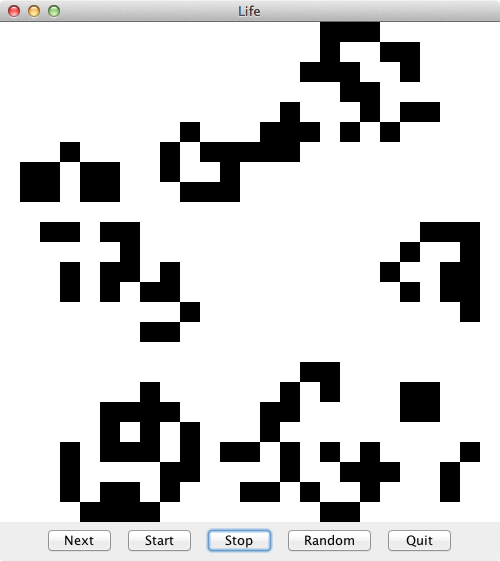
After evolving for a while, the board usually settles into a state somewhat like this:
In this week's lab, you will implement the Game of Life and experiment with it.
This lab will be completed in pairs. Be sure to review the pair programming guidelines. You also must work with a different partner than you have before!
Objectives
- To practice working with 2-dimensional arrays: declaring them, instantiating them, and accessing them
- To review using for loops (particularly when working with arrays) and conditionals.
Necessary Files
You will need to download and extract the BlueJ project from the LabH.zip file. This project will supply you with the following classes:
-
LifeThis class represents the grid in which the cells live and die. It is used to determine what the board looks like and to breed the next generation of dots. You will be making significant changes to this class (this is where your code will go). -
LifePanelThis class is used to draw theLifegame on the screen (it's theJComponentwith apaintComponentmethod). You will NOT need to modify this class; drawing is provided for you. -
LifeFrameThis class creates a graphical frame to hold the Life board (just like with the Bouncing Balls lab). It also has some buttons you can use to control the game. You will NOT need to modify this class; buttons are provided for you. -
LifeTesterA tester for the program. You can use this to test your code, or you can simply create a new instance of LifeFrame by right-clicking on the class in BlueJ.
Details
In this lab, you will not need to write any new classes! However, you will need to modify the Life class in order to make things work.
-
The
Lifeclass does not have an instance variable to keep track of the board. Add an appropriate two-dimensional array instance variable called "board" to track the state of the cells. What type would be appropriate? What values will represent either "living" or "dead"? (Hint: a cell is either "living" or "not living"...)- This instance variable should be defined in the constructor. Hint: if the constructor has some parameters, you might want to use them (and/or store them as instance variables!)
-
At this point, you should fill in the
isAlive()helper method so that it returns whether a cell is alive or not, based on your board. Note that this should be a very simple method, just return information about the board state (the calcuation of "will a cell be alive next generation" goes elsewhere). -
Next, complete the
fillRandom()method. This method should fill yourboardwith random values--that is, randomly determine whether a cell should be alive or dead.-
You can calculate this using
Math.random()(give each cell a .5 or 50% chance of being alive). Alternatively, theRandomclass has anextBoolean()method that you might find handy.
-
You can calculate this using
-
Remember to test your code! At this point you should be able to run the program and hit the "Random" button to create a random community of cells!
- For testing, you may wish to call the
fillRandom()method from your constructor. This will save you a few button clicks when testing your program, though you will remove this method call later. Sometimes we write code temporarily and then throw it out!
- For testing, you may wish to call the
-
Now we need to do something with these cells. Fill in the method
nextGeneration()that updates the state of the board by:- Declaring a new two-dimensional array of the same dimensions as
board. -
Iterating over all cells in
board, and for each cell, determining whether the cell should be living or dead in the next state. You should use thecountNeighbors()helper method (described below) to get the number of living neighbors for the purpose of updating the cell in the new array.- Just like in the PhotoShopper, you'll be reading from ("sampling") one object in order to set values in another! Just like with PhotoShopper, this lets us avoid modifying in place errors.
-
When that is done, assign the new array to your
boardinstance variable. This replaces your instance variable with the new, updated board.
- Declaring a new two-dimensional array of the same dimensions as
-
In order to determine if a cell should survive to the next generation, you'll want to fill in the
countNeighbors()helper method to count the number of living cells neighboring a given cell. There are eight possible neighbors for a cell in the "middle" of the grid, and fewer neighbors for cells near the edge -- this method will need to account for that.- Think about how you can talk about the "neighboring" cell. Hint: think of the 2D array as a grid, and each entry as the coordinates of a box.
- Another hint: It might be easiest to think about testing each of the 8 neighbors individually (i.e., using a separate check for whether to increase the count).
- Note that in order to test this method, you may wish to implement the below methods first. Coming up with an order for how to build and test your program is a good skill to practice!
- Remember to test your code! At this point, you should be able to hit the "Next" button to see a single generation, or use the "Start" and "Stop" button to run through continuous generations and see your board evolve! Try running the game multiple times (or hitting "Random" to reset the board). Does everything die out? Or does it keep going for a long time? Does it eventually "settle" into a steady state? Or alternate between two closely related states?
- After a while of watching your program run, you may notice several shapes and patterns that seem to appear often. Take a look at the section of the Wikipedia page on patterns in Life.
-
Do you see the list of Oscillators? Write a new method
makeBlinker()that creates a blinker pattern of your choice at a given spot on the board.- This method should take in a board position (e.g., an
xand ay) and use those positions to determine where to put the blinker. This will make it easy to create multiple copies of the blinker! -
You can "create" the blinker by simply setting the appropriate cells (entries in your array) to be alive. Thus a simple blinker (with 3 cells) will involve specifying 3 entries in your array as alive.
- Note: making the pattern just involves creating an initial state--it will "move" once you run the program and calculate future generations!
- You may wish to make sure that all the cells around your blinker are dead, so that it doesn't get destroyed by its neighbors
- Similarly, making sure that the caller doesn't try to make the blinker off the board would be polite.
Once you've implemented this method, call in from the constructor (remove the fillRandom() call if you added that in... unless your blinker clears out its neighbors). This way your blinker should show up when the user first launches the program! If you run the program, you should be able to see it blink.
- This method should take in a board position (e.g., an
-
Similarly, write a new method
makeStillLife()that modifies the board to include a Still Life (as described on the Wikipedia page) of your choice at a given location.- Again, this method should take in a board position for where to create the still life.
- And again, call this method from your constructor so that both the blinker and the still life occur when the user runs the program
-
Finally, write a new method
makeGlider()that places a glider or spaceship on your screen at a given location (just like with the previous method). You should be able to run your program and see your glider fly across the screen!- You'll need to "flip" the glider horizontally and/or vertically to make it move in a different direction. Add a third parameter to your method that tells the glider what direction it should go (either left or right, up or down). You can use an
ifstatement to determine which orientation you should set the cells alive in. - In your constructor, you'll need to call this method at least twice (with two different orientations), so that you can have two gliders collide!
- You'll need to "flip" the glider horizontally and/or vertically to make it move in a different direction. Add a third parameter to your method that tells the glider what direction it should go (either left or right, up or down). You can use an
- Remeber to test your code! At this point you should be able to see a number of patterns. If you are anything like me, at this point you might goof around for a while with various patterns, just watching what happens. Make sure you don't run out of time!
-
In the end, your Life class's constructor should have the program start with (at least) the following:
- A blinker pattern (see here for other oscillator patterns)
- A still life pattern (see here for other still life patterns)
- Two gliders that eventually collide!
Feel free to add anything else you find interesting (using a helper method to specify the shape, as above). You might make an R-pentomino, a glider gun, or any other cool pattern you find on the Wikipedia page. Or make up your own pattern. Make a picture. Draw your name. Have fun!
- As always, be sure to fill out the lab partner evaluation survey on Moodle after you turn in your work! Do this in lab; don't wait until you get home and then forget!
Submitting
Once you are sure that your program works (remember to test your code), make sure that both your and your partner's names are in the class comment at the top of the Life class. Then upload the entire project directory to the LabH submission folder on hedwig. Only one partner needs to upload the code. Make sure you upload your work to the correct folder! The lab is due at the start of class the morning after lab.
After you have submitted your solution, log onto Moodle and submit the Lab G Partner Evaluation. Both partners need to submit evaluations!
Grading
This assignment will be graded on approximately the following criteria:
- You declare and initialize an appropriate board array. [10%]
- Your isAlive method works as specified [5%]
- Your nextGeneration method works as specified. [25%]
- Your countNeighbors method works as specified. [15%]
- Your fillRandom method fills the board with random cells [10%]
- Your constructor creates a blinker pattern using the makeBlinker method [5%]
- Your constructor creates a still life pattern using the makeStillLife method [5%]
- Your constructor creates two glider patterns (that collide!) using the makeGlider method [10%]
- You have used good programming style and documentation [10%]
- You completed your lab partner evaluation [5%]